AVG AntiVirus and AVG Internet Security work in real-time to protect your Mac from viruses, malware, phishing, and other malicious threats. This article explains how to use AVG Internet Security (paid version) and AVG AntiVirus (free version) on your Mac.
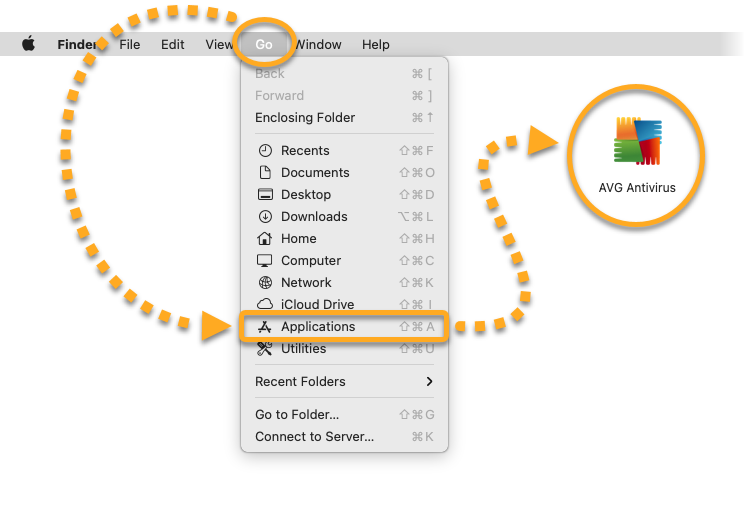
Open the application
Open AVG Internet Security using one of the following methods:
- Click the AVG Internet Security icon in the Apple menu bar and select Open AVG Internet Security.

- Click Go ▸ Applications in the Apple menu bar, then double-click the AVG Antivirus icon.

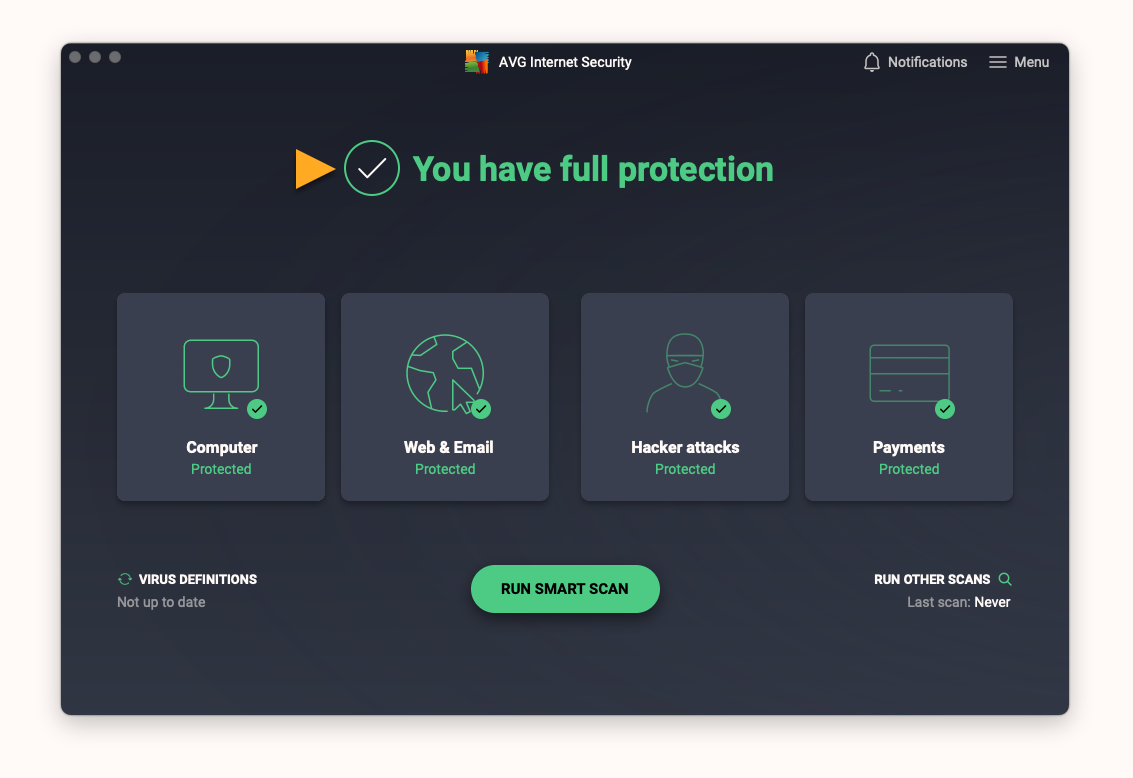
Status message
When you open AVG Internet Security, the status message indicates if you need to take any action to protect your Mac.
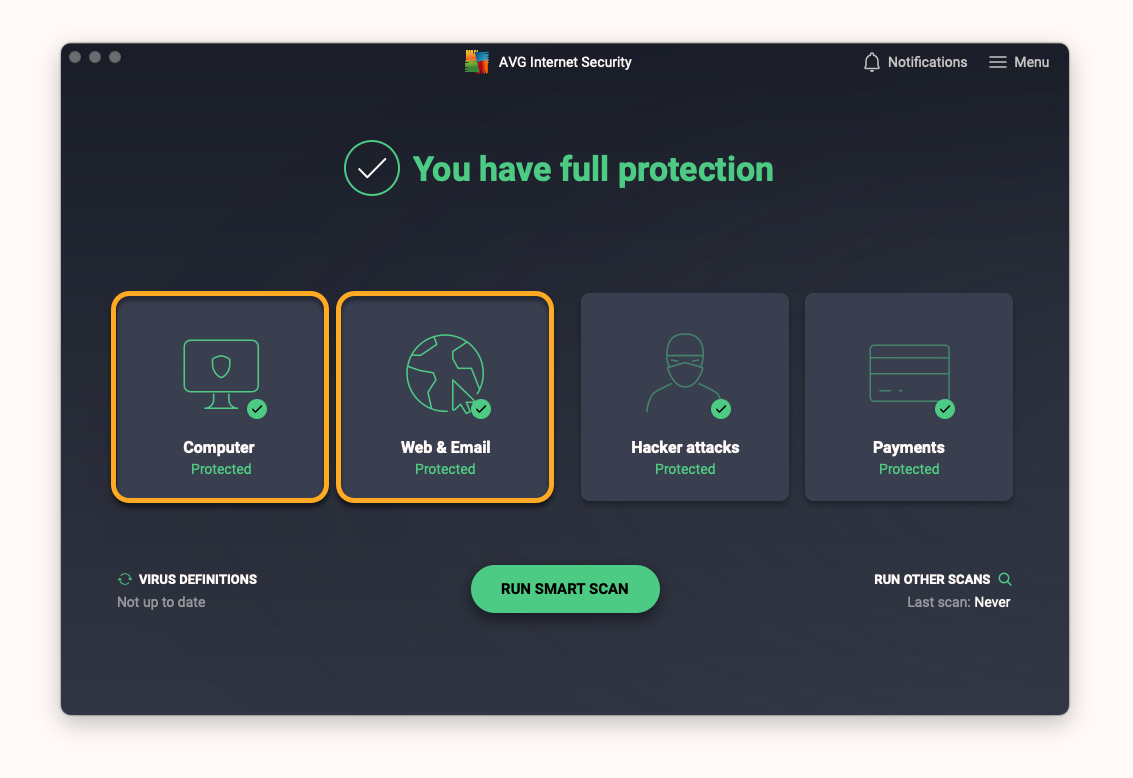
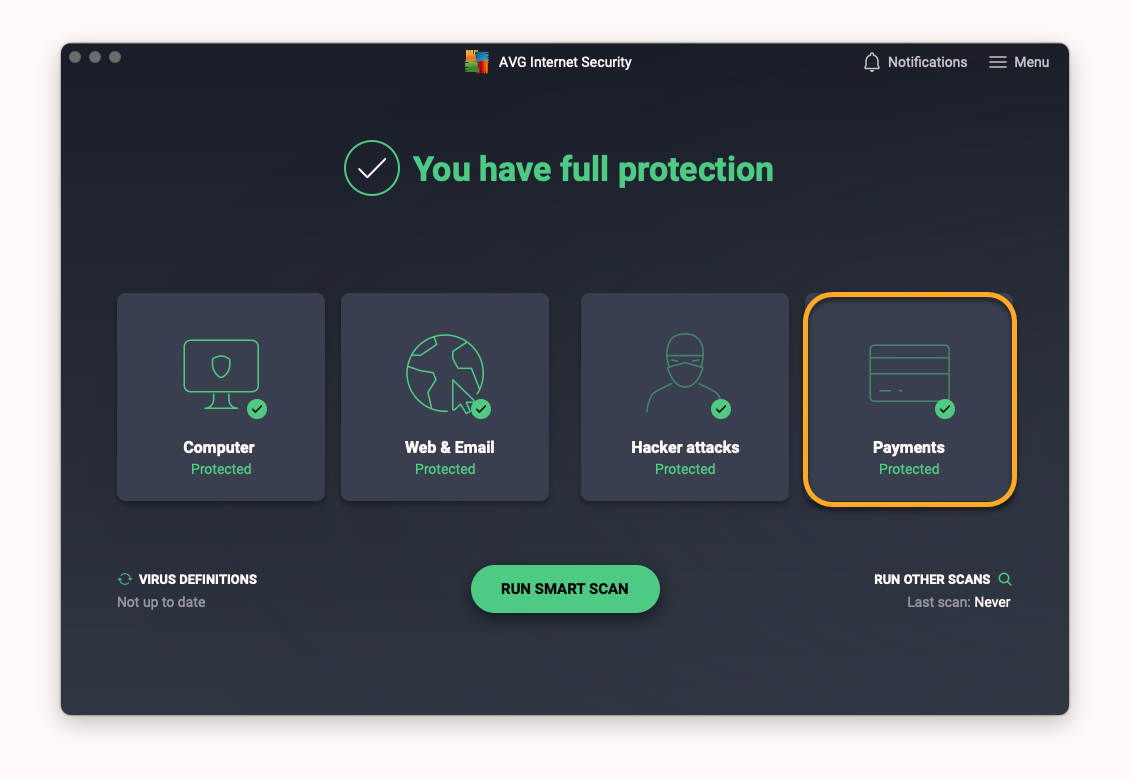
When all available features are enabled, and the application and virus definitions are up-to-date, you see the status message You have full protection.
If you see the status You are not fully protected, check the following:
- Ensure you have manually enabled AVG software extensions, DNS proxy configurations, and Full Disk Access. To do this, close and reopen AVG Internet Security, then follow the on-screen instructions in the AVG Internet Security setup wizard. For detailed instructions, refer to the following article:
- Ensure the application and virus definitions are up-to-date. To do this, click the refresh icon next to Virus definitions.

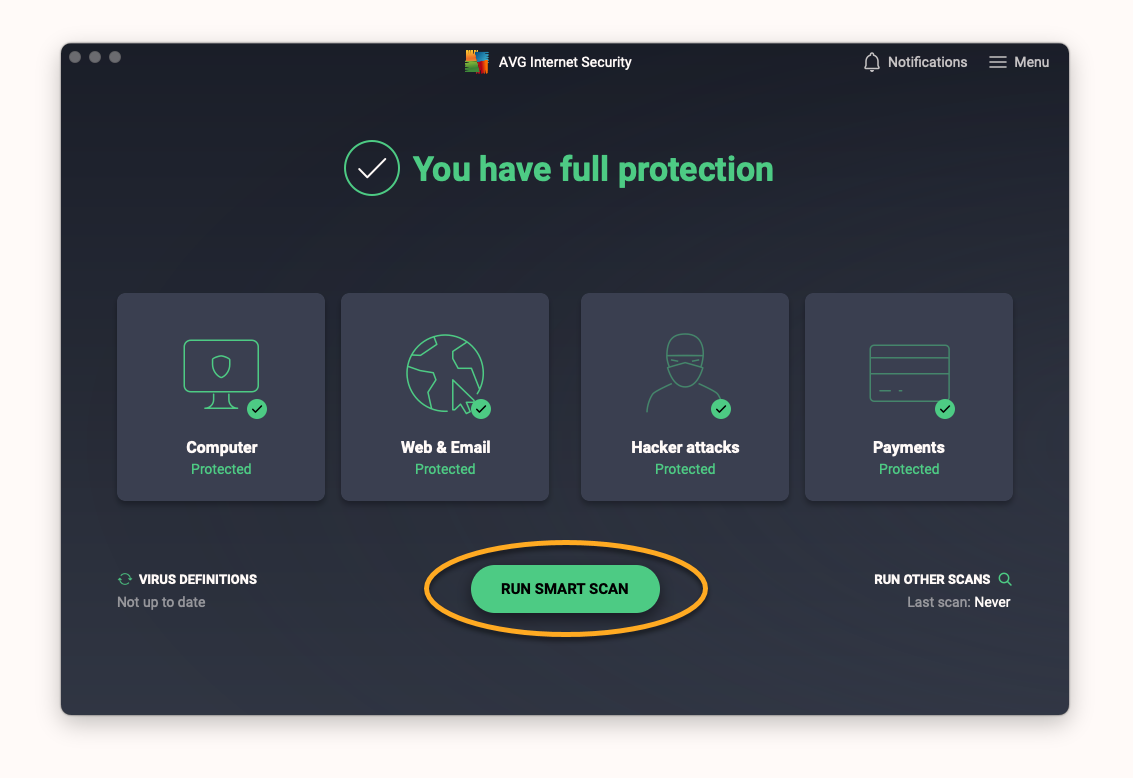
Scan your Mac
To run a comprehensive scan for threats in the most important directories on your Mac:
- Click Run Smart Scan on the main application screen, then move through each of the screens below:
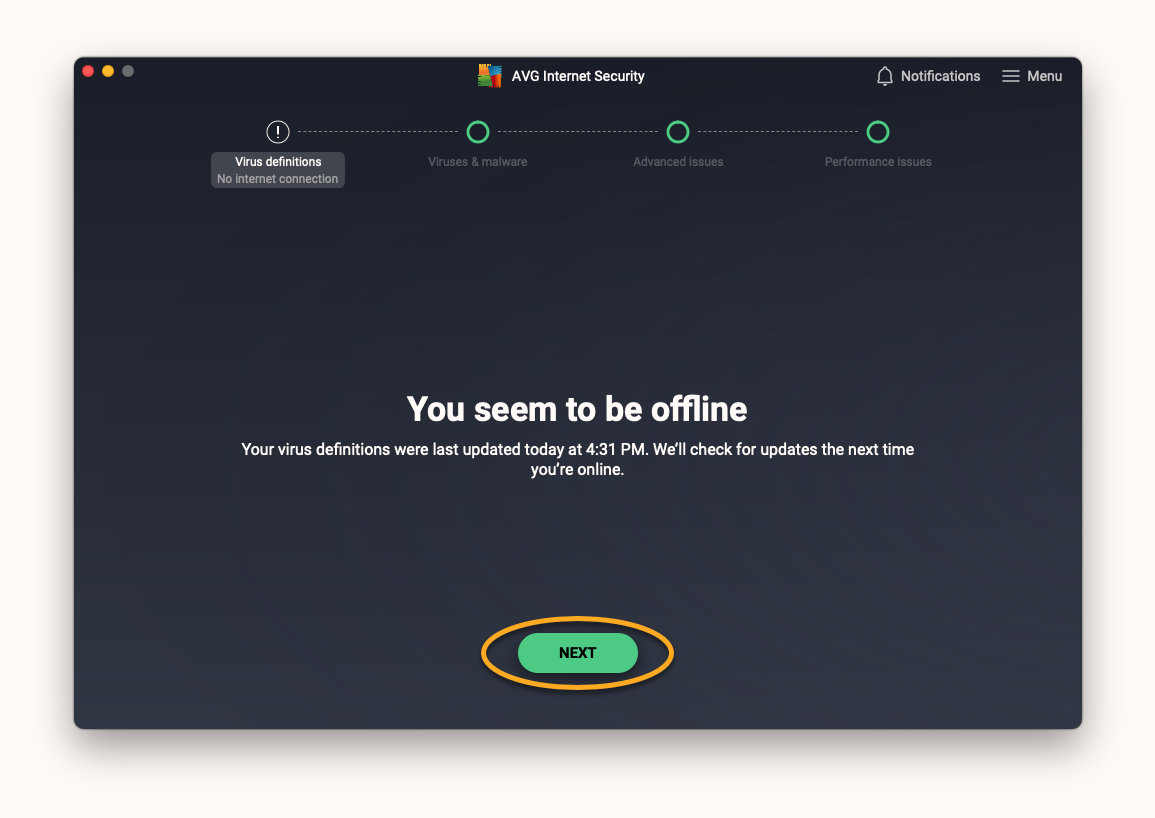
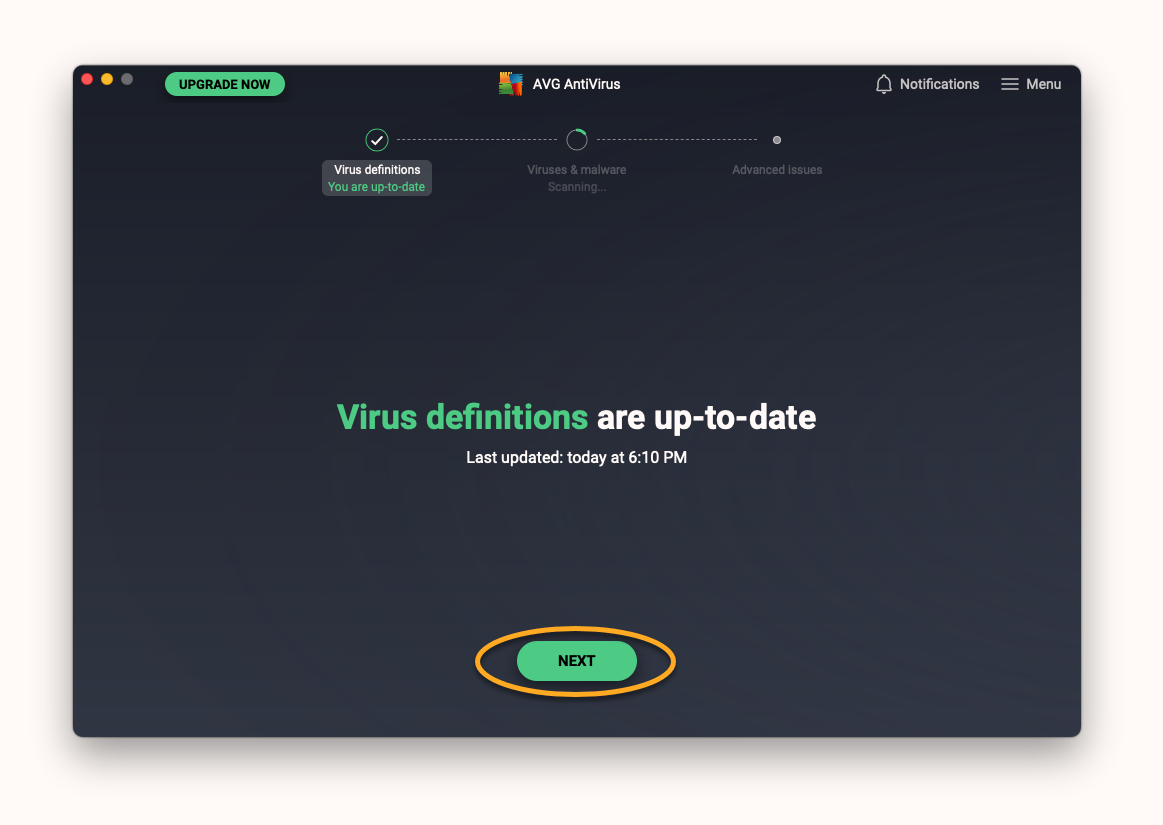
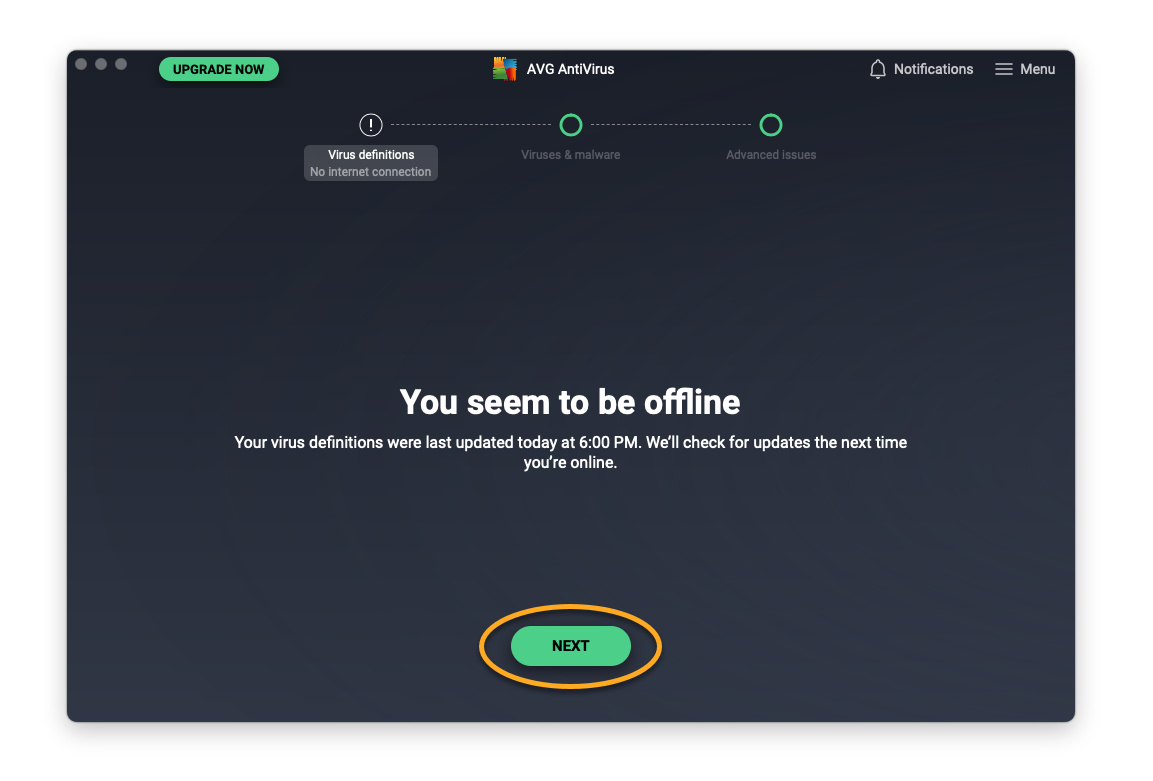
- Virus definitions: checks if your virus definitions are up-to-date and updates them if necessary. Follow the relevant step below according to the message you see:
- Virus definitions are up-to-date: click Next to proceed to the next screen.
- You seem to be offline: AVG Internet Security cannot update the virus definitions if you are not connected to the internet. Click Next to proceed with the Smart Scan. AVG Internet Security will update your virus definitions the next time you connect to the internet.
- Virus definitions are up-to-date: click Next to proceed to the next screen.
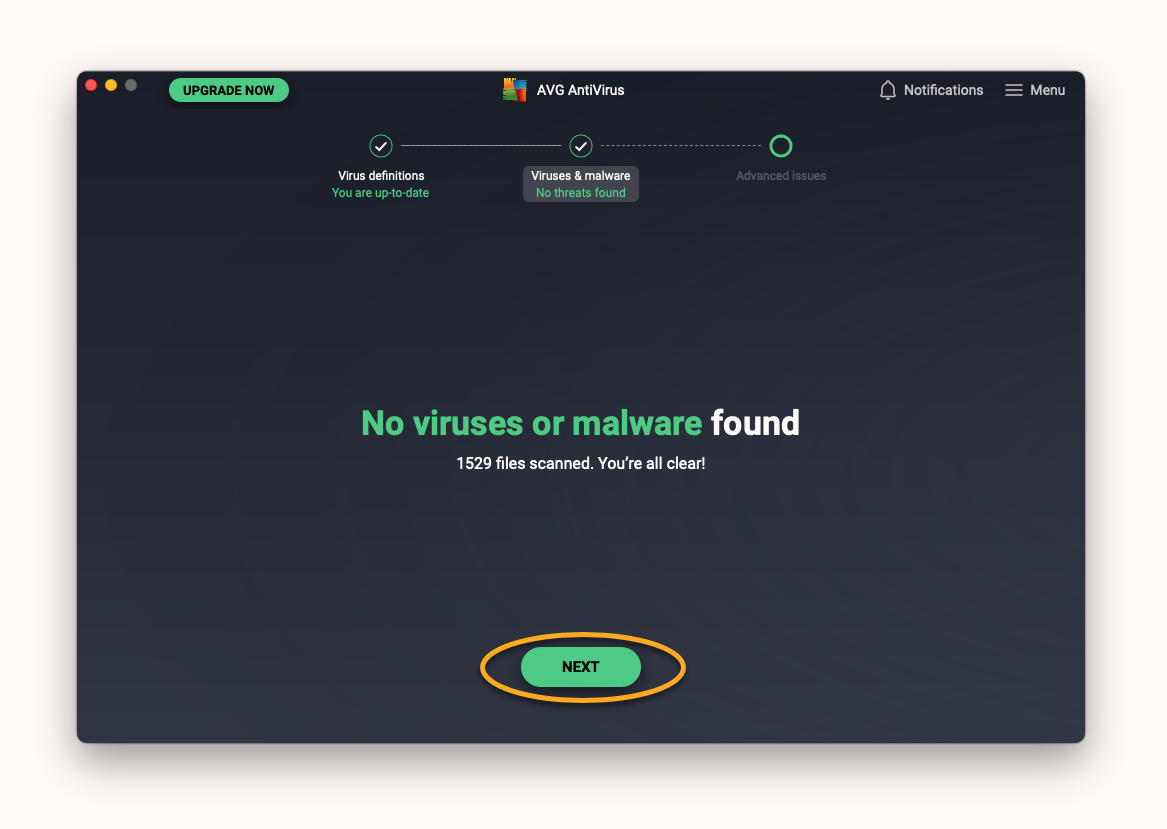
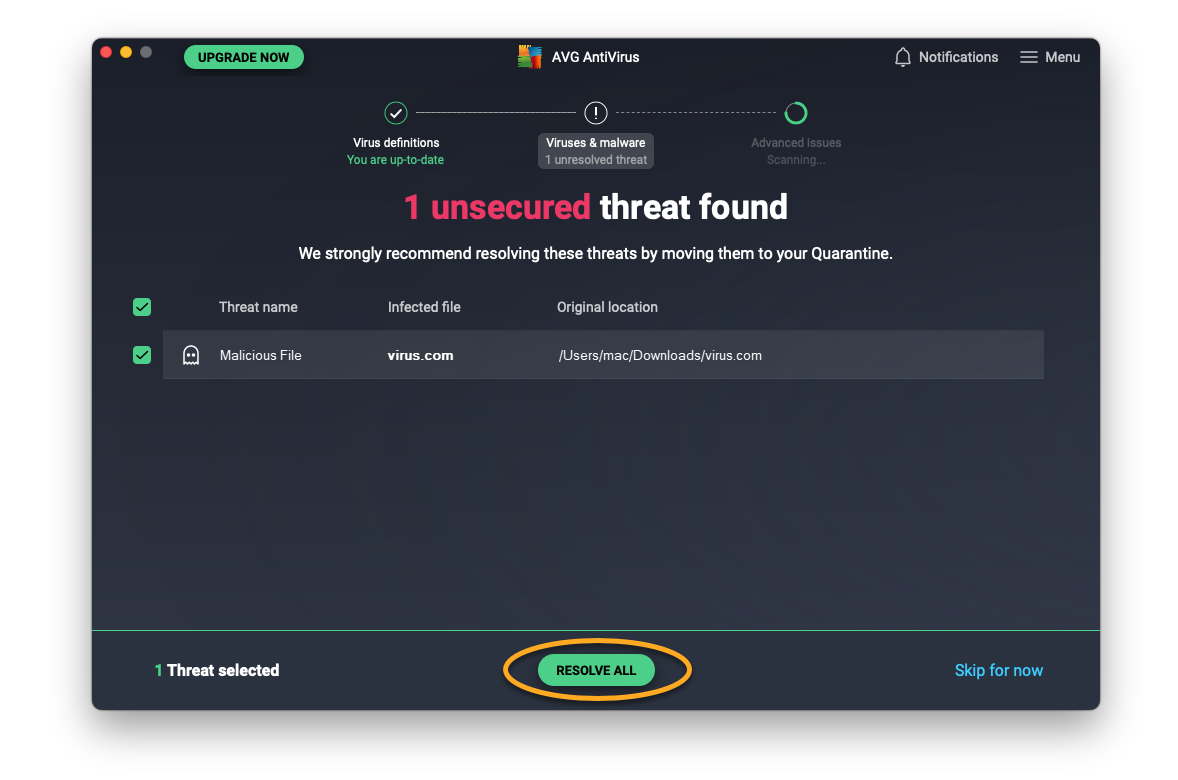
- Viruses & malware: alerts you about malicious threats on your Mac. Follow the relevant step below according to the message you see:
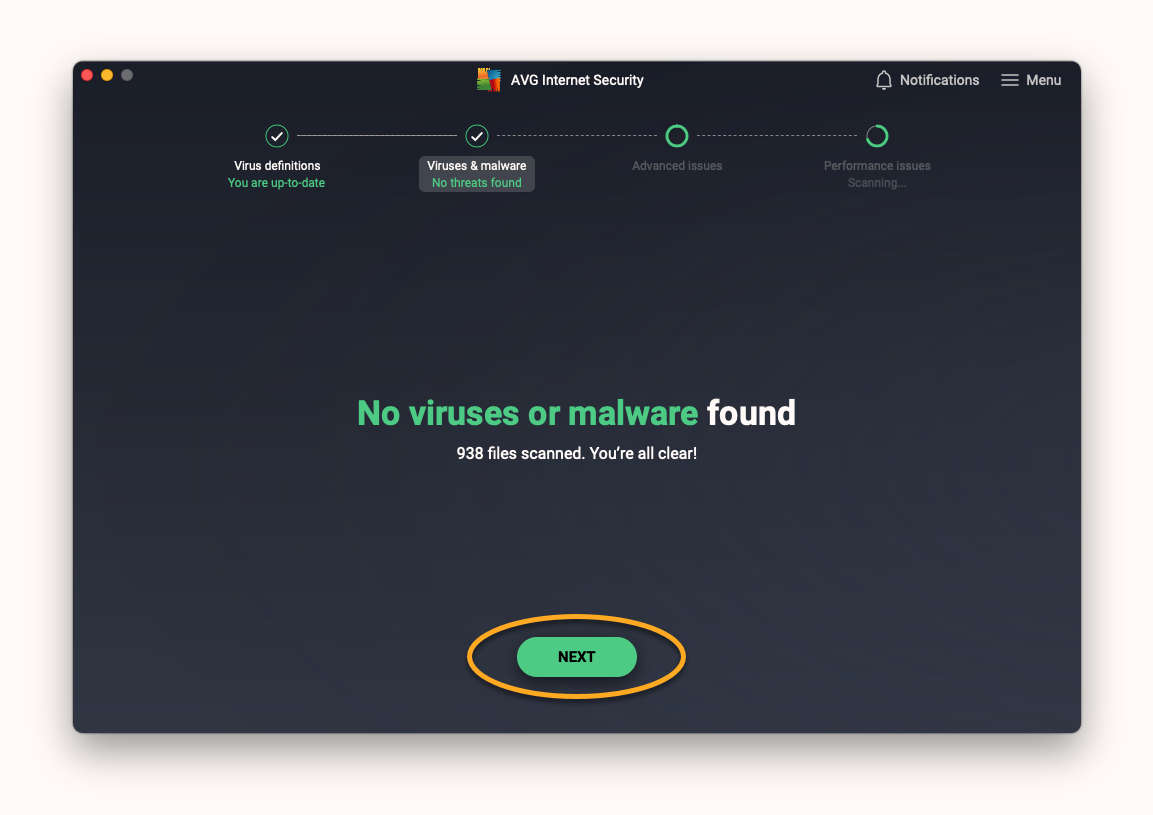
- No viruses or malware found: click Next to proceed to the next screen.
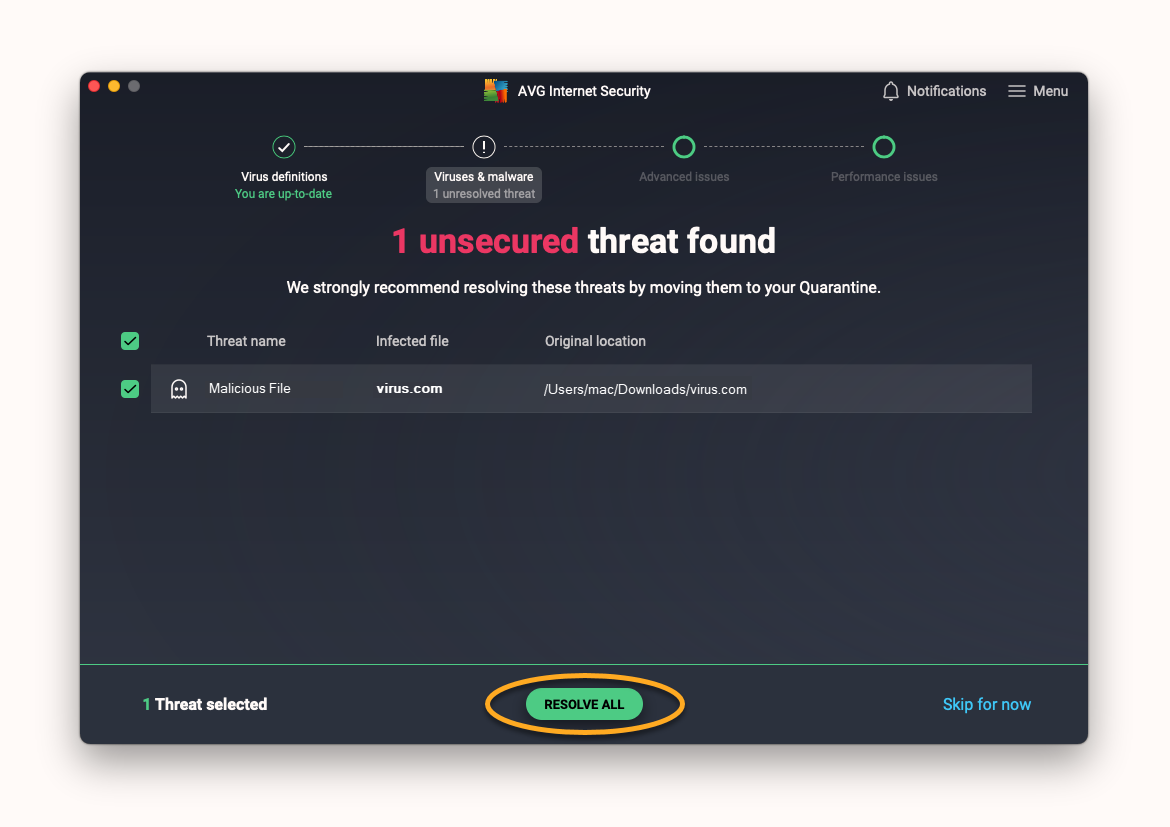
- Unsecured threats found: click Resolve all to move the malicious files directly to Quarantine, then click Next to proceed to the next screen.
- No viruses or malware found: click Next to proceed to the next screen.
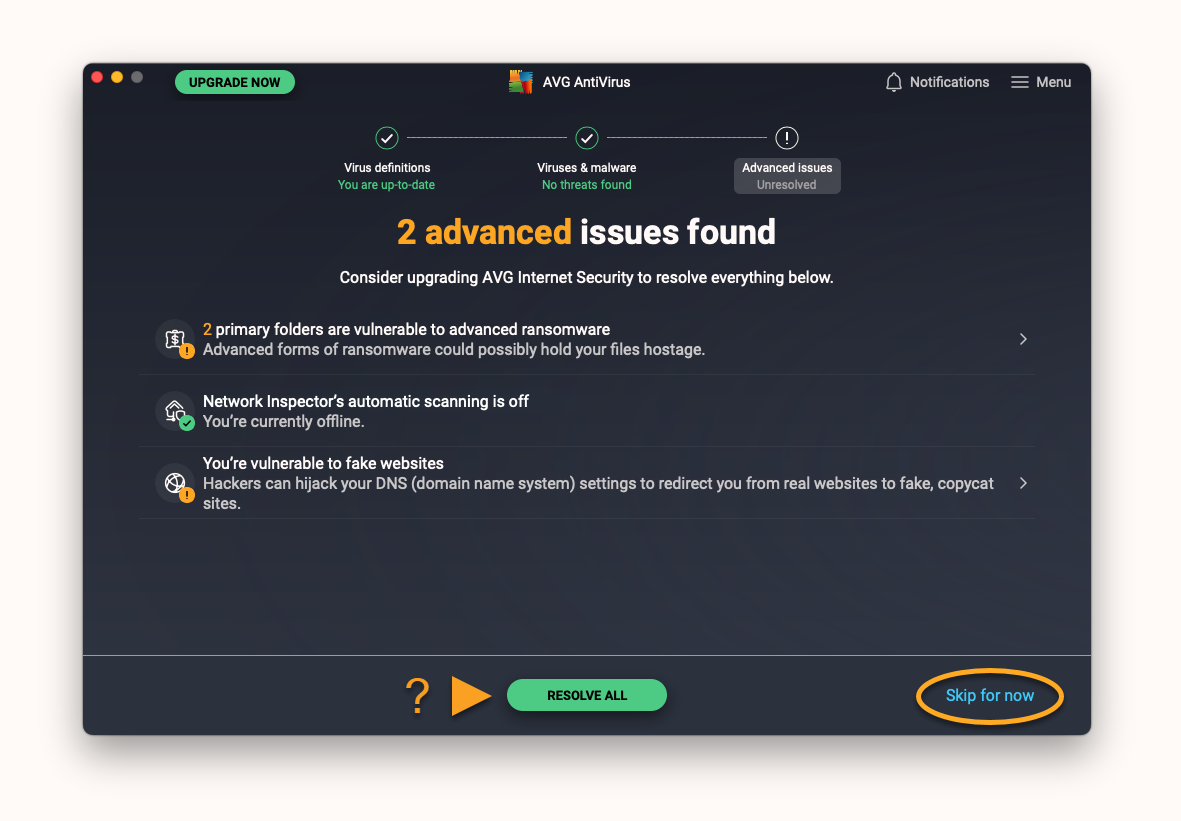
- Advanced issues: presents any potential security issues relating to your full protection features (for example, if a feature is not correctly enabled). Follow the relevant step below according to the message you see:
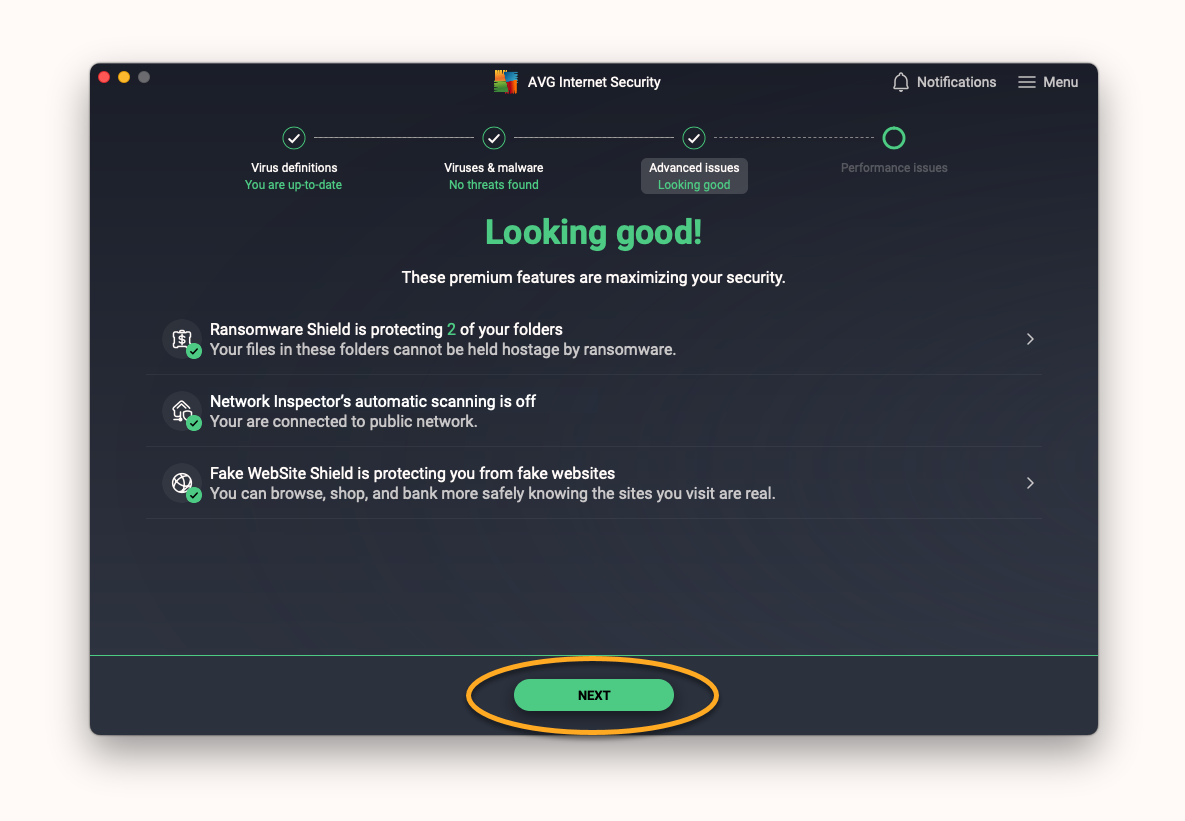
- No advanced issues found: click Next to proceed to the next screen.
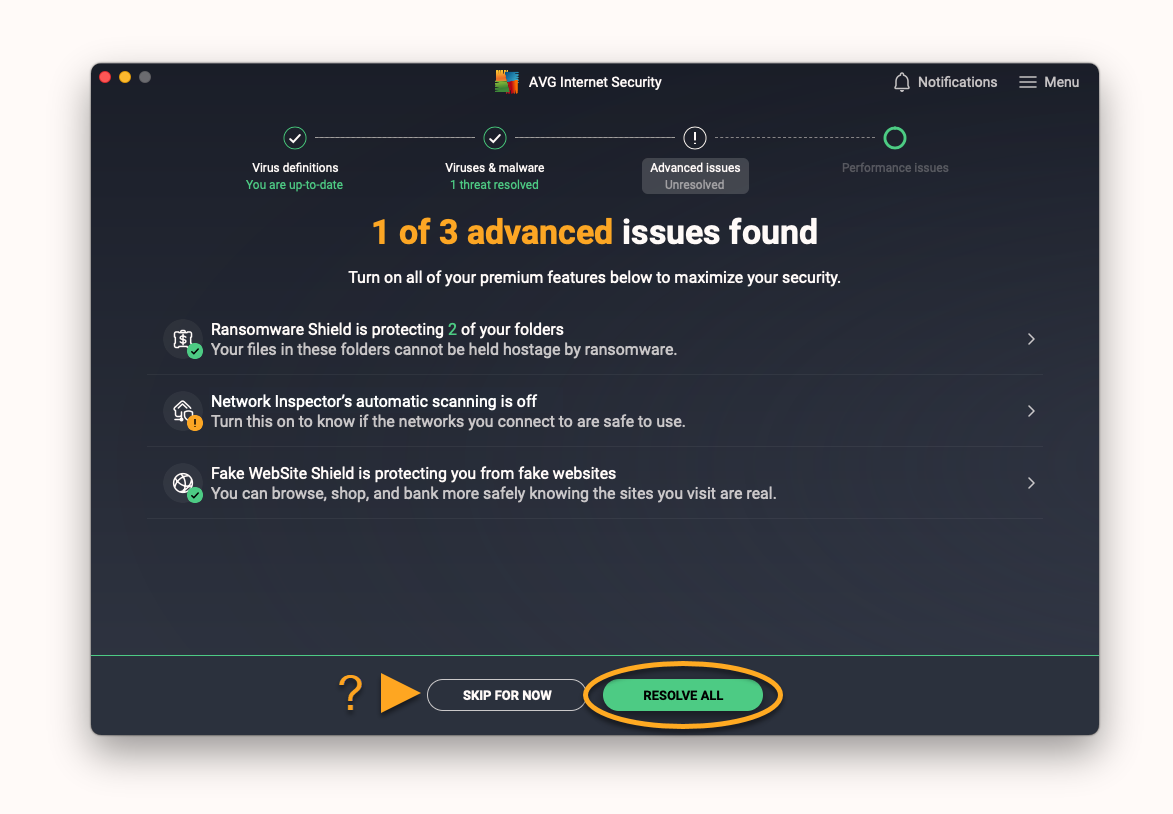
- Advanced issues found: click Resolve all to ensure that your premium features are enabled. Otherwise, click Skip for now to ignore the detected issues and proceed to the next screen.
- No advanced issues found: click Next to proceed to the next screen.
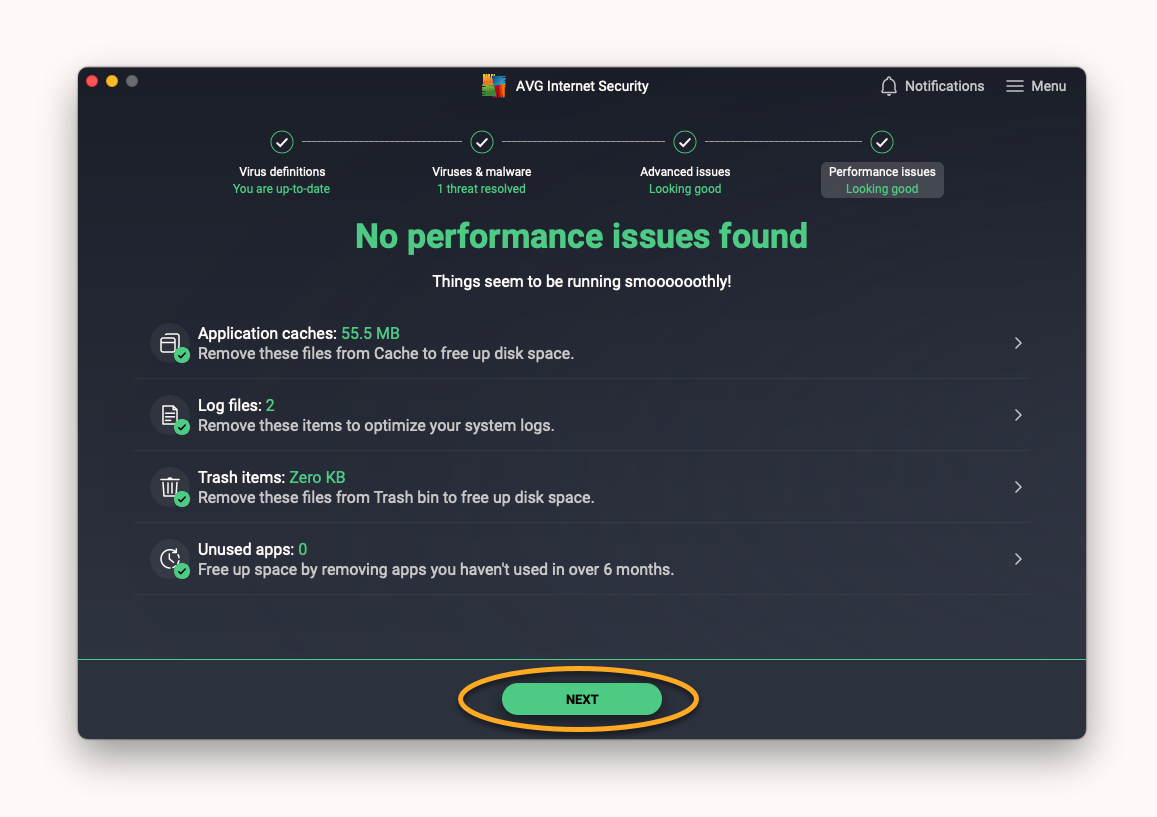
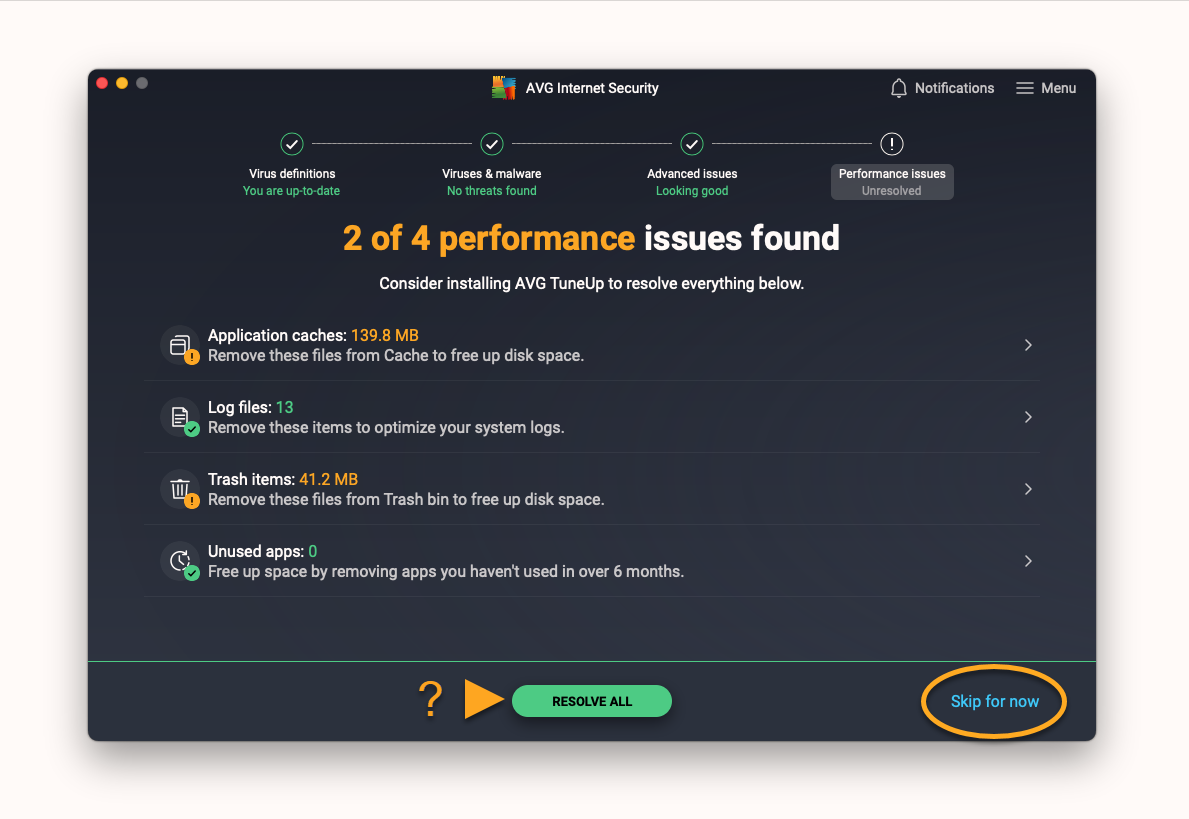
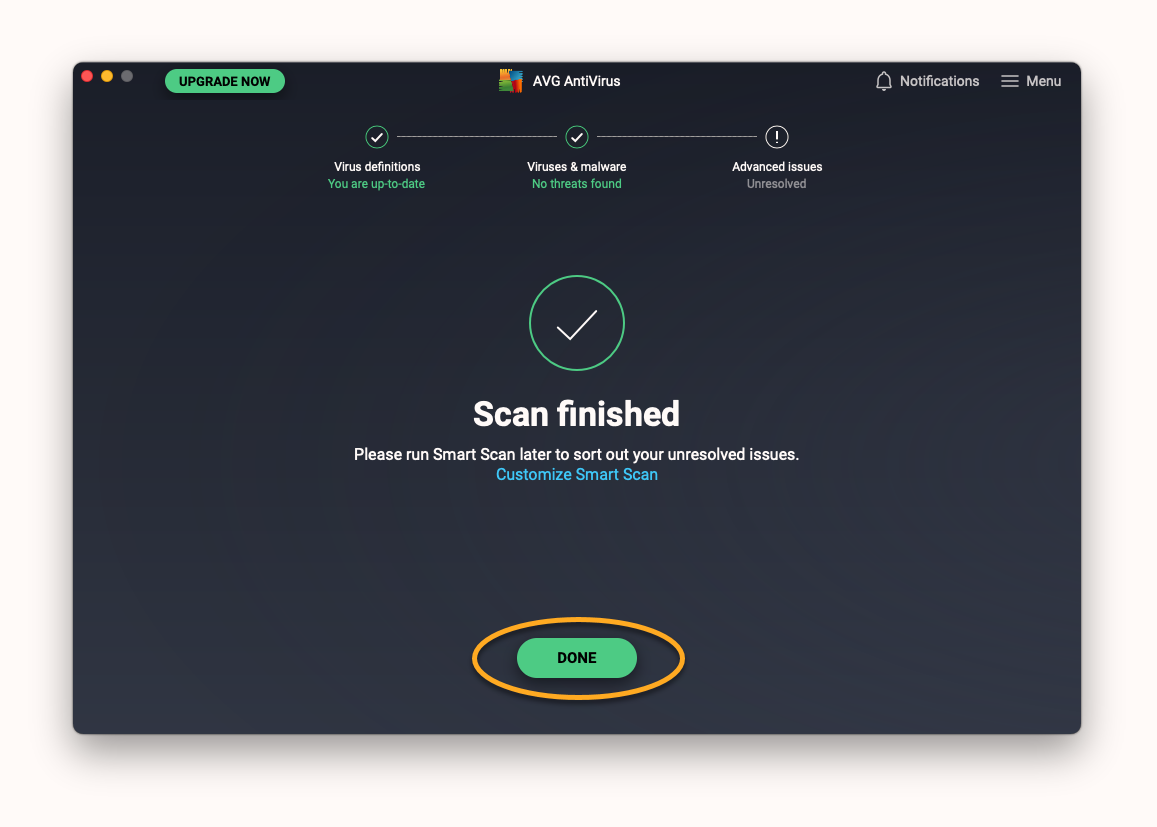
- Performance issues: suggests items that could be removed from your Mac to improve performance. Follow the relevant step below according to the message you see:
- No performance issues found: click Next to proceed to the next screen.
- Performance issues found: if you already have AVG TuneUp installed on your Mac, or you would like to purchase this product, click Resolve all. Otherwise, click Skip for now to proceed to the next screen.
- No performance issues found: click Next to proceed to the next screen.
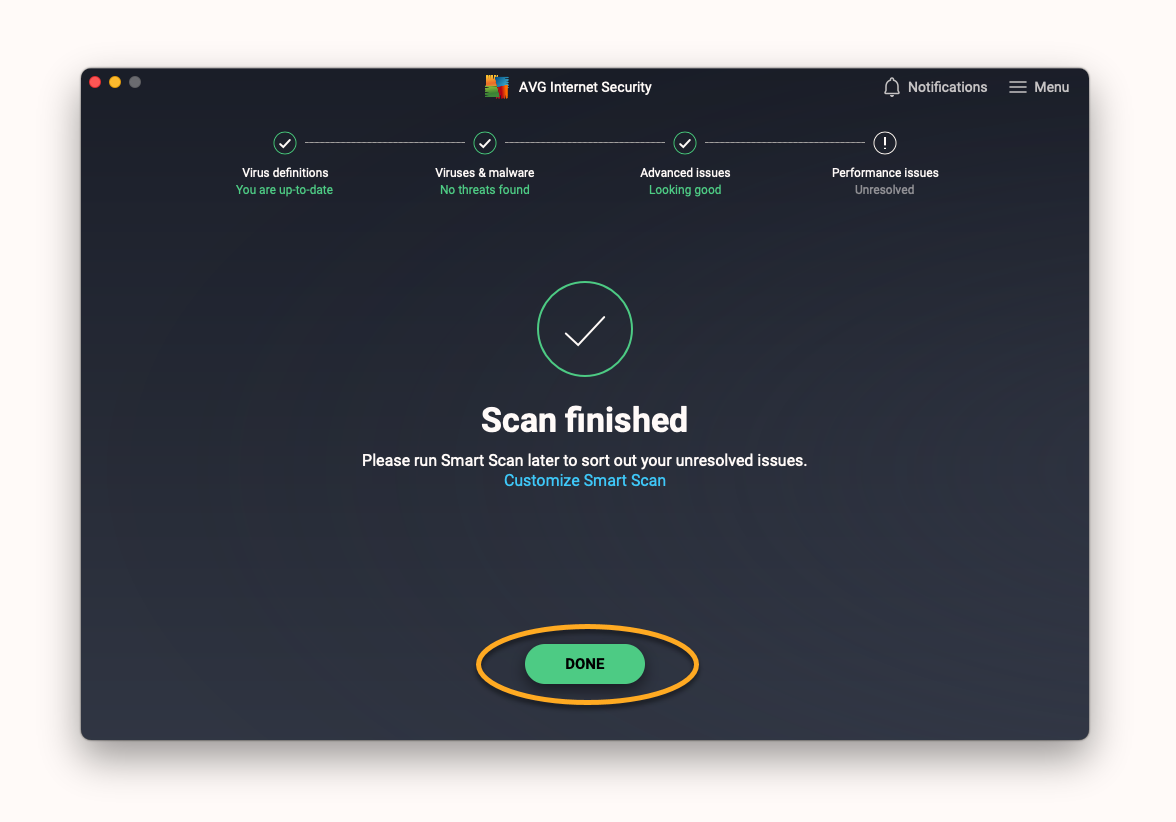
- Click Done to return to the main application screen.

Several other scan types are also available, as well as the option to customize your scan settings. For more information about scanning your Mac, refer to the following article:
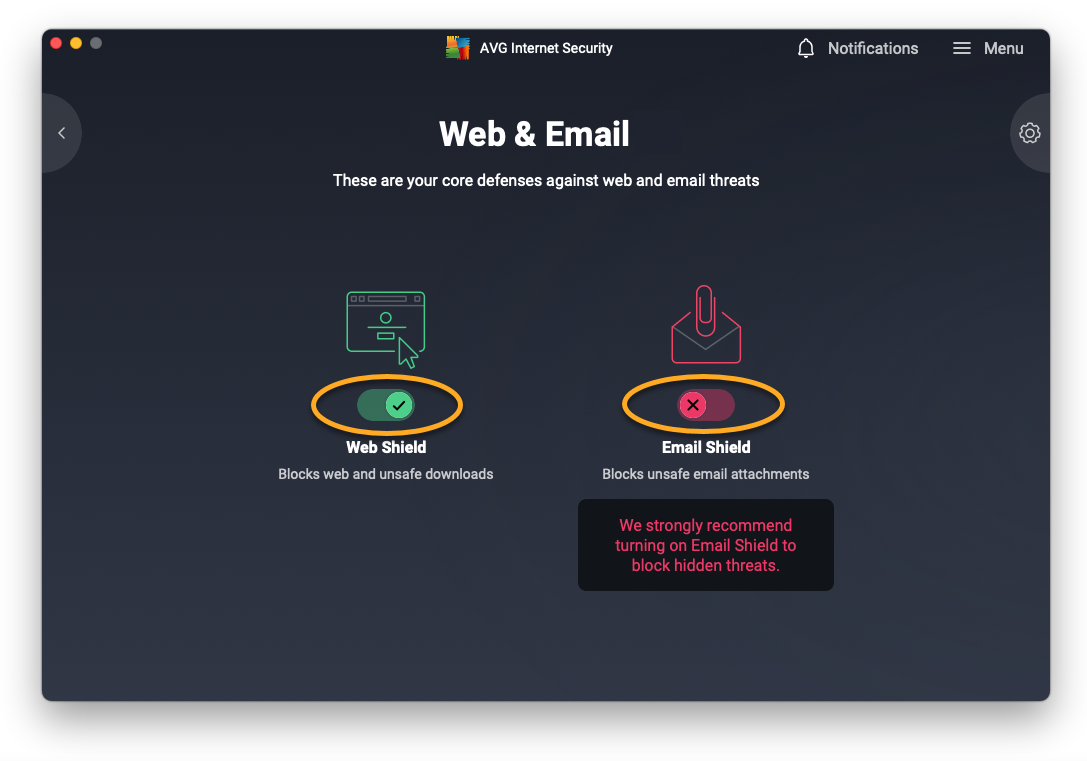
Core Shields
The following shields are available in AVG Internet Security:
- File Shield: scans applications, programs, and files saved on your Mac for malicious threats in real-time before allowing them to be opened, run, modified, or saved. If malware is detected, File Shield prevents the program or file from infecting your Mac.
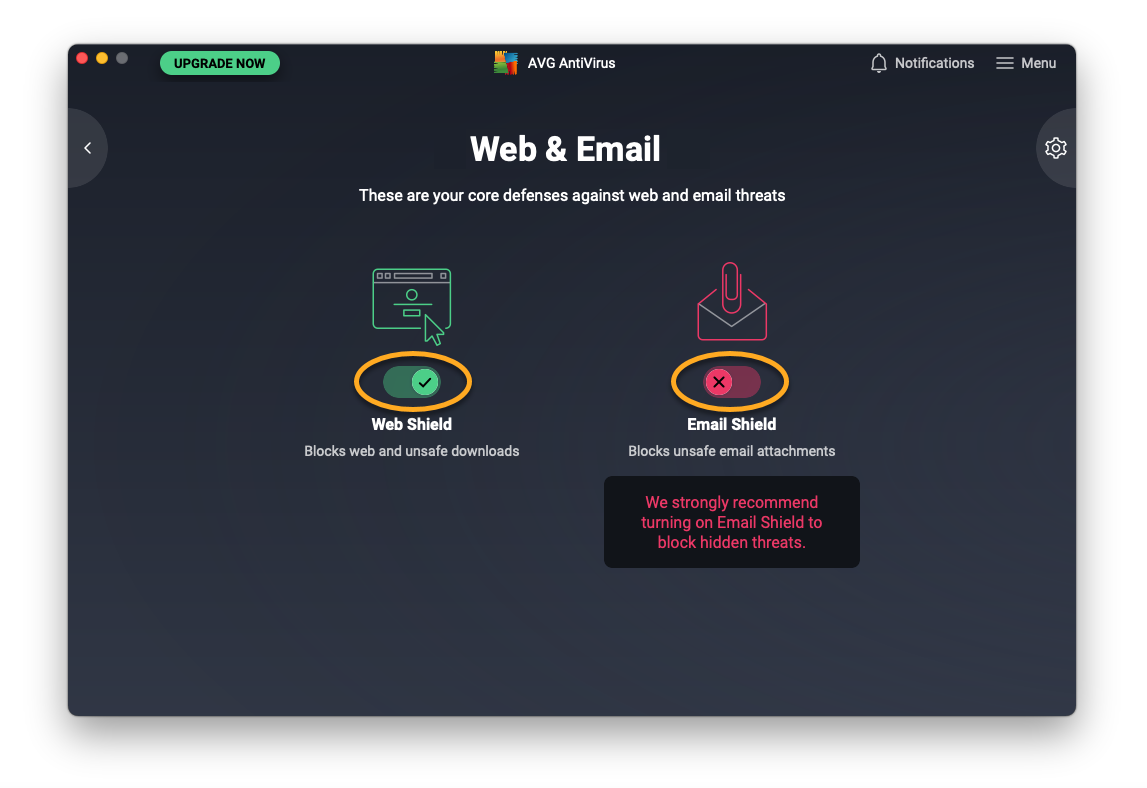
- Web Shield: scans data that is transferred when you browse the internet in real-time. This prevents malware, such as malicious scripts, from being downloaded and run on your Mac.
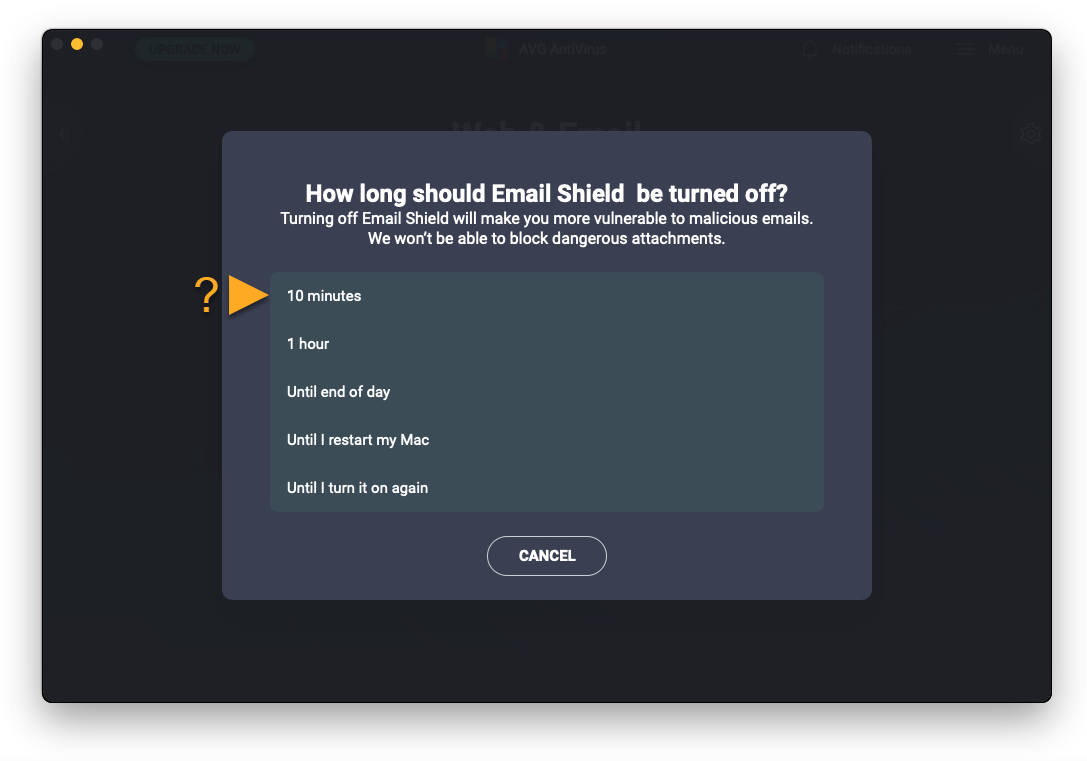
- Email Shield: scans email attachments in real-time before allowing them to be opened, run, modified, or saved. If malware is detected, Email Shield prevents the program or file from infecting your Mac.
These core shields are enabled by default when you install AVG Internet Security and allow all permissions. We strongly recommend keeping all shields enabled at all times to ensure maximum protection for your Mac.
To manage core shields:
- Click the relevant tile on the main AVG Internet Security screen:
- Computer: to access File Shield.
- Web & Email: to access Web Shield and Email Shield.
- Verify the status of a core shield by checking the slider above the shield name:
- A green (ON) slider indicates that the shield is enabled.
- A red (OFF) slider indicates that the shield is disabled.
- If you disable a shield, select a time duration.
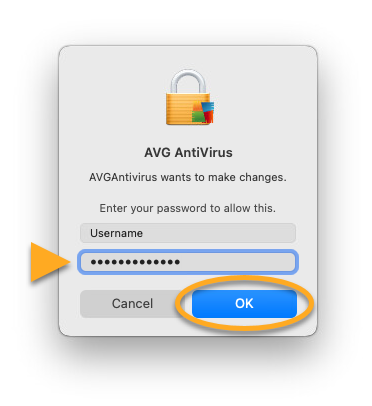
- Enter the password that you use when you start your Mac, then click OK.
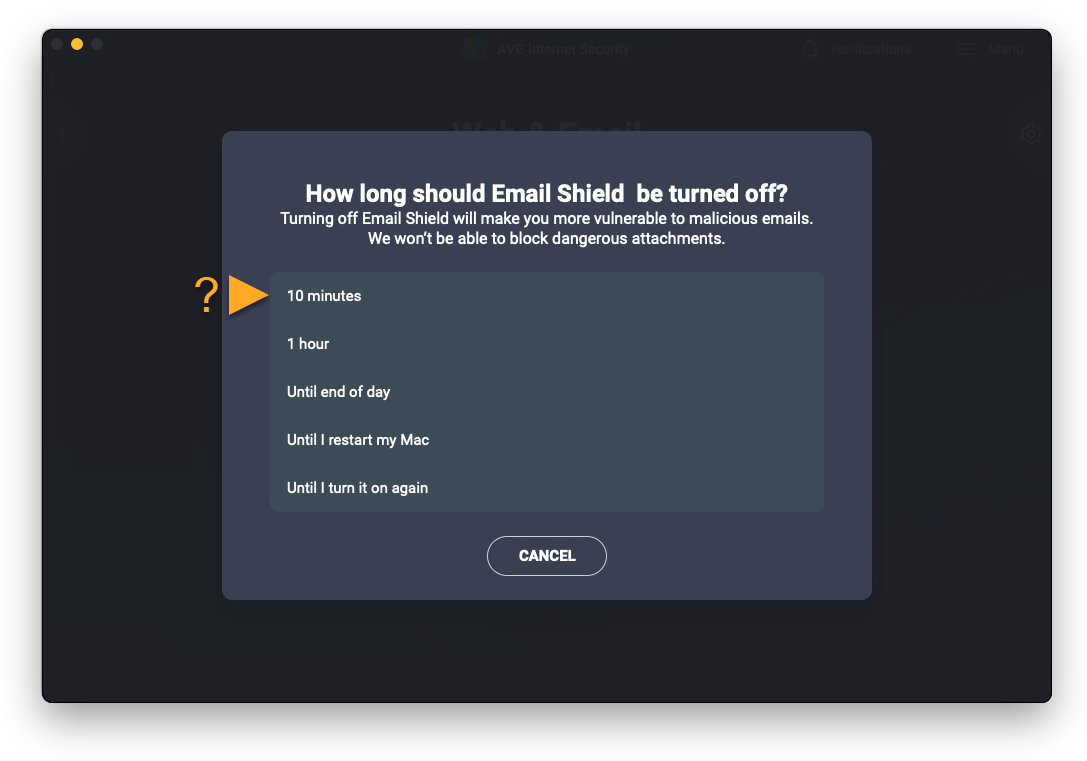
The slider changes to indicate that the shield is enabled or disabled according to your preferences.
For more information about customizing settings for core shields, refer to the following article:
Quarantine
Quarantine is a secure vault for detected threats. When an AVG Internet Security shield or scan detects a potentially malicious file, it is moved to Quarantine when you click Got it on the alert notification or Resolve all on the scan results screen.
When a file is in Quarantine, the following options are available:
- Delete the file
- Restore the file to its original location on your Mac
- Send the file to AVG Threat Labs for analysis
To manage the files that are currently in Quarantine, click the Computer tile on the main application screen, then select Open on the Quarantine tile.
For more information about using Quarantine, refer to the following article:
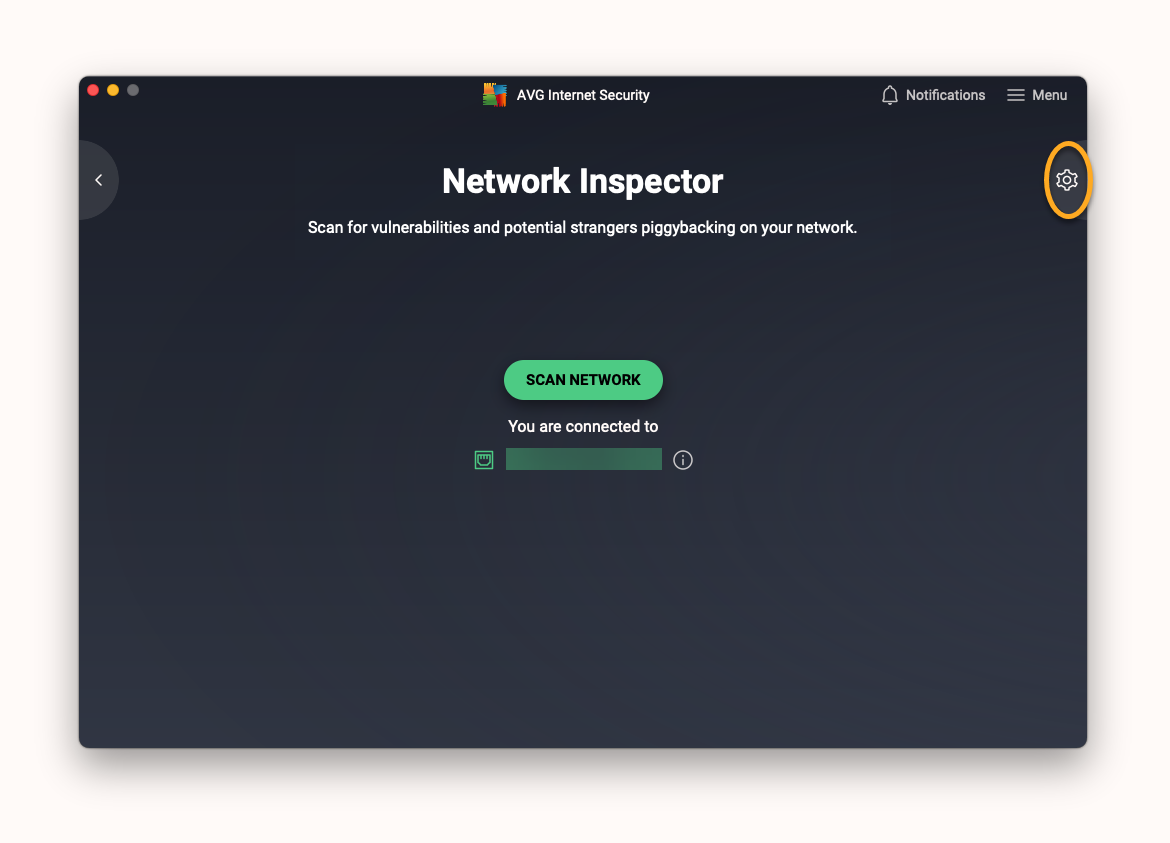
Network Inspector
Network Inspector scans for vulnerabilities when you connect to a Wi-Fi network by checking the status of your network, devices connected to the network, and router settings. If any vulnerabilities are detected, Network Inspector displays information about the vulnerable device so that you can investigate the potential threat.
You can scan the network you are currently connected to by clicking the Hacker attacks tile on the main AVG Internet Security screen, then clicking Open on the Network Inspector tile.
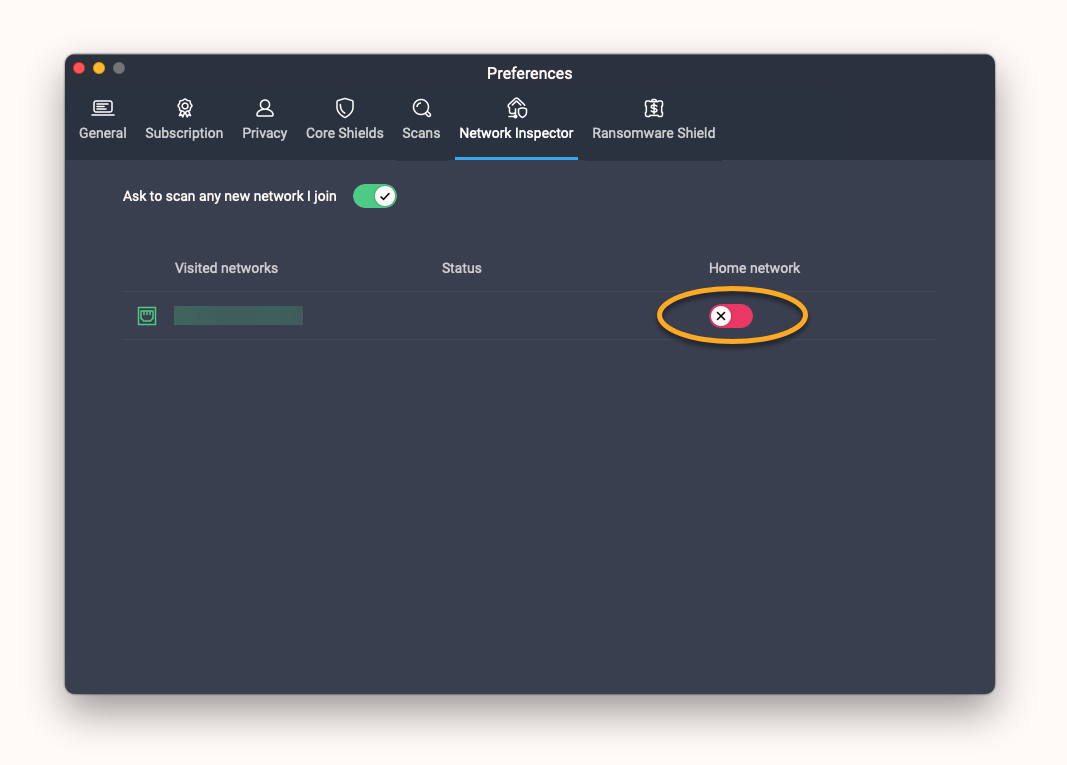
Additionally, AVG Internet Security allows you to keep a network monitored while you are connected to it:
- Click Preferences (the gear icon) on the Network Inspector screen.
- If the slider next to your chosen network is red (OFF), click that slider so that it changes to green (ON).
- Hover your cursor over the relevant panel and click
…More options (three dots) ▸ Monitor.
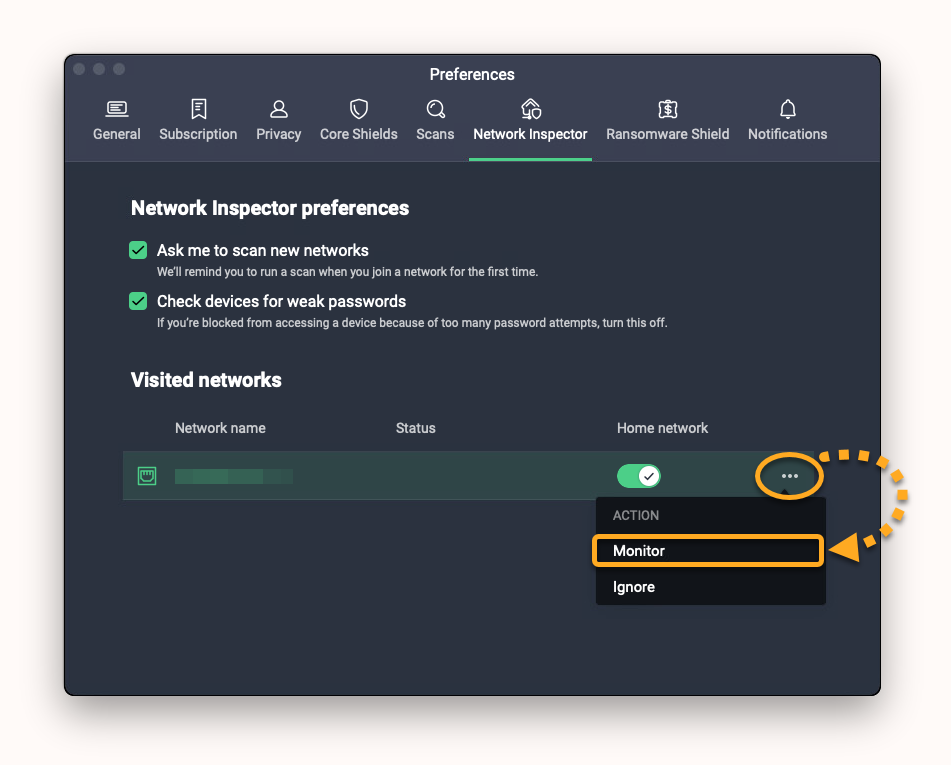
The status of the network changes to Monitored. Network Inspector notifies you if any new vulnerabilities are detected on the monitored network.
Ransomware Shield
Ransomware Shield secures your personal photos, documents, and files from ransomware attacks that can modify, delete, or encrypt your files. This feature is enabled by default and automatically secures your Pictures and Documents folders.
For detailed instructions on how to use Ransomware Shield, refer to the following article:
Advanced defenses
AVG Internet Security includes two additional features to protect you when shopping or banking online:
- Phishing Net: uses our cloud database to catch the newest phishing sites. Phishing Net blocks spam, scams, and malicious phishing emails.
- Fake Website Shield: helps you avoid fake websites so you don't unknowingly give criminals your passwords, credit card numbers, and other personal data. This feature prevents criminals from hijacking your Domain Name System (DNS) settings by using AVG's own secured DNS servers to faithfully direct you to real websites.
Both features are enabled by default when you install AVG Internet Security and allow all permissions. We strongly recommend keeping both features enabled at all times to ensure maximum protection for your Mac.
To verify the status of each feature:
- Click the Payments tile on the main AVG Internet Security screen.
- Check the slider above the feature name:
- A green (ON) slider indicates that the feature is enabled.
- A red (OFF) slider indicates that the feature is disabled.
- Enter the password that you use when you start your Mac, then click OK.
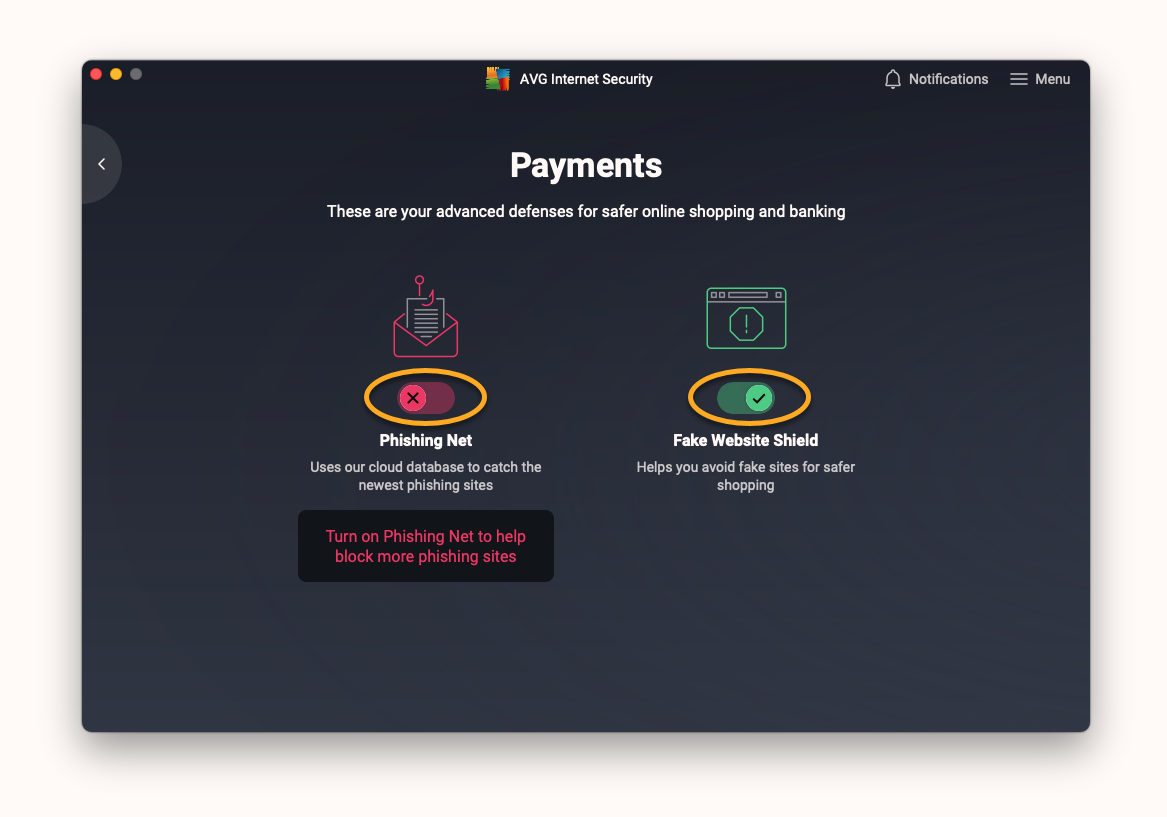
The slider changes to indicate that the feature is enabled or disabled according to your preferences.
For more information on about Fake Website Shield, refer to the following article:
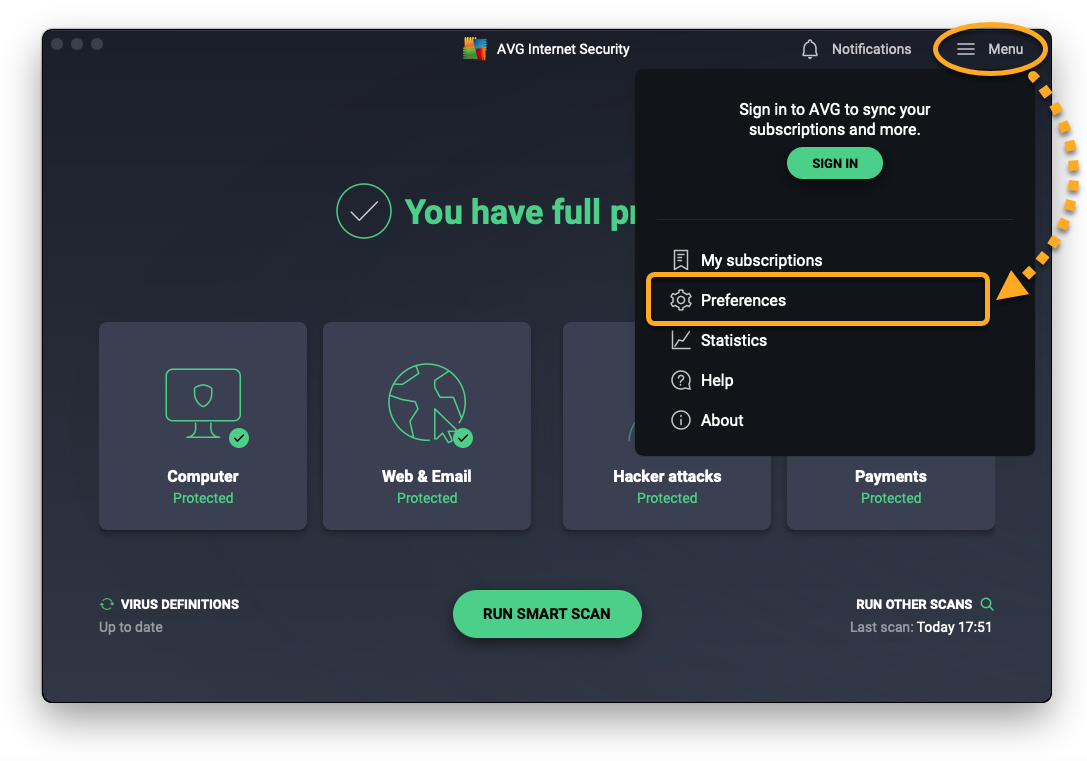
Manage settings
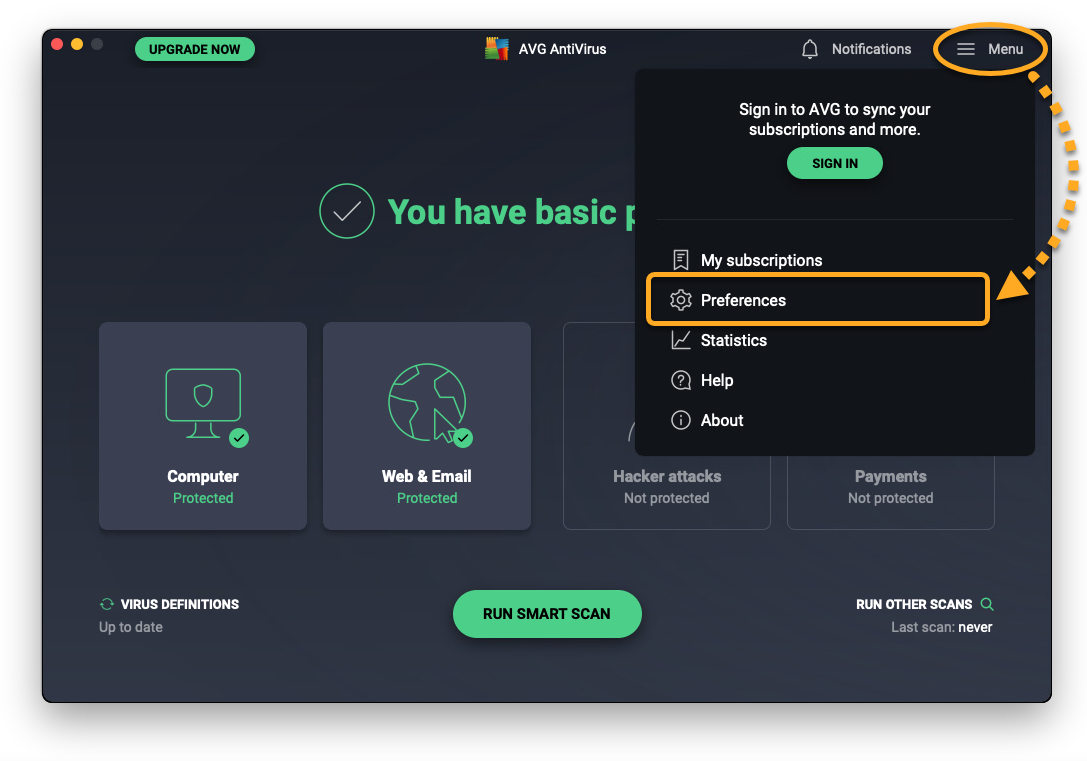
To access settings in AVG Internet Security:
- Click
☰Menu ▸ Preferences.
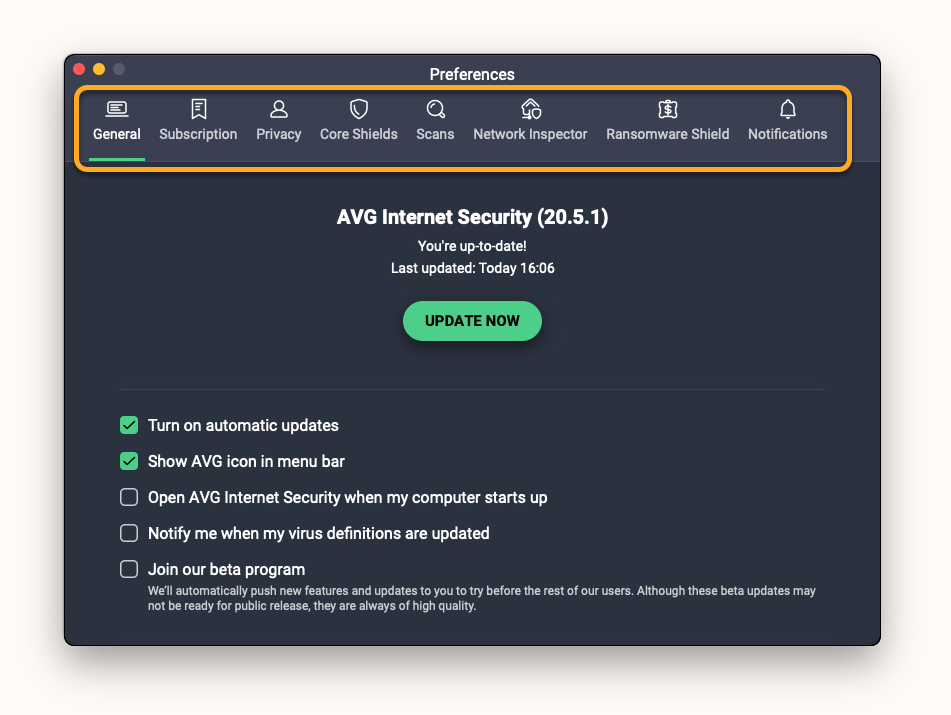
- Select a tab to manage the following settings:
- General: adjust settings for application updates and opening preferences, notifications, and joining our beta program.
- Subscription: view your subscription details.
- Privacy: access the AVG privacy and product policies, and choose to opt-out of sharing threat data and app-usage data with us, or seeing offers for our other products. AVG Internet Security customers can additionally choose to opt-out of seeing offers for our other products.
- Core Shields: adjust settings and add exceptions for File Shield, Web Shield, and Email Shield.
- Scans: adjust settings and add exceptions for Smart Scan, Deep Scan, Targeted Scan, and USB / DVD Scan.
- Network Inspector: view details of previously scanned networks and change whether you are prompted to scan new networks.
- Ransomware Shield: add apps to the allowed list and add file types to the protected files list.
- Notifications: specify when AVG should display non-critical notifications.
For more information about managing settings for Core Shields and scans, refer to the following articles:
Open the application
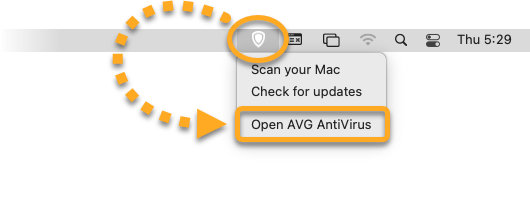
Open AVG AntiVirus using one of the following methods:
- Click the AVG AntiVirus icon in the Apple menu bar and select Open AVG AntiVirus.
- Click Go ▸ Applications in the Apple menu bar, then double-click the AVG Antivirus icon.
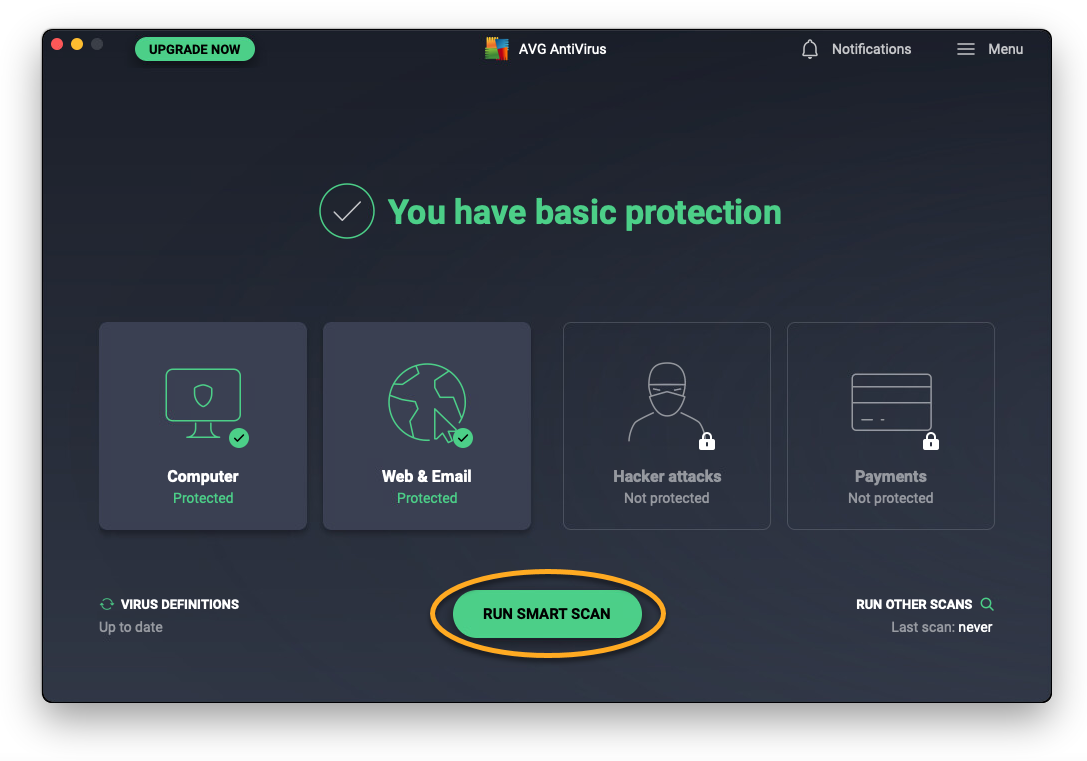
Status message
When you open AVG AntiVirus, the status message indicates if you need to take any action to protect your Mac.
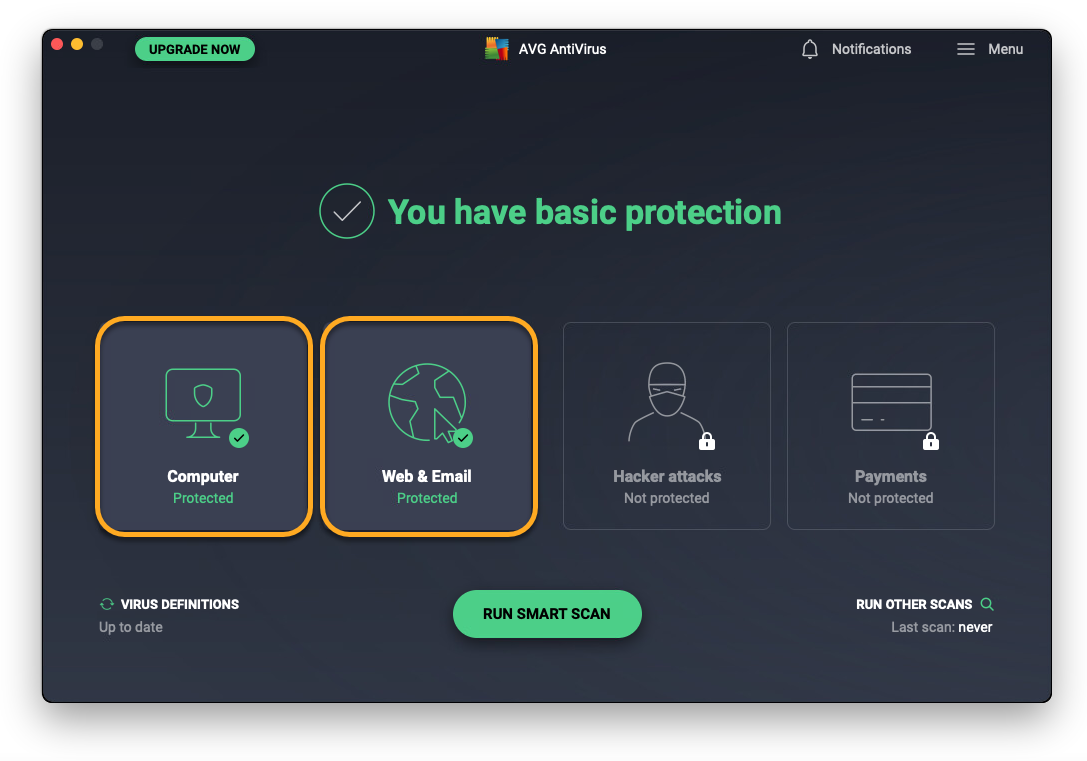
When all available features are enabled, and the application and virus definitions are up-to-date, you see the status message You have basic protection.

If you see the status You are not protected, check the following:
- Ensure you have manually enabled AVG software extensions, DNS proxy configurations, and Full Disk Access. To do this, close and reopen AVG AntiVirus, then follow the on-screen instructions in the AVG AntiVirus setup wizard. For detailed instructions, refer to the following article:
- Ensure the application and virus definitions are up-to-date. To do this, click the refresh icon next to Virus definitions.

Scan your Mac
To run a comprehensive scan for threats in the most important directories on your Mac:
- Click Run Smart Scan on the main application screen, then move through each of the screens below:
- Virus definitions: checks if your virus definitions are up-to-date and updates them if necessary. Follow the relevant step below according to the message you see:
- Virus definitions are up-to-date: click Next to proceed to the next screen.
- You seem to be offline: AVG AntiVirus cannot update the virus definitions if you are not connected to the internet. Click Next to proceed with the Smart Scan. AVG AntiVirus will update your virus definitions the next time you connect to the internet.
- Virus definitions are up-to-date: click Next to proceed to the next screen.
- Viruses & malware: alerts you about malicious threats on your Mac. Follow the relevant step below according to the message you see:
- No viruses or malware found: click Next to proceed to the next screen.
- Unsecured threats found: click Resolve all to move the malicious files directly to Quarantine, then click Next to proceed to the next screen.
- No viruses or malware found: click Next to proceed to the next screen.
- Advanced issues: presents potential security issues that could be resolved by purchasing AVG Internet Security. If you are interested in this offer, click Resolve all. Otherwise, click Skip for now to proceed to the next screen.
- Click Done to return to the main application screen.
Several other scan types are also available, as well as the option to customize your scan settings. For more information about scanning your Mac, refer to the following article:
Core Shields
The following shields are available in AVG AntiVirus:
- File Shield: scans applications, programs, and files saved on your Mac for malicious threats in real-time before allowing them to be opened, run, modified, or saved. If malware is detected, File Shield prevents the program or file from infecting your Mac.
- Web Shield: scans data that is transferred when you browse the internet in real-time. This prevents malware, such as malicious scripts, from being downloaded and run on your Mac.
- Email Shield: scans email attachments in real-time before allowing them to be opened, run, modified, or saved. If malware is detected, Email Shield prevents the program or file from infecting your Mac.
These core shields are enabled by default when you install AVG AntiVirus and allow all permissions. We strongly recommend keeping all shields enabled at all times to ensure maximum protection for your Mac.
To manage core shields:
- Click the relevant tile on the main AVG AntiVirus screen:
- Computer: to access File Shield.
- Web & Email: to access Web Shield and Email Shield.
- Verify the status of a core shield by checking the slider above the shield name:
- A green (ON) slider indicates that the shield is enabled.
- A red (OFF) slider indicates that the shield is disabled.
- If you disable a shield, select a time duration.
- Enter the password that you use when you start your Mac, then click OK.
The slider changes to indicate that the shield is enabled or disabled according to your preferences.
For more information about customizing settings for core shields, refer to the following article:
Quarantine
Quarantine is a secure vault for detected threats. When an AVG AntiVirus shield or scan detects a potentially malicious file, it is moved to Quarantine when you click Got it on the alert notification or Resolve all on the scan results screen.
When a file is in Quarantine, the following options are available:
- Delete the file
- Restore the file to its original location on your Mac
- Send the file to AVG Threat Labs for analysis
To manage the files that are currently in Quarantine, click the Computer tile on the main application screen, then select Open on the Quarantine tile.
For more information about using Quarantine, refer to the following article:
Manage settings
To access settings in AVG AntiVirus:
- Click
☰Menu ▸ Preferences.
- Select a tab to manage the following settings:
- General: adjust settings for application updates and opening preferences, notifications, and joining our beta program.
- Subscription: view your subscription details.
- Privacy: access the AVG privacy and product policies, and choose to opt-out of sharing threat data and app-usage data with us, or seeing offers for our other products. AVG Internet Security customers can additionally choose to opt-out of seeing offers for our other products.
- Core Shields: adjust settings and add exceptions for File Shield, Web Shield, and Email Shield.
- Scans: adjust settings and add exceptions for Smart Scan, Deep Scan, Targeted Scan, and USB / DVD Scan.
- Network Inspector: optionally click Upgrade now to purchase an AVG Internet Security subscription and start using this premium feature.
- Ransomware Shield: optionally click Upgrade now to purchase an AVG Internet Security subscription and start using this premium feature.
- Notifications: specify when AVG should display non-critical notifications.
For more information about managing settings for Core Shields and scans, refer to the following articles:
- AVG AntiVirus 20.x for Mac
- AVG Internet Security 20.x for Mac
- Apple macOS 13.x (Ventura)
- Apple macOS 12.x (Monterey)
- Apple macOS 11.x (Big Sur)
- Apple macOS 10.15.x (Catalina)
- Apple macOS 10.14.x (Mojave)
- Apple macOS 10.13.x (High Sierra)
- Apple macOS 10.12.x (Sierra)
- Apple Mac OS X 10.11.x (El Capitan)