AVG Antivirus provides a range of scans to help protect your PC from viruses and malware. You can also create your own scan and specify the parameters. Refer to the sections in this article for details about the following Scans:
- Smart Scan: A comprehensive scan that detects malware, out-of-date software, browser add-ons with poor reputations, network threats, and performance issues.
- Deep Scan: A predefined, in-depth scan of your system that checks your storage drives and memory for malware (including rootkits).
- File or Folder Scan: Scans the folders you select when you initiate the scan.
- Boot-Time Scan: Scans your PC during the next system startup before any malware is launched. Running a Boot-Time Scan during startup improves the chances of detecting and removing malware before it can attack your PC.
- USB / DVD Scan: Scans all removable media that is currently attached to your PC, such as USB flash drives and external hard drives.
- Performance Scan: Scans your system for useless data and other issues that may affect the speed and security of your PC. To resolve any issues that are detected, you must first install AVG TuneUp. If you have already installed AVG TuneUp, clicking this option loads the AVG TuneUp dashboard.
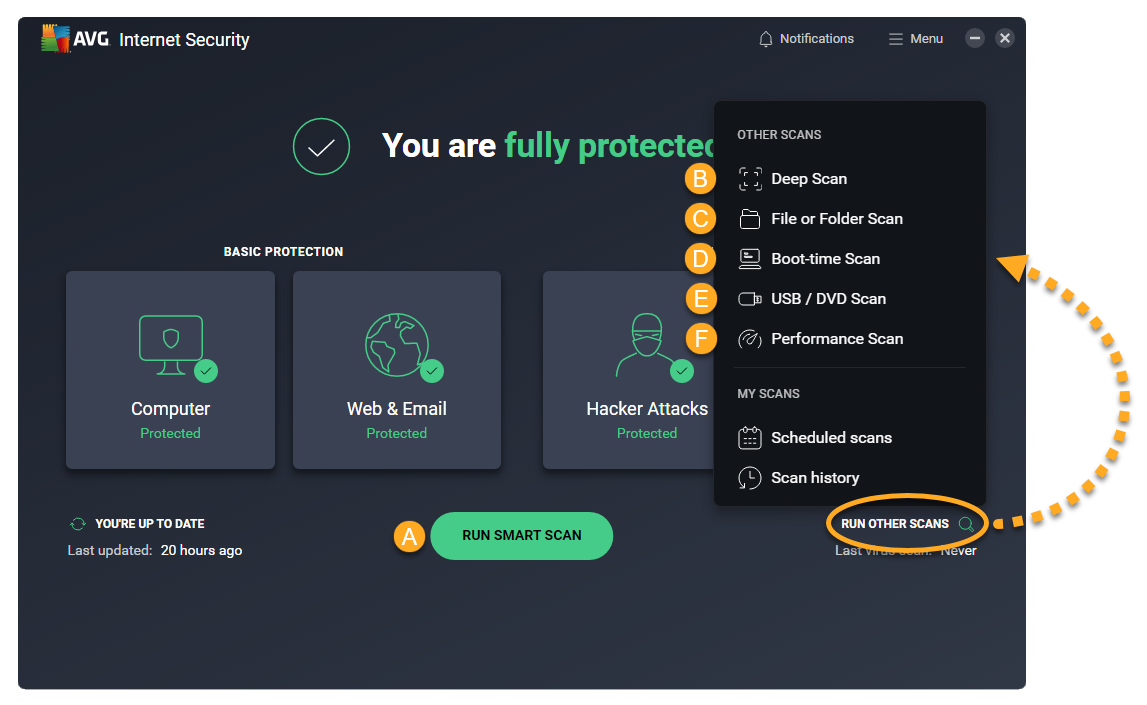
Run a scan
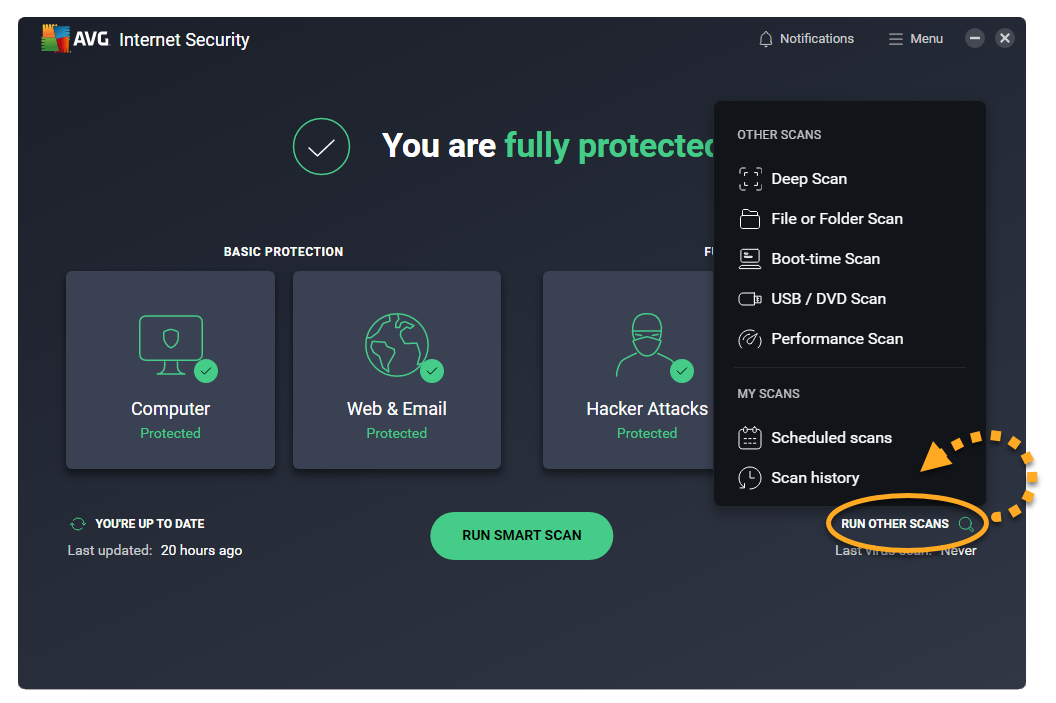
- Open AVG AntiVirus and select the type of scan you want to run.
- Smart Scan: Click the Run Smart Scan button.
- Deep Scan: Click Run other scans ▸ Deep Scan.
- File or Folder Scan: Click Run other scans ▸ File or Folder Scan.
- Boot-Time Scan: Click Run other scans ▸ Boot-Time Scan.
- USB / DVD Scan: Click Run other scans ▸ USB / DVD Scan.
- Performance Scan: Click Run other scans ▸ Performance Scan.

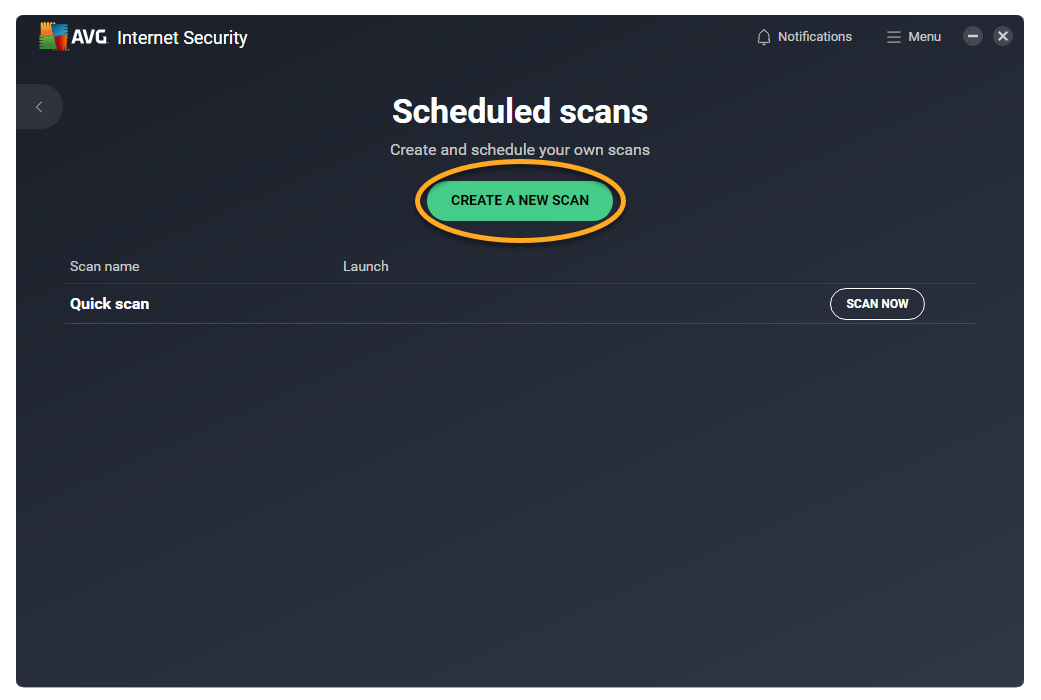
Create a custom scan
To create a custom scan that runs according to your specifications:
- Open AVG AntiVirus and go to Run other scans ▸ Scheduled scans.
- Click Create a new scan.
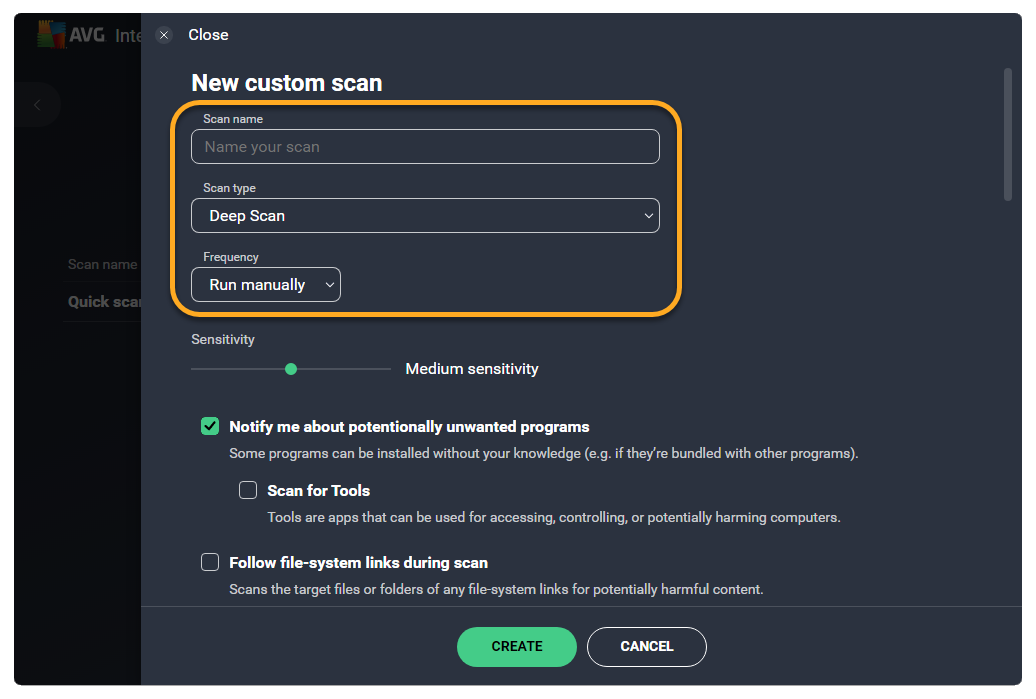
- Define the scan parameters and settings:
- Scan name: Type a name for your scan into the text box.
- Scan type: Click the drop-down menu and select the type of scan you want.
- Frequency: Click the drop-down menu and define how often your scan runs.

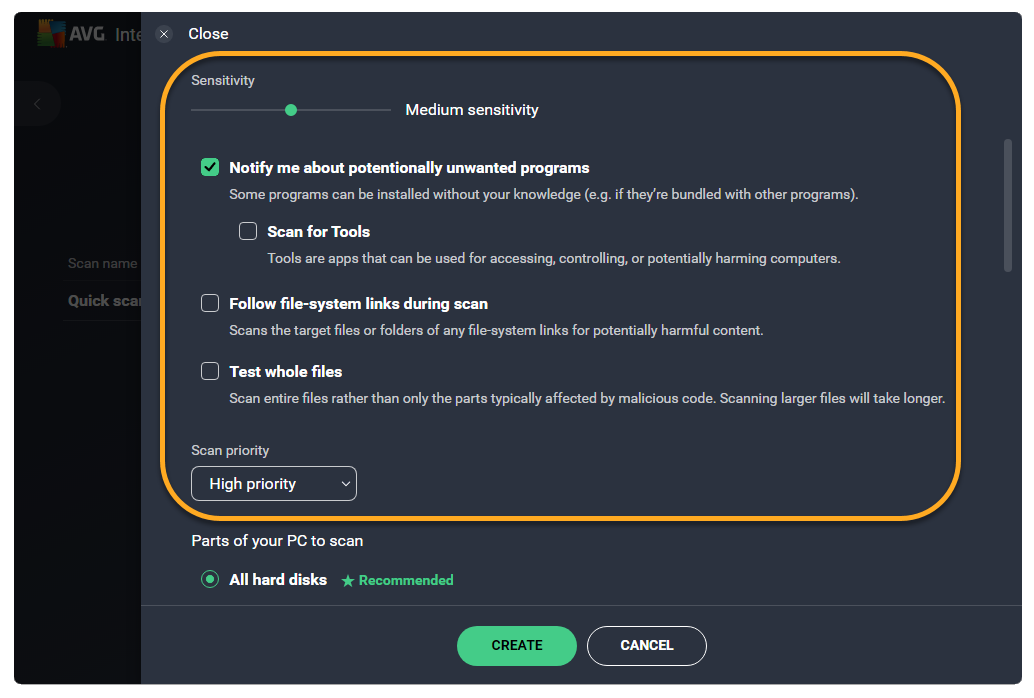
Advanced settings
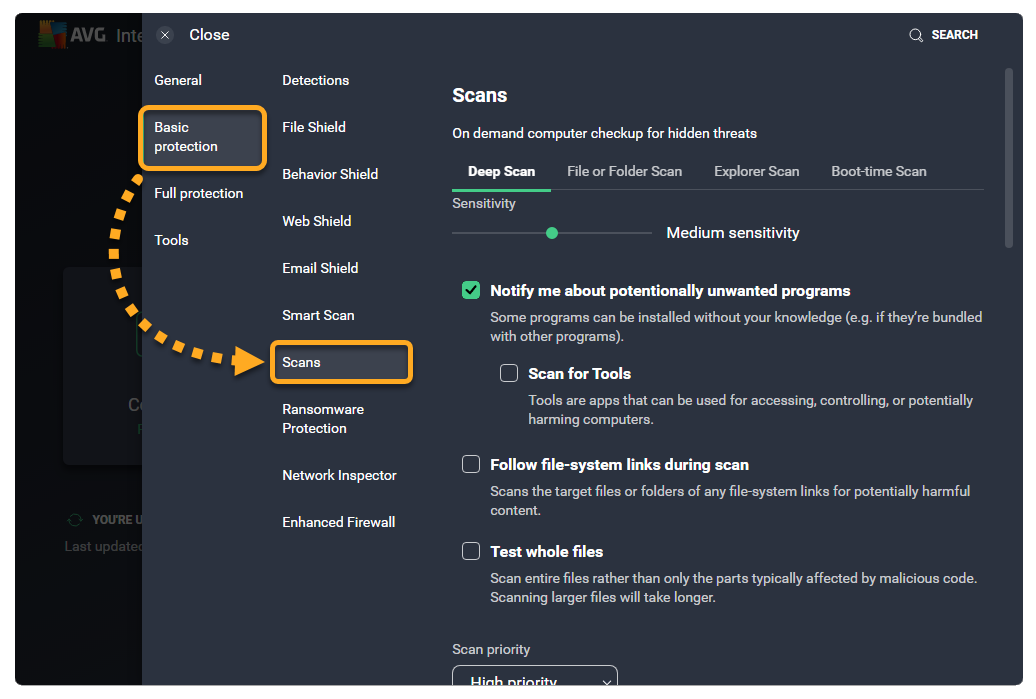
- Sensitivity (Medium by default): Click and drag the slider to adjust the scan sensitivity. Higher sensitivity increases protection and potential for false positive malware detection. Lower sensitivity reduces the potential for false positive detections, but may reduce the effectiveness of the scan.
- Notify me about potentially unwanted programs (enabled by default): Tick to receive notifications about programs that are stealthily downloaded with other programs and typically perform unwanted activity.
- Scan for Tools: Tick to scan for potentially harmful apps.
- Follow file-system links during scan: Tick to scan other files used by the files being scanned for potentially harmful content.
- Test whole files (very slow for big files): Tick to scan entire files rather than only the parts typically affected by malicious code.
- Scan priority: Use the drop-down menu to set your scan priority (high priority by default).
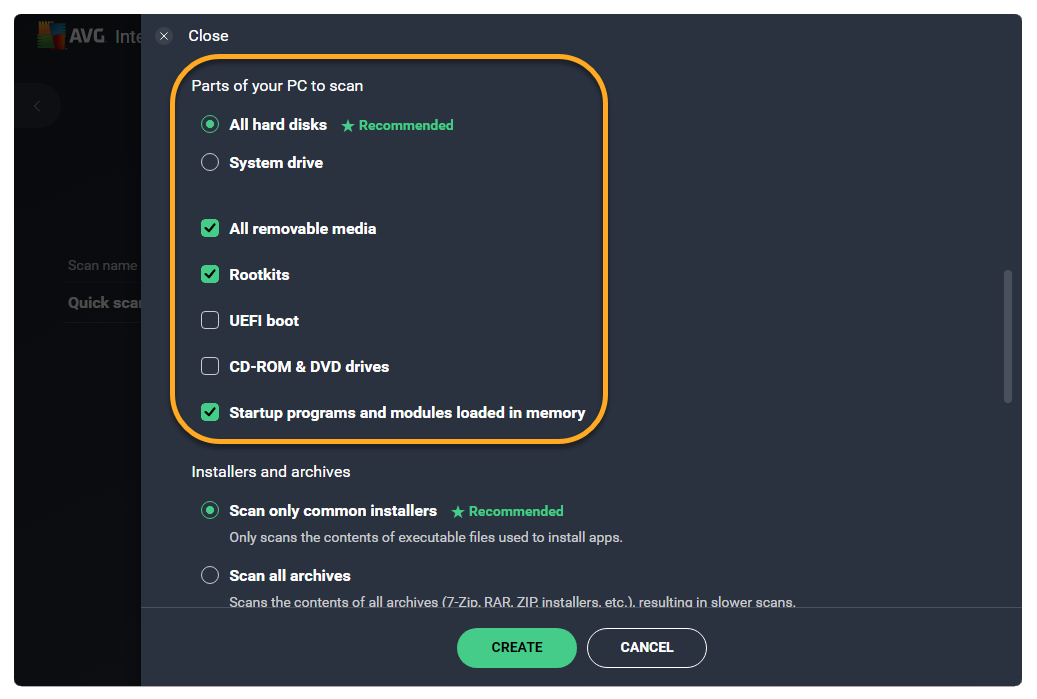
Parts of your PC to scan
- All hard disks (selected by default): Select to enable AVG to scan all hard drives on your PC.
- System drive: Select to include data that is stored on physical devices such as hard drives and USB sticks.
- All removable media (enabled by default): Tick to enable AVG to scan applications that launch automatically when you insert a USB or other removable device into your PC. Scanning removable media may take a long time due to speed limitations.
- Rootkits (enabled by default): Tick to enable AVG to scan for hidden threats in the system.
- UEFI BIOS: Tick to enable AVG to scan for hidden threats in the UEFI BIOS boot-up process.
- CD-ROM & DVD drives: Tick to enable AVG to scan CD and DVD drives for malicious content.
- Startup programs and modules loaded in memory (enabled by default): Tick to enable AVG to scan applications and processes that launch after system startup or run in the background.
Installers and archives
- Scan only common installers (selected by default): Select to scan only commonly used file types such as .zip, .rar, and other executable or installer archives.
- Scan all archives: Select to scan all archive files, which significantly increases the scan duration.
- Don't scan archives: Select to exclude all archive files from the scan.
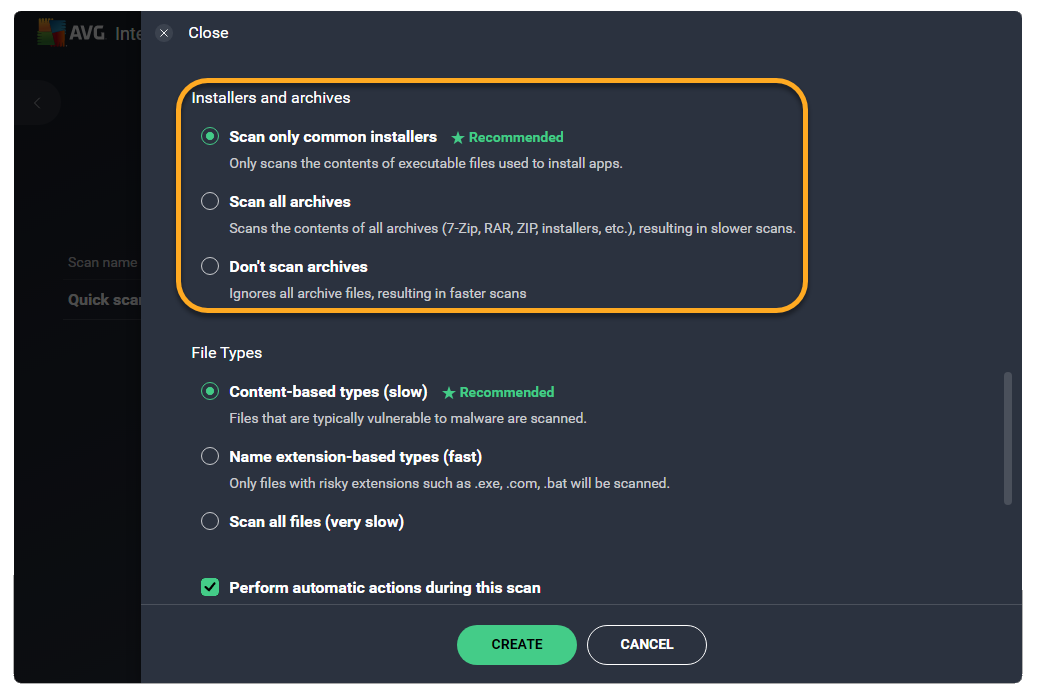
File Types
- Content-based types (slow) (selected by default): Select to scan files that are typically most vulnerable to malware attacks.
- Name extension-based types (fast): Select to only scan files with risky extensions, such as .exe, .com, and .bat.
- Scan all files (very slow): Select to scan all files on your PC for malware.
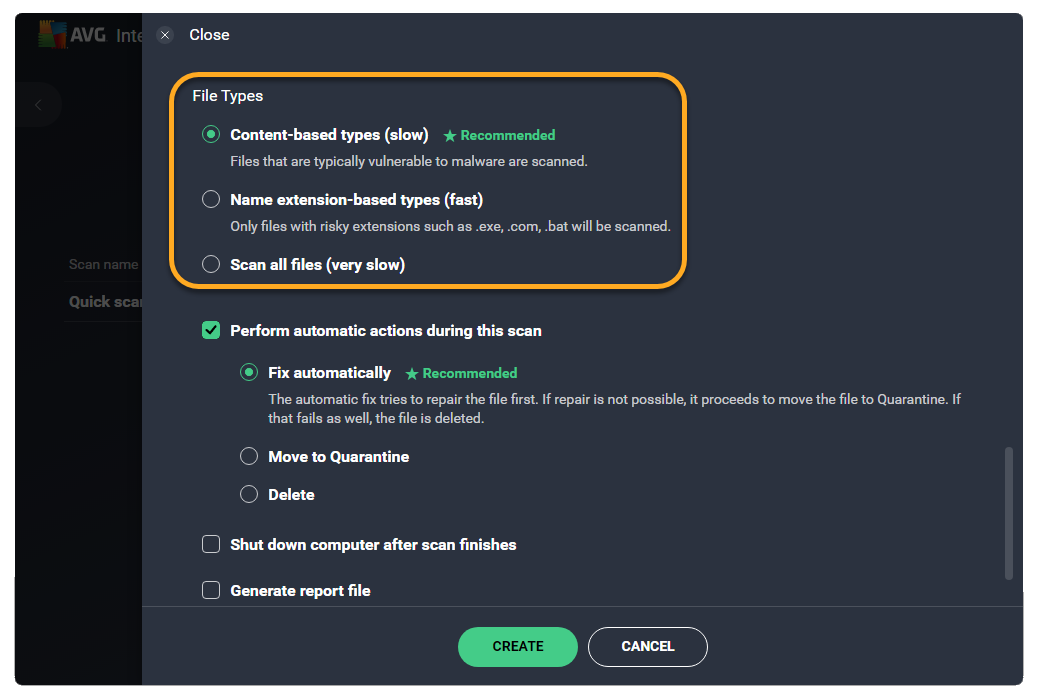
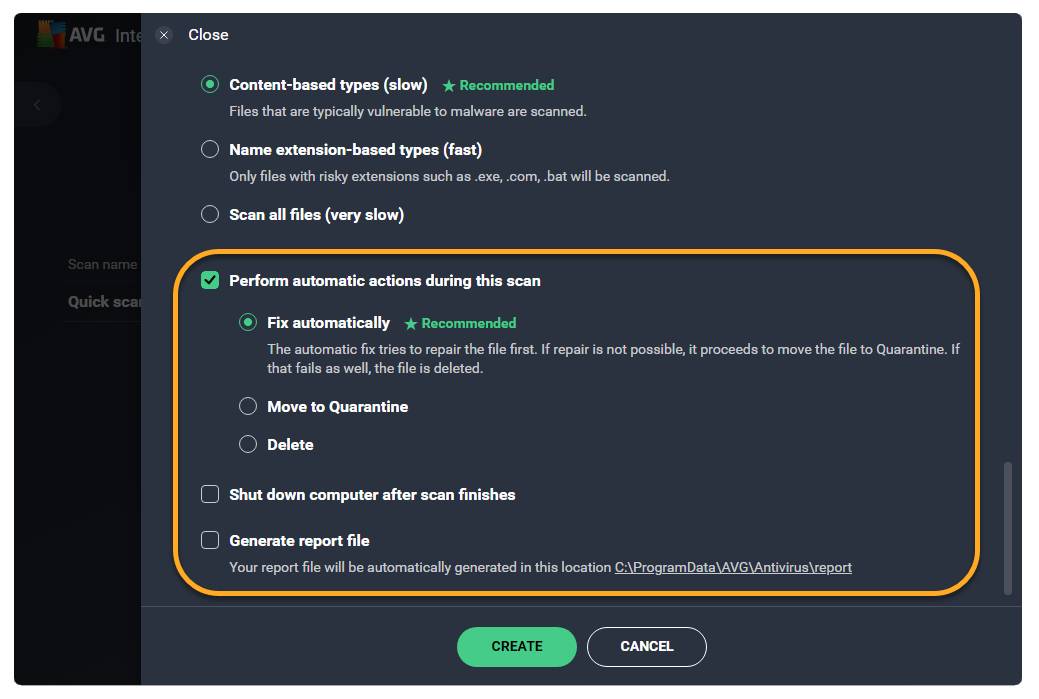
Automatic actions
- Perform automatic actions during this scan: Tick this option to enable it, then define the automatic action AVG will perform when an infected file is found.
- Fix automatically (selected by default): When an infected file is detected, AVG will try to fix the file. If repair is not possible, the file is moved to Quarantine. If this fails, the file is deleted.
- Move to Quarantine: When an infected file is detected, AVG moves the file to Quarantine.
- Delete: When an infected file is detected, AVG automatically deletes the file.
- Shut down computer after scan finishes: Tick to enable AVG to shut down your PC after the scan completes.
- Generate report file: Tick to enable AVG to create and store a report file automatically after the scan completes.
Click Create to complete your custom scan setup.

To edit your custom scan settings, go to Run other scans ▸ Scheduled scans, then hover your cursor over the scan name and click … More options (three dots) ▸ Settings.
Process scan results
After a scan completes, AVG displays all found issues. You can resolve the issues directly on the results screen, or configure each Virus Scan to resolve issues automatically upon detection.
Smart Scan
To learn more about resolving found issues after Smart Scan completes, refer to the following article:
Other Scans
To define how each scan automatically reacts to a found issue, follow the steps below:
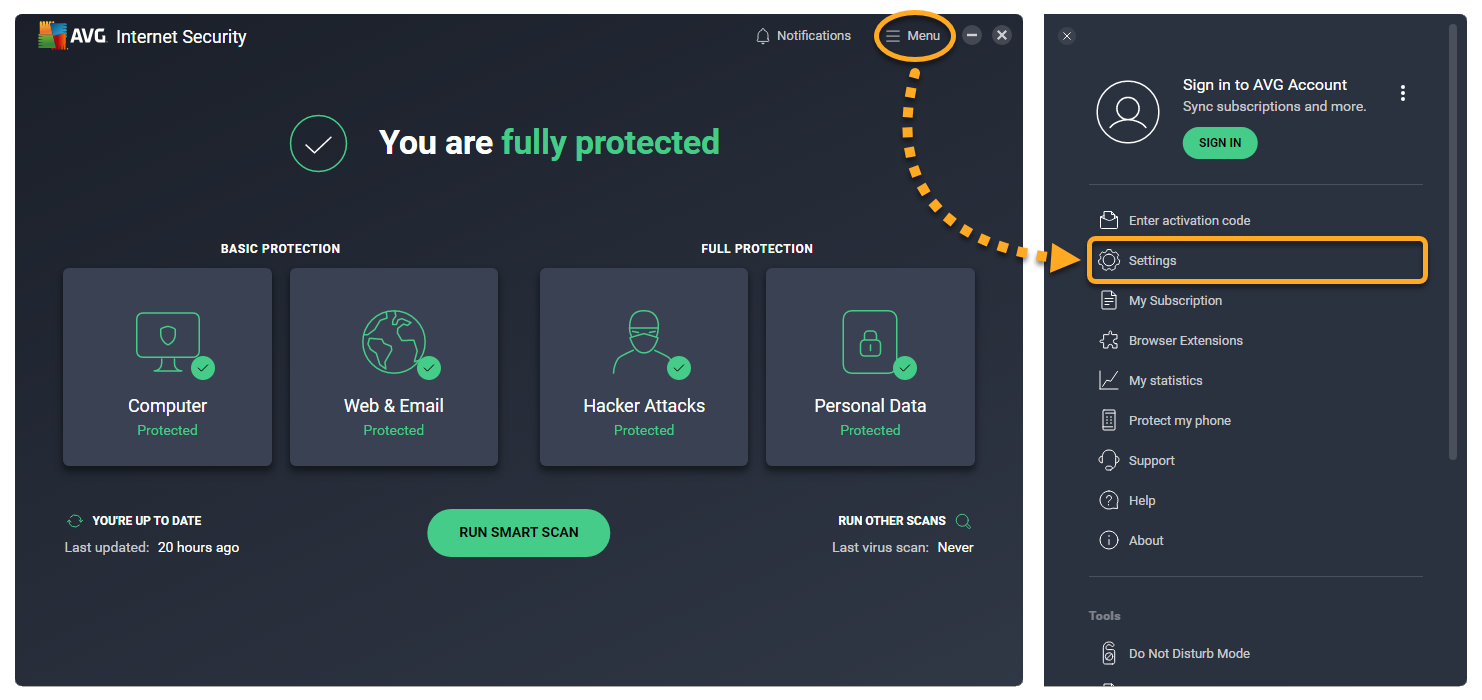
- Open AVG AntiVirus, and go to
☰Menu ▸ Settings. - Select Basic protection ▸ Scans.
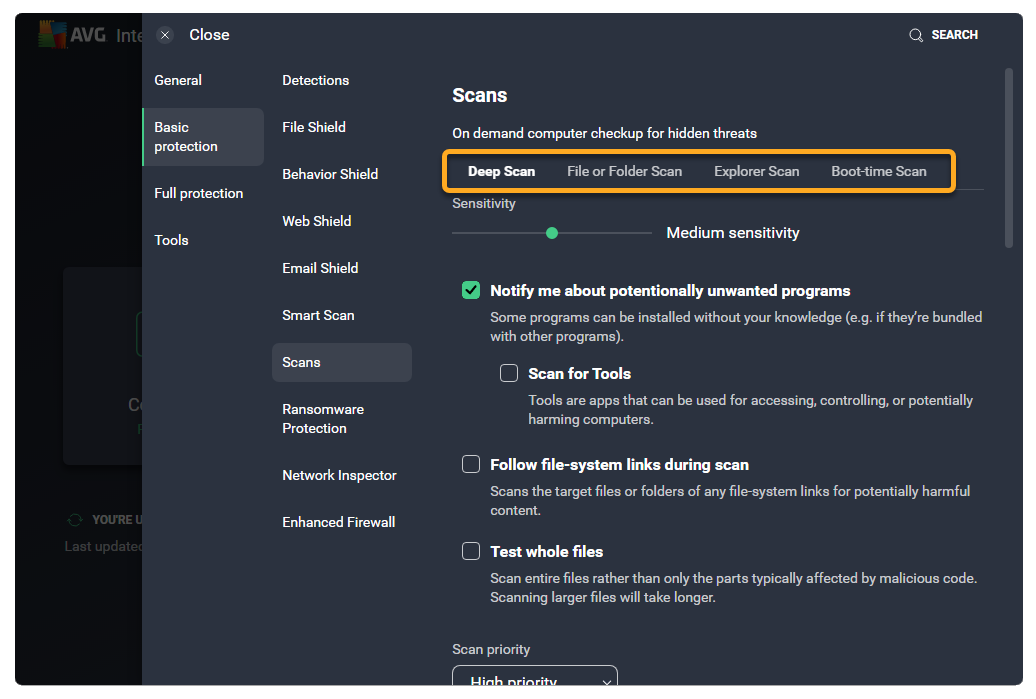
- Click the tab for your chosen scan.
- Scroll down, then tick the box next to Perform automatic actions during this scan and select which action you want AVG to perform when an issue is found:
- Fix automatically (selected by default): When an infected file is detected, AVG will try to fix the file. If repair is not possible, the file is moved to Quarantine. If this fails, the file is deleted.
- Move to Quarantine: When an infected file is detected, AVG moves the file to Quarantine.
- Delete file: When an infected file is detected, AVG automatically deletes the file.
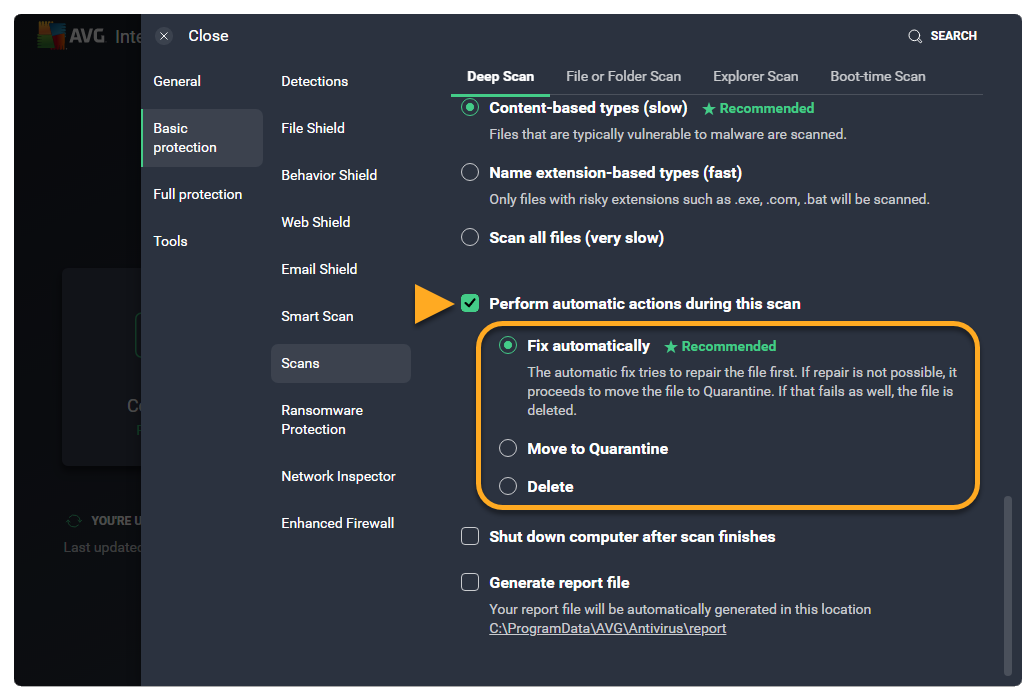
If you want AVG to do nothing when an infected file is found, untick the box next to Perform automatic actions during this scan (not recommended). To manage unresolved scan detections at any time, go to Run other scans ▸ Scan history.
Special cases
For incomplete scans, an error message indicating the reason the scan was unable to complete is visible on the scanning screen. Although there are many different reasons a scan may be unable to complete, some of the most common reasons are:
- Archive is password protected: Indicates that the file is password protected. Some programs use password protected archives to store their data even if you did not set the password. Depending on your scan settings, only the "wrapper" file is scanned while the archive content is not.
- Archive is corrupted: Indicates that the file may be corrupt because it was only partially downloaded or saved to your harddisk, or that it is a special type of archive.
- The process cannot access the file because of another process: Indicates that another process or program was accessing the file during the scan.
- The file is a decompression bomb: Indicates that the file was too large to be decompressed for malware analysis. Decompression of large files generates vast amounts of data which can cause your system to be unstable or cause it to crash.
Adjust scan settings
Although customizable settings are available for some Virus Scans, we recommend you only modify settings for Custom Scans. To configure scan settings:
- Open AVG AntiVirus and go to
☰Menu ▸ Settings. - Select Basic protection ▸ Scans.
- Click the tab for your chosen scan.
- Configure the relevant settings.
Smart Scan settings
To learn more about adjusting Smart Scan settings, refer to the following article:
Create and use Rescue Disk
If you suspect your PC is infected with malware and all other Virus Scans (including the Boot-Time scan) were unable to resolve the issue, you can use Rescue Disk. Rescue Disk enables you to scan your PC when your system is not running. This method significantly increases your chances of detecting and removing malware because the malware is detected before it is able to counteract.
For more information about Rescue Disk, refer to the following article:
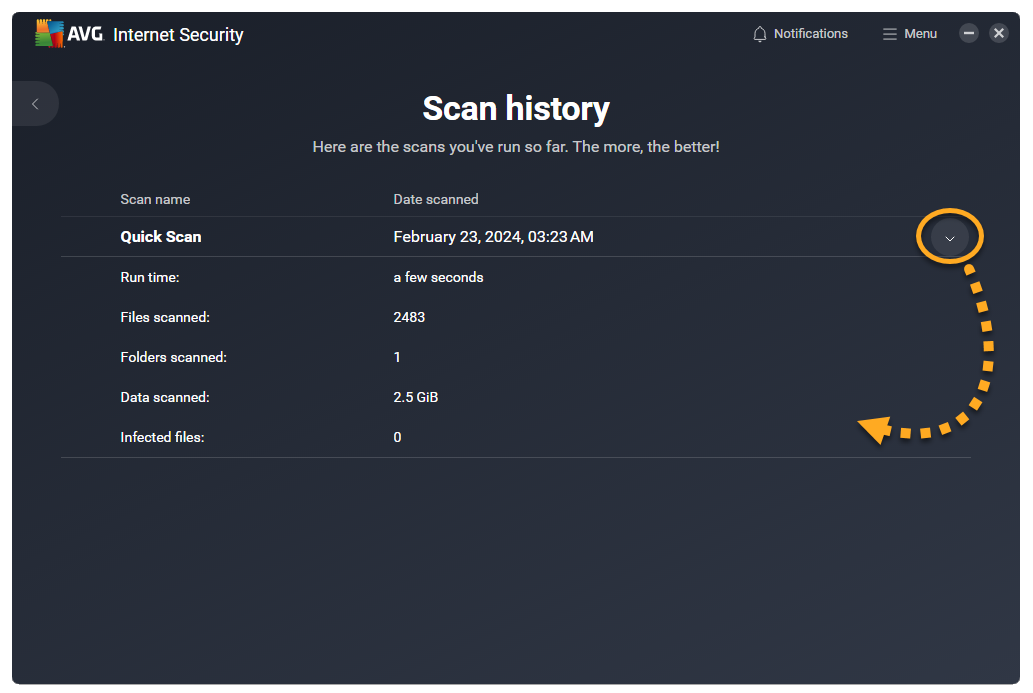
Review scan history
To view a full list of your completed scans:
- Open AVG AntiVirus and go to Run other scans ▸ Scan history.
- Hover your cursor over a scan panel, and click the down arrow to see the scan details.
- AVG Internet Security 24.x for Windows
- AVG AntiVirus FREE 24.x for Windows
- Microsoft Windows 11 Home / Pro / Enterprise / Education
- Microsoft Windows 10 Home / Pro / Enterprise / Education - 32 / 64-bit
- Microsoft Windows 8.1 / Pro / Enterprise - 32 / 64-bit
- Microsoft Windows 8 / Pro / Enterprise - 32 / 64-bit
- Microsoft Windows 7 Home Basic / Home Premium / Professional / Enterprise / Ultimate - Service Pack 1 with Convenient Rollup Update, 32 / 64-bit