AVG AntiVirus is a security app for Android designed to protect your device against unwanted phishing, malware, spyware, and malicious viruses. Refer to the sections in this article for instructions on using AVG AntiVirus.
Run a Smart Scan
When you open AVG AntiVirus, you have the option to run a Smart Scan, which checks your device for any potential threats. To start the scan:
- Open AVG AntiVirus and tap Start scan on the main AVG AntiVirus screen.

- Follow the on-screen instructions to resolve any issues found.
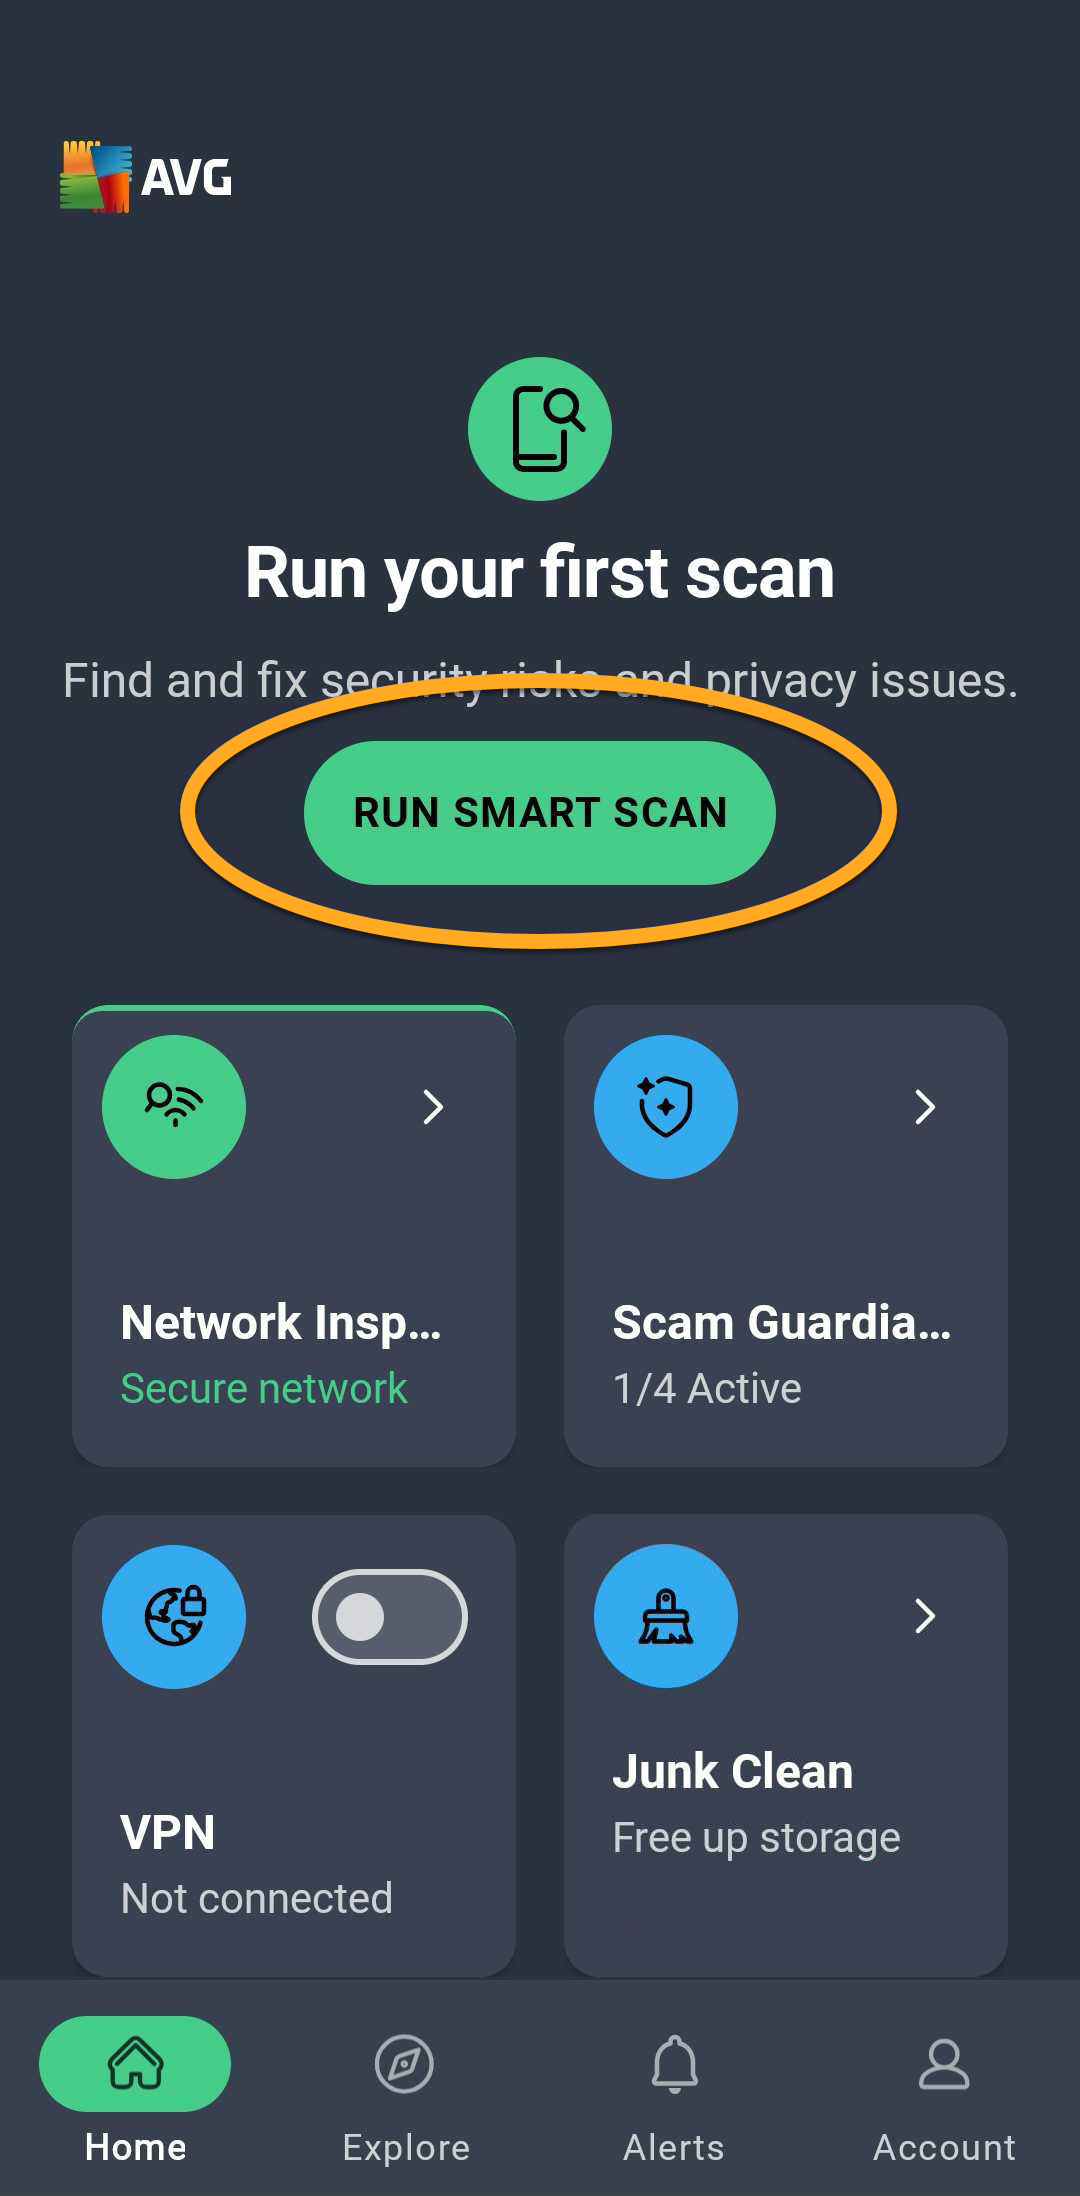
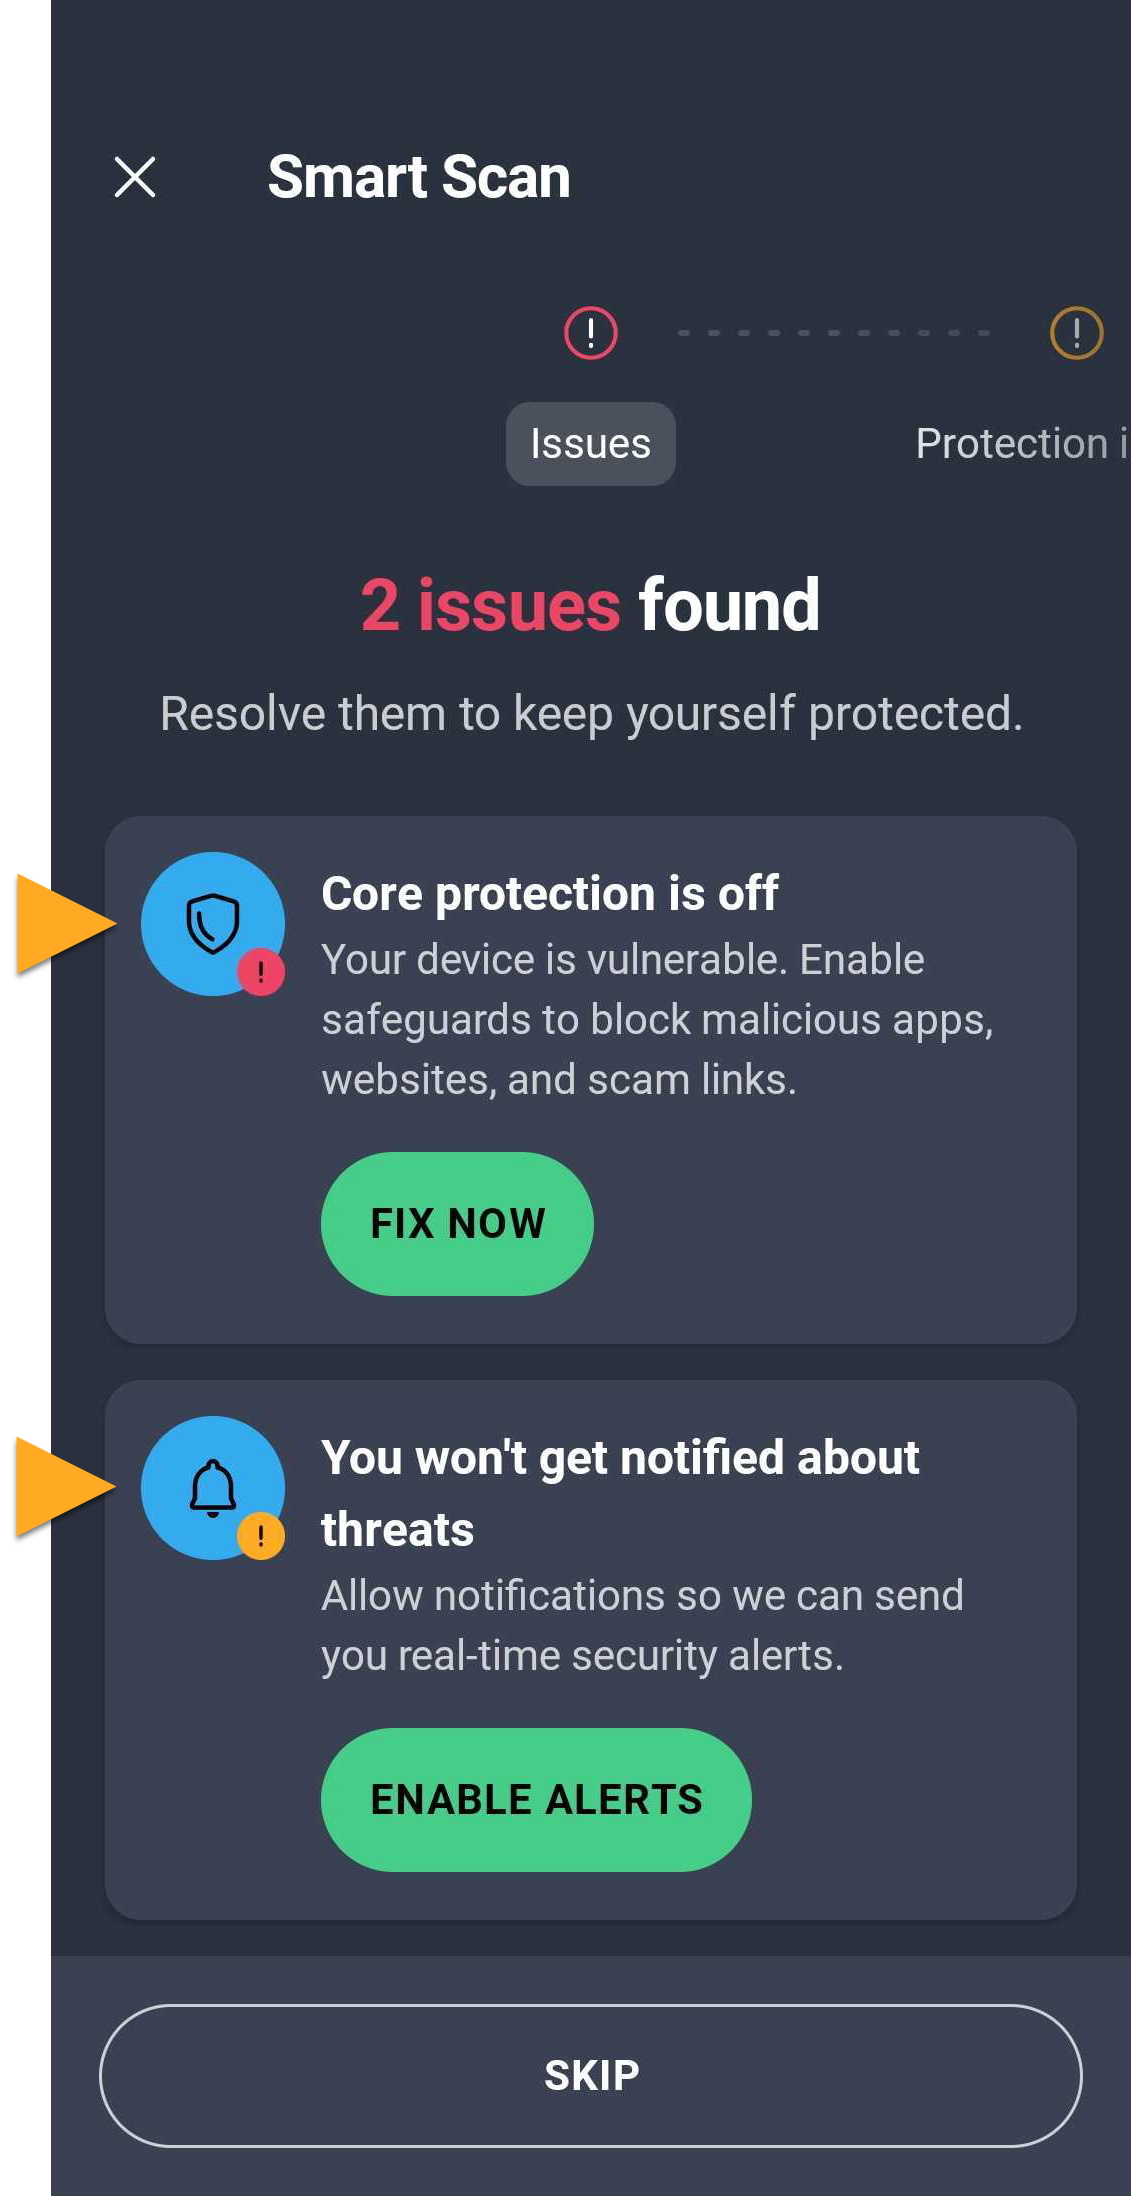
For detailed instructions on how to solve the found issues, refer to the sections below.
Schedule regular scans
The Scan now button on the main app screen scans apps installed on your device and informs you about security risks caused by changes in default Android settings.
To schedule automatic scans:
- Tap Account ▸ Settings.
- Tap Device protection.
- Tap Automatic scan.
- Ensure the slider at the bottom of the screen is On.
- Specify Scan days and Scan time by selecting the days and time when you want the scan to automatically run.
 Account ▸
  Settings.
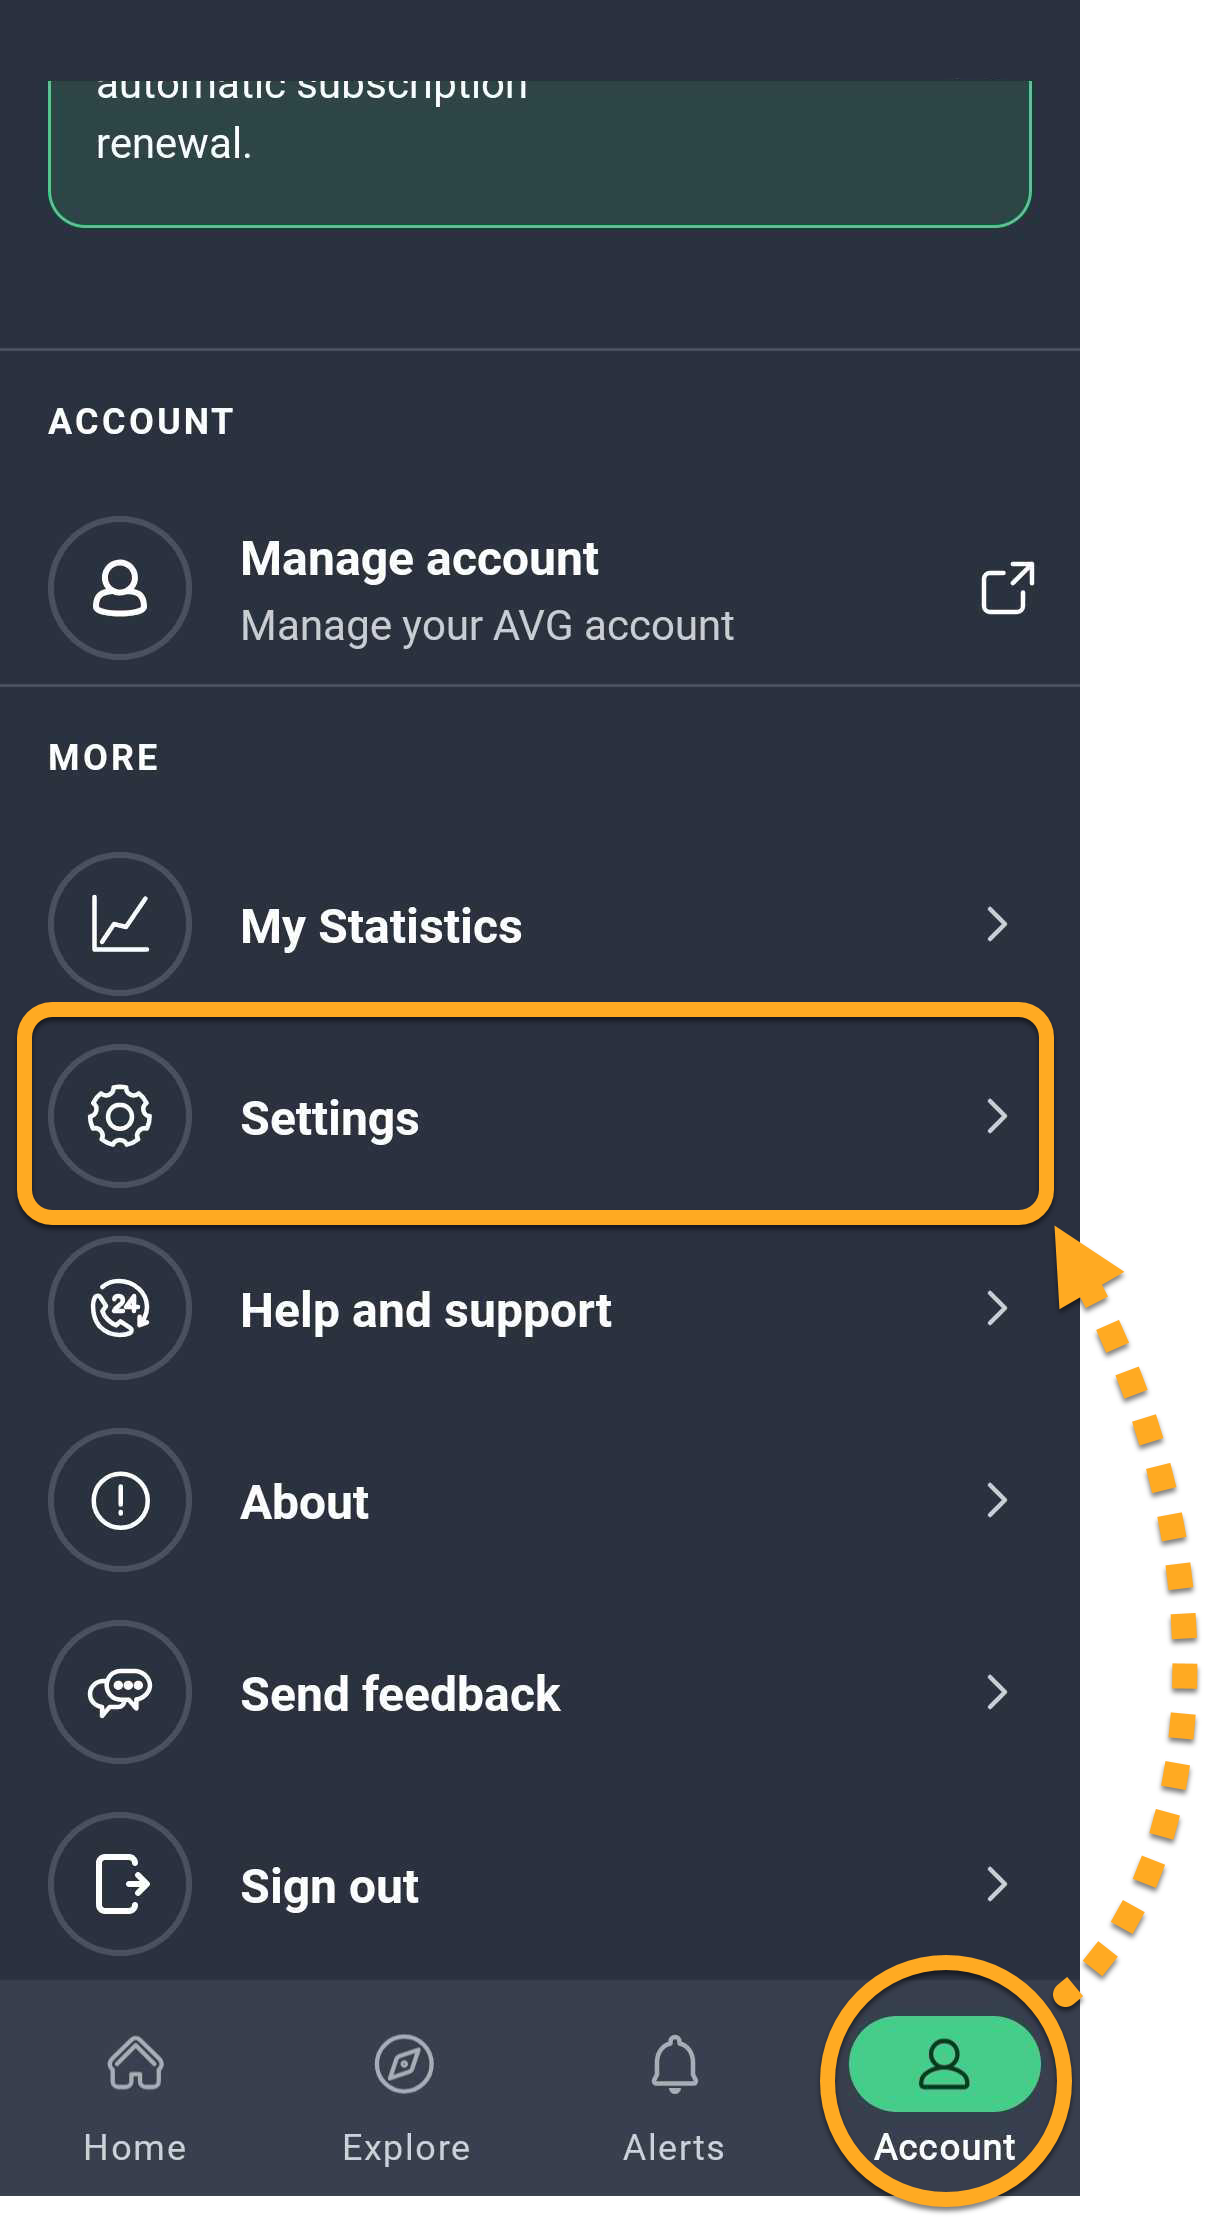
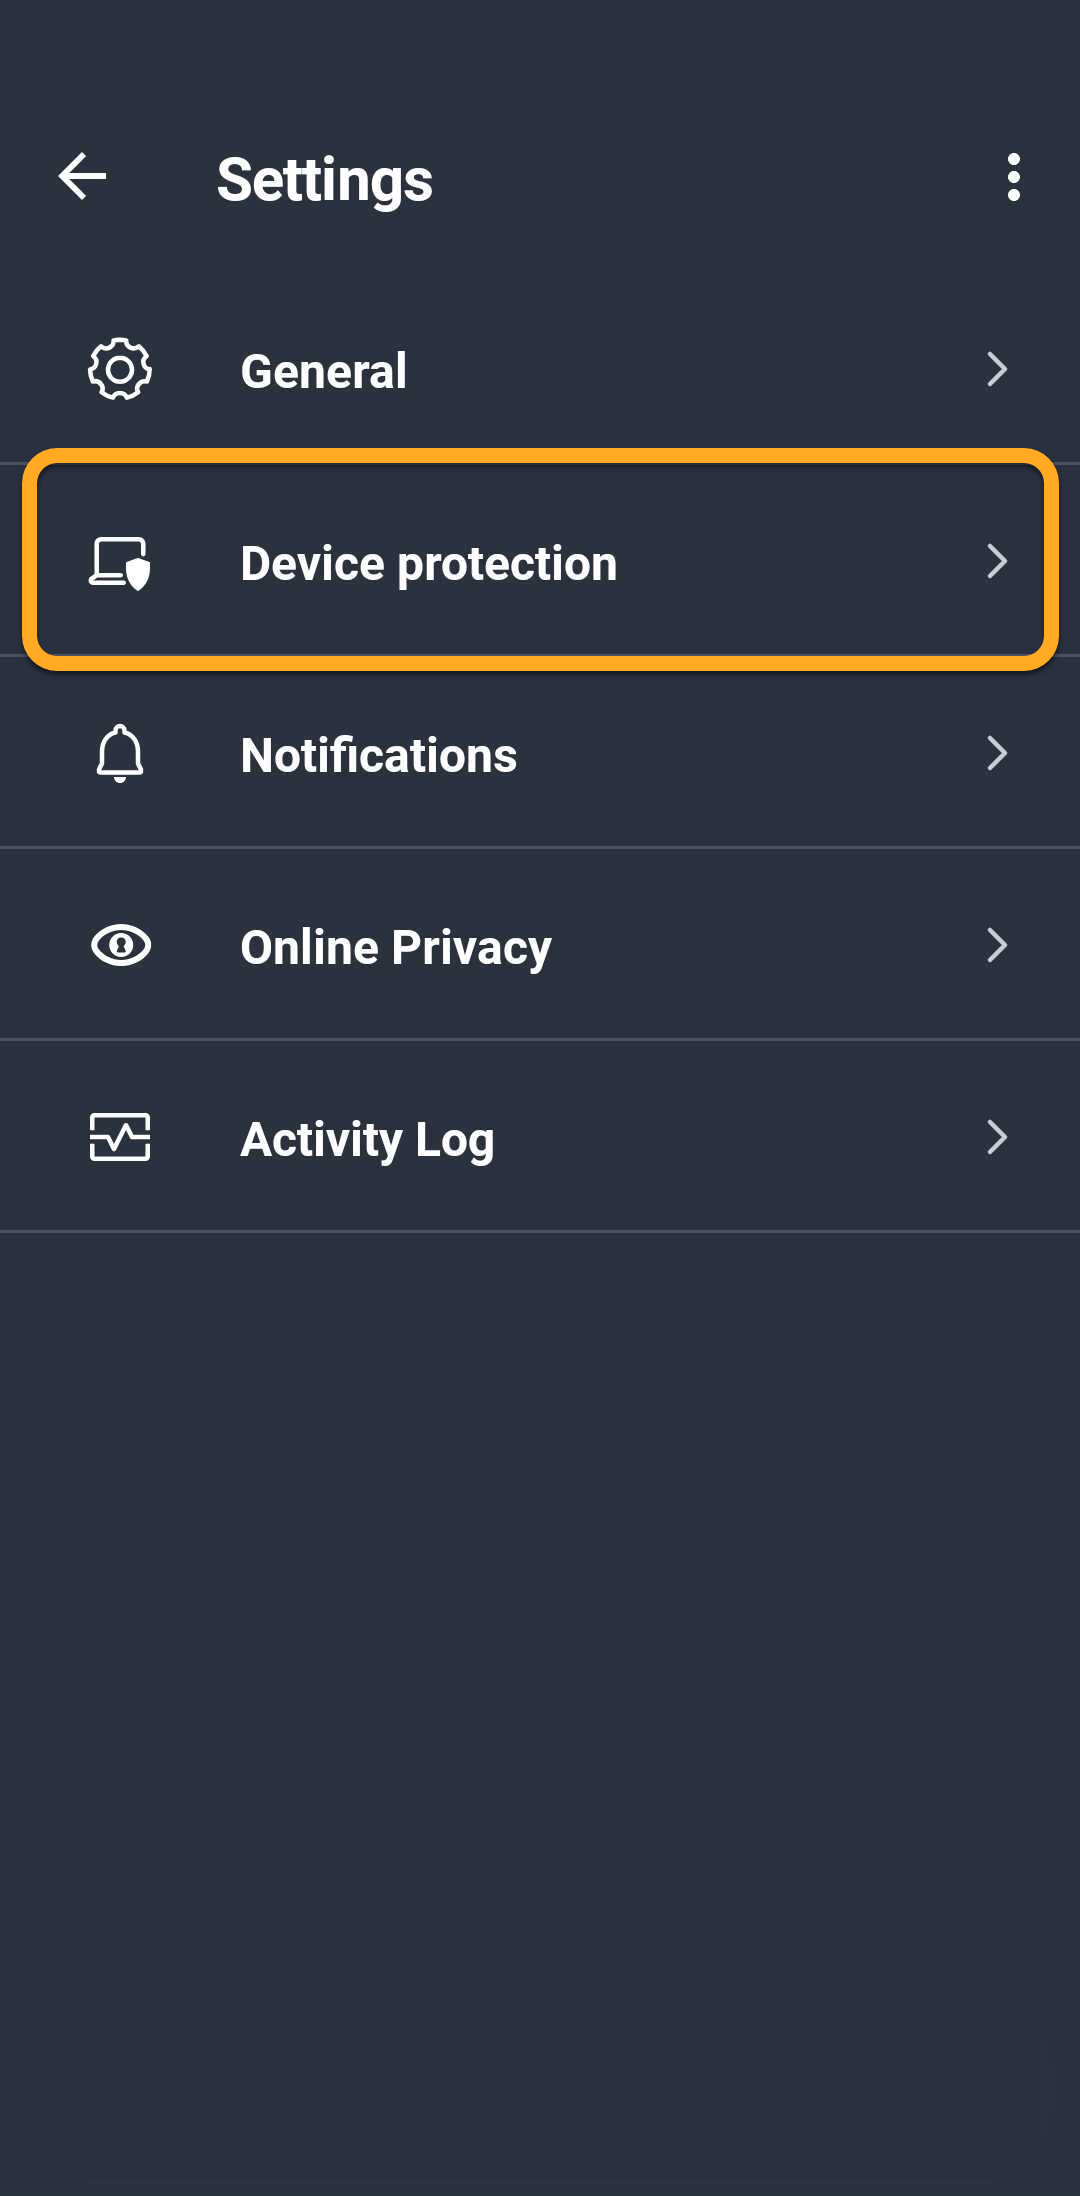
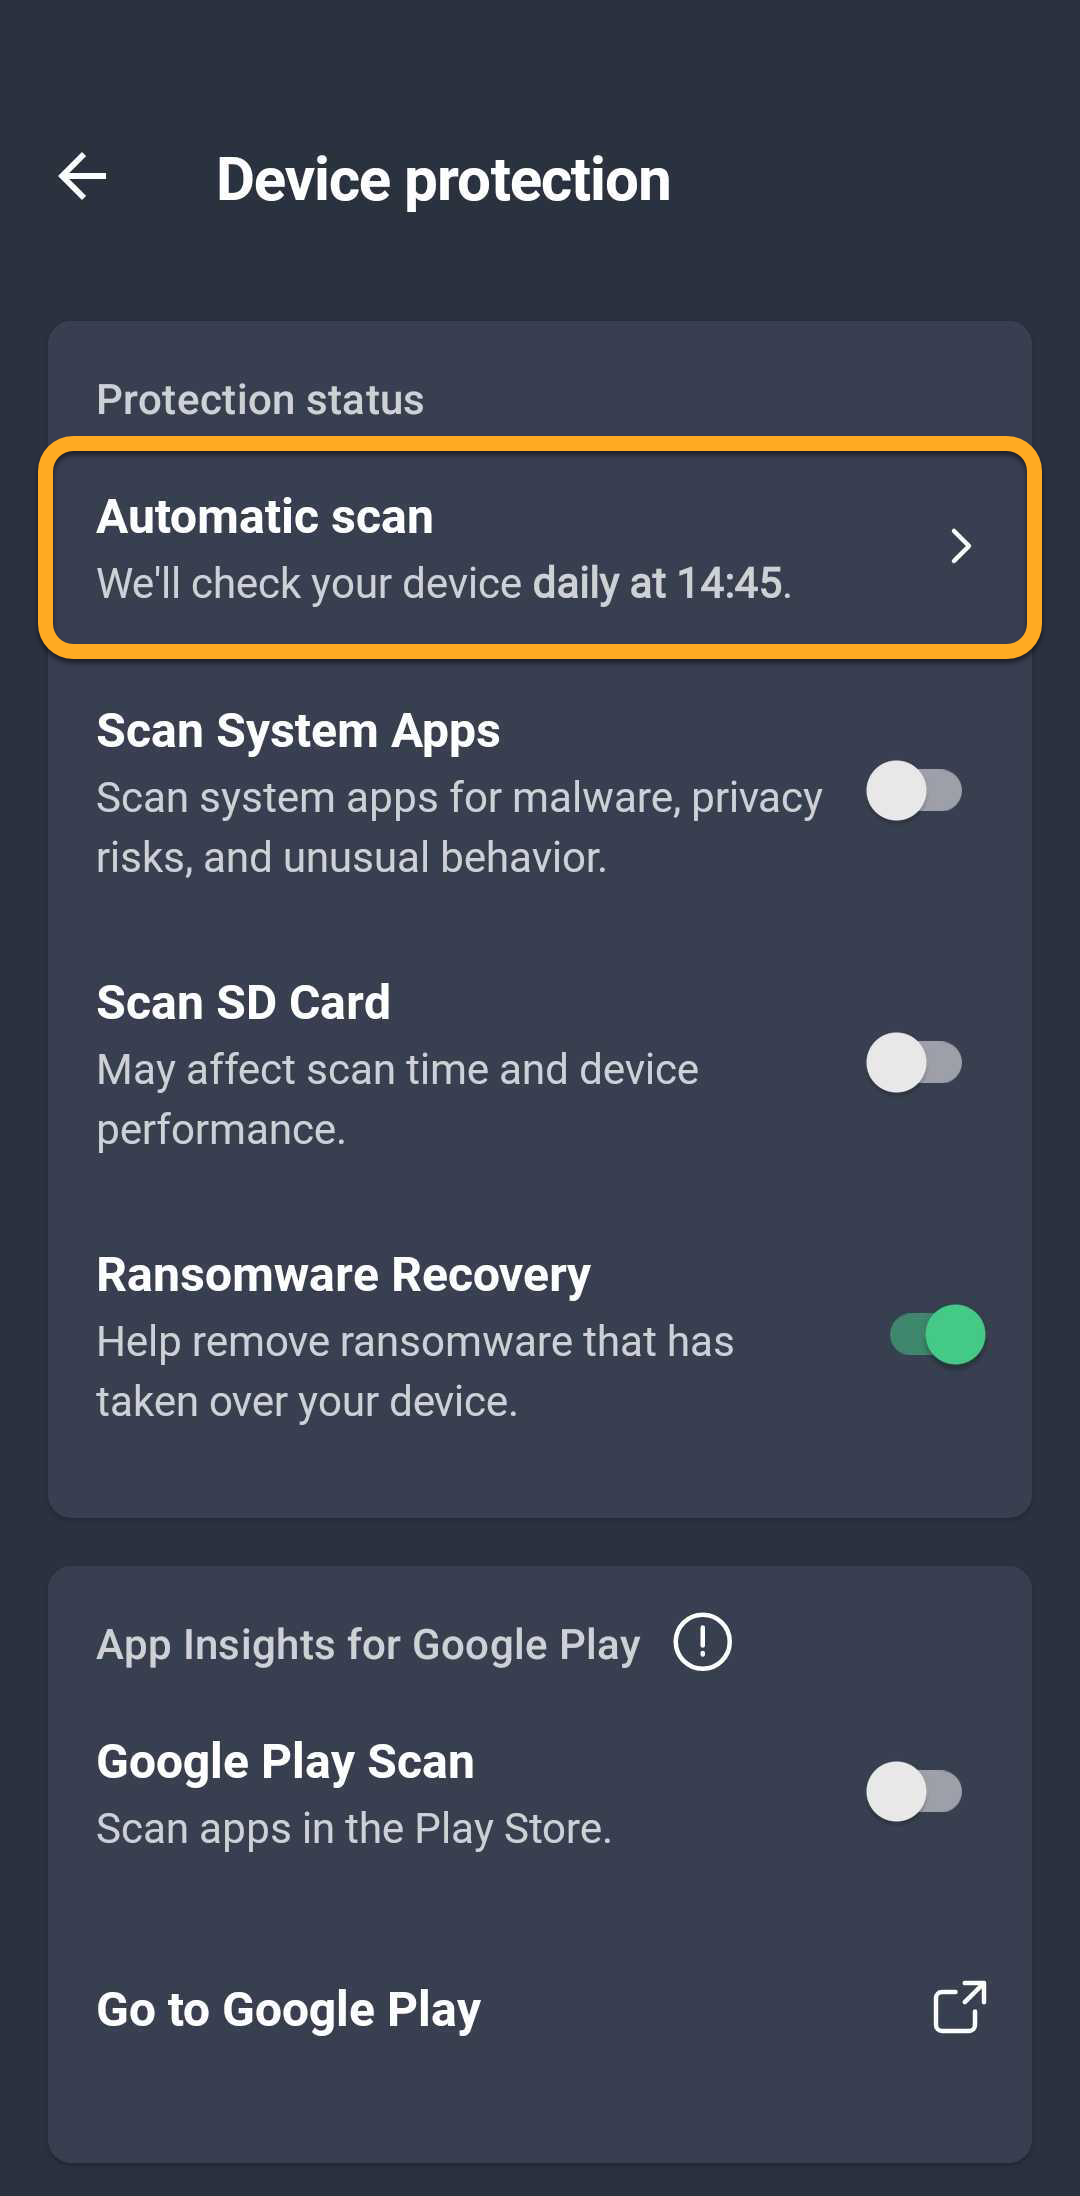
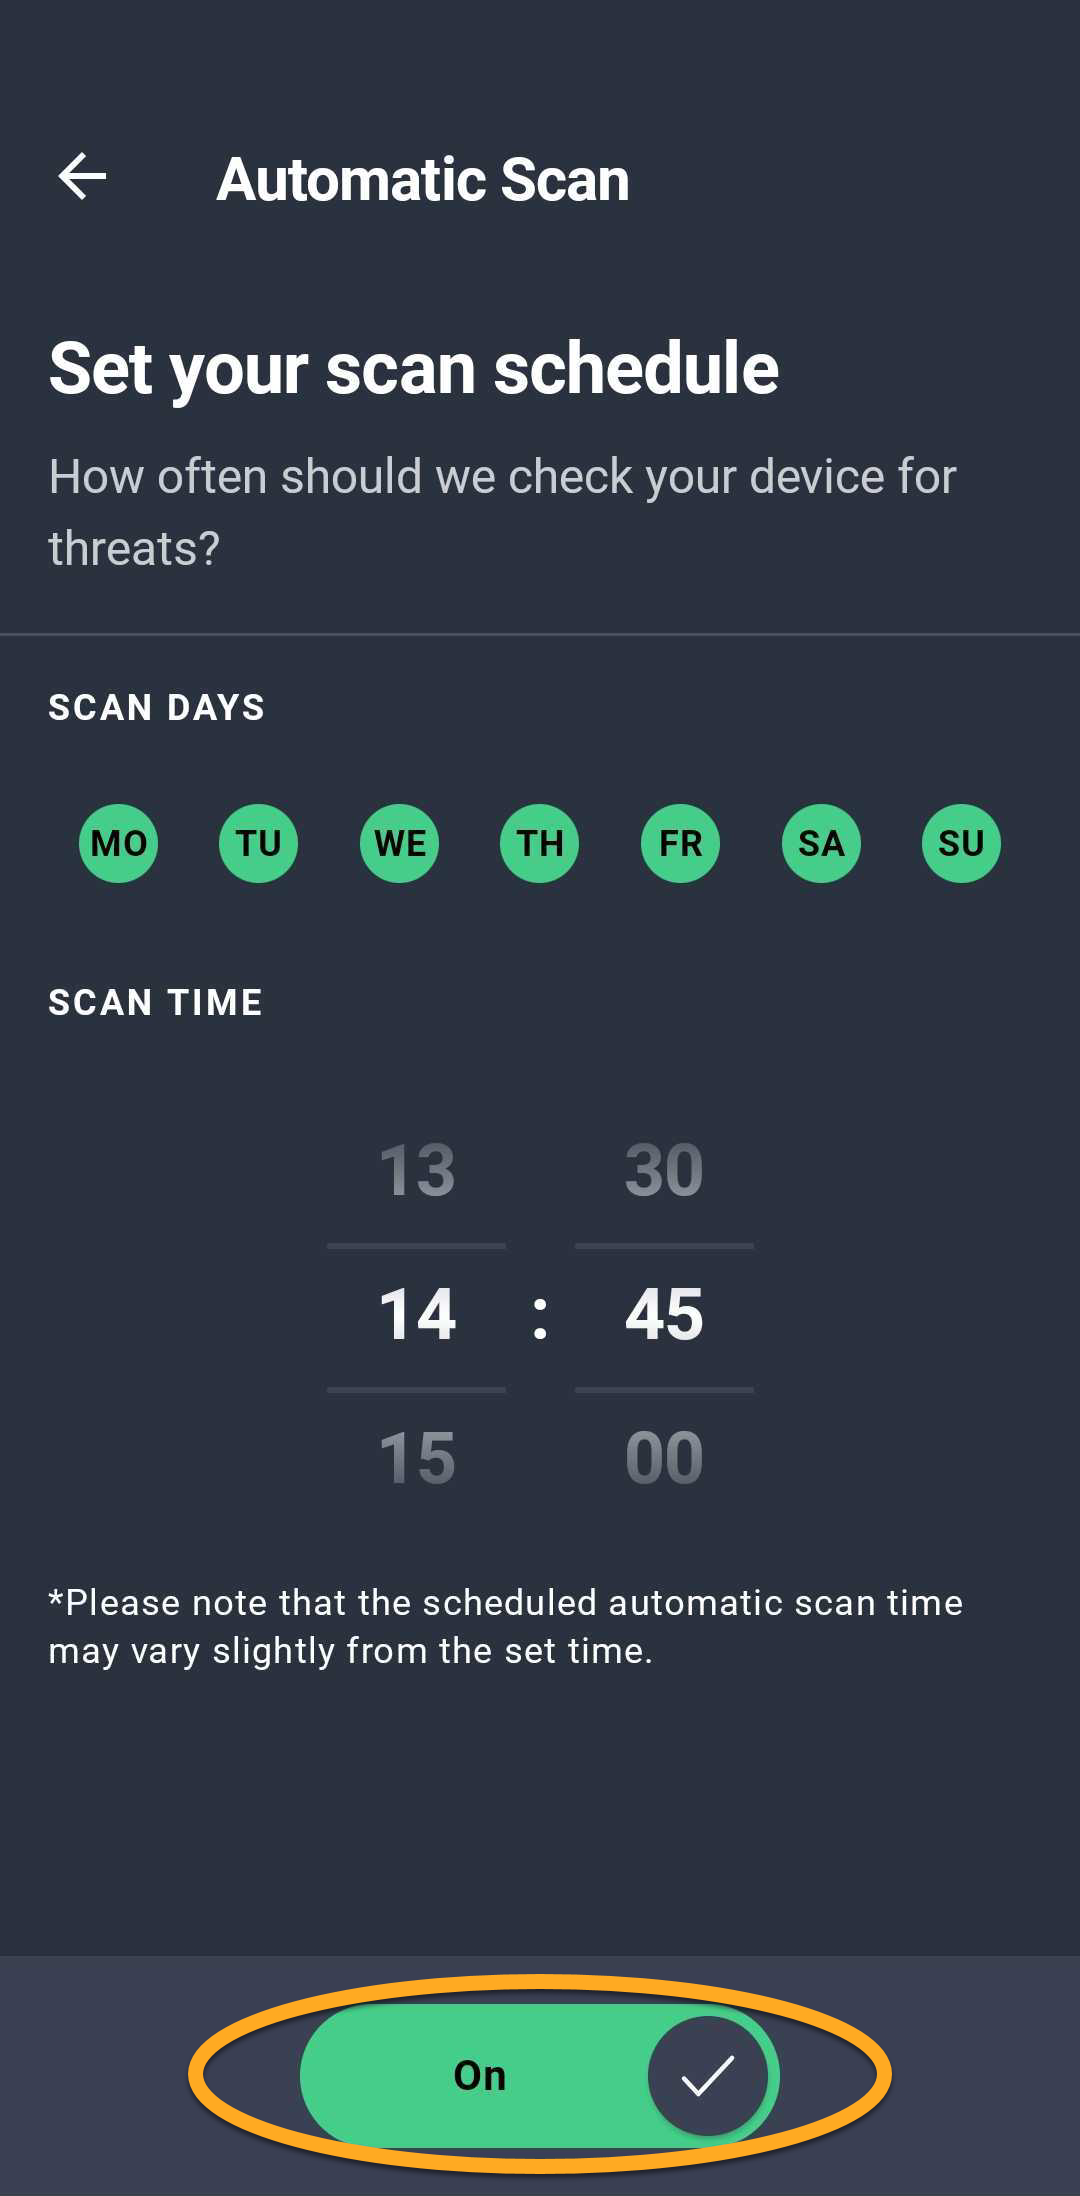
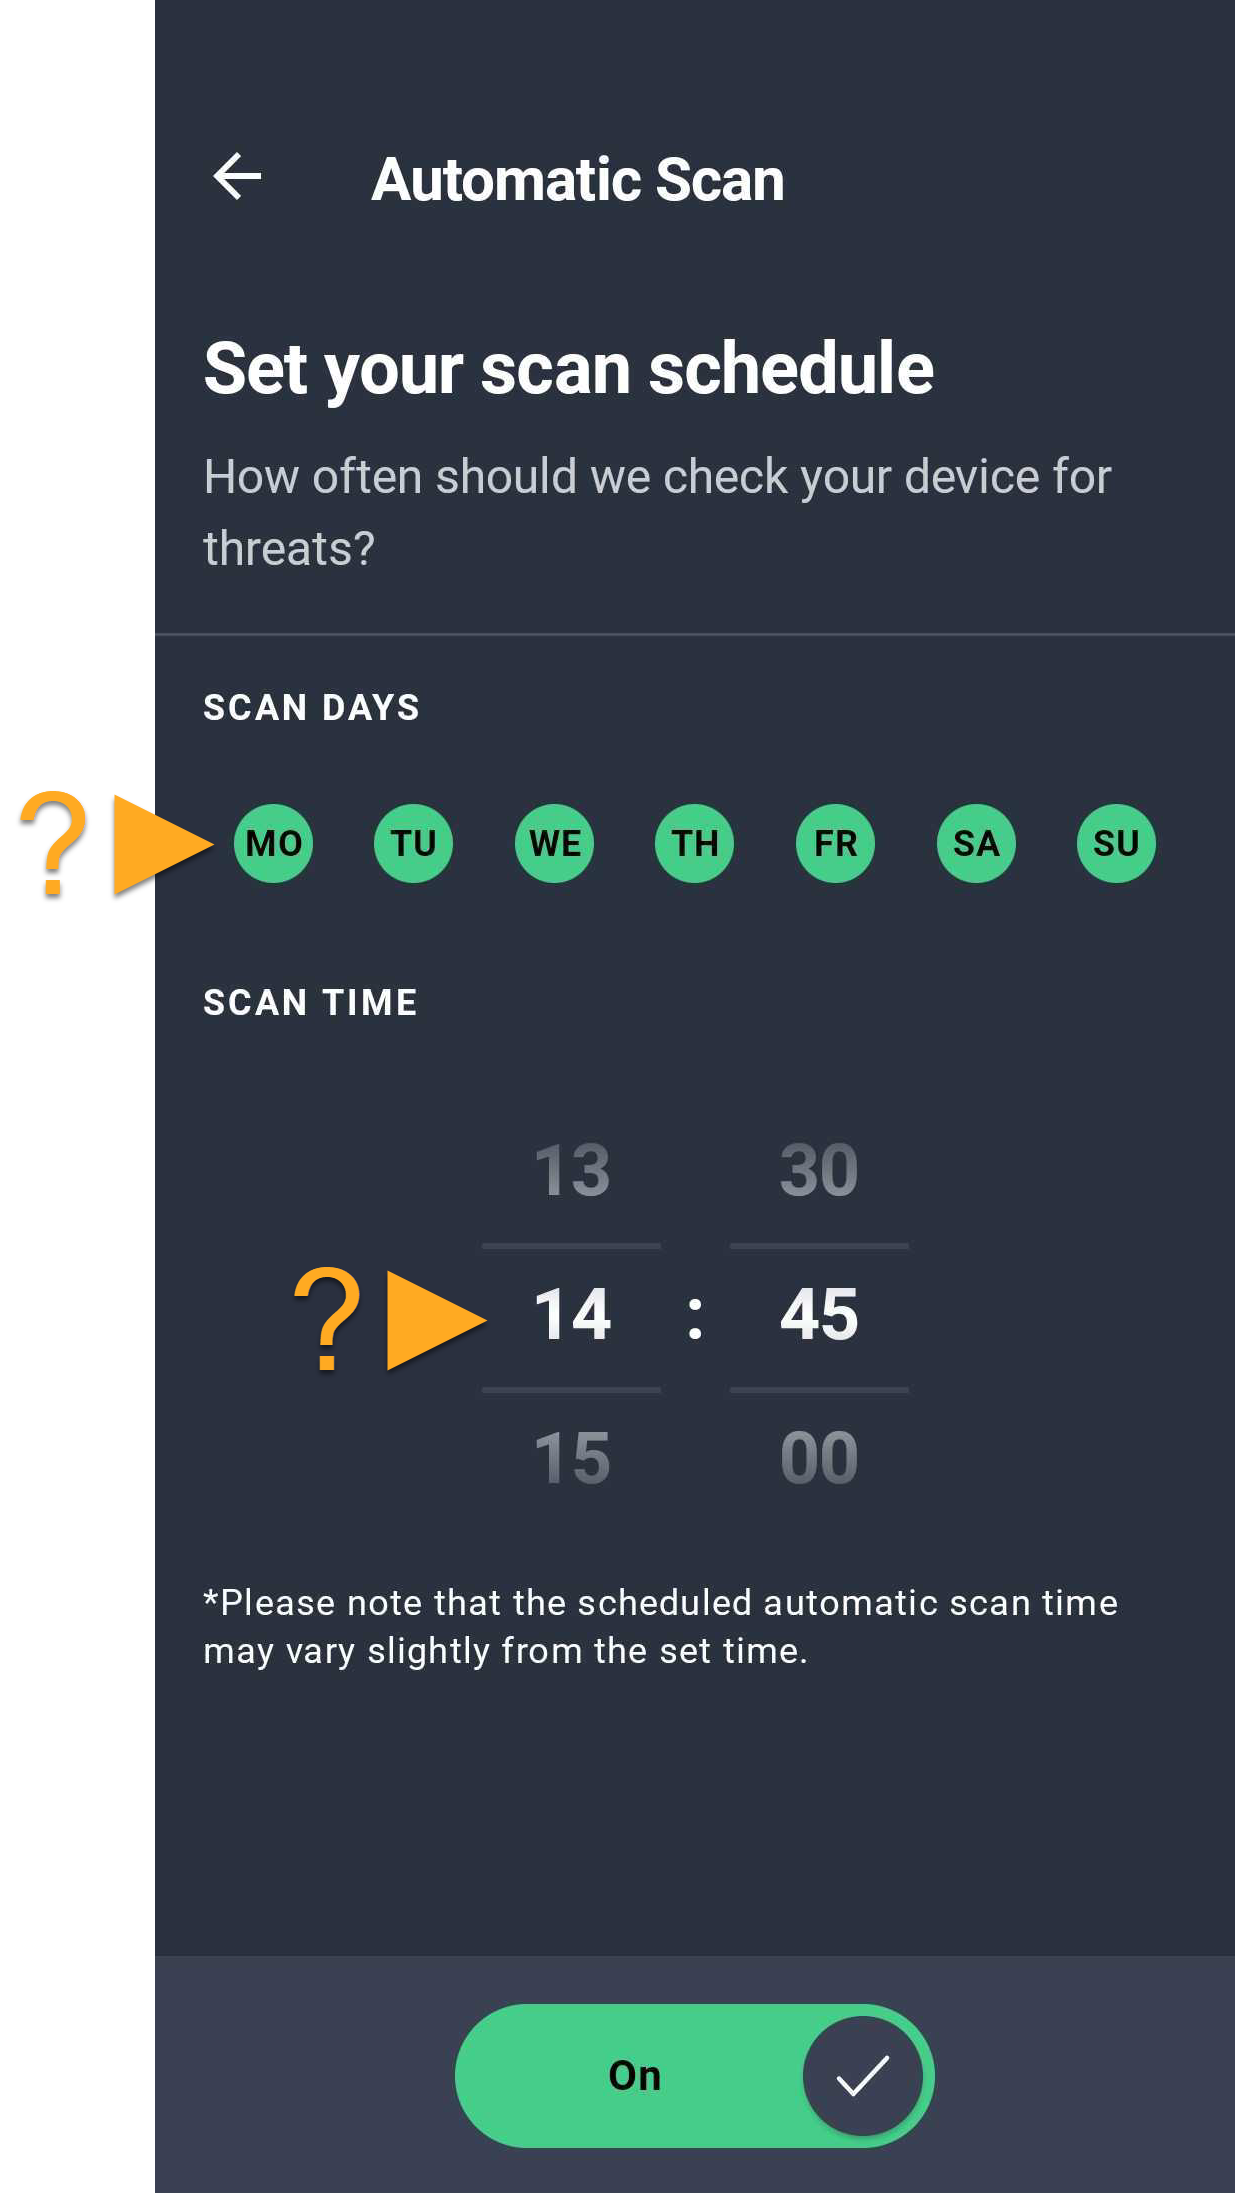
Scheduled scans run automatically as configured.
Use Scam Guardian Pro
Scam Guardian Pro is one of the main feature of AVG AntiVirus. It provides users with the following tools to recognize and avoid online threats, improving digital security:
- Web Guard: This tool scans internet activity in real time to prevent malware from downloading onto devices and help you avoid suspicious websites.
- SMS Guard: A scam protection tool that scans text messages in your default messaging app to help detect potentially risky links or scam content.
- Call Guard: Automatically blocks suspicious and scam calls, and helps you identify whether incoming calls are from trusted contacts, businesses, or potentially risky sources.
- Link Guard: This features scans links you access from outside your browser, such as links from emails or messages, and warns you if they are dangerous before opening them in your default browser.
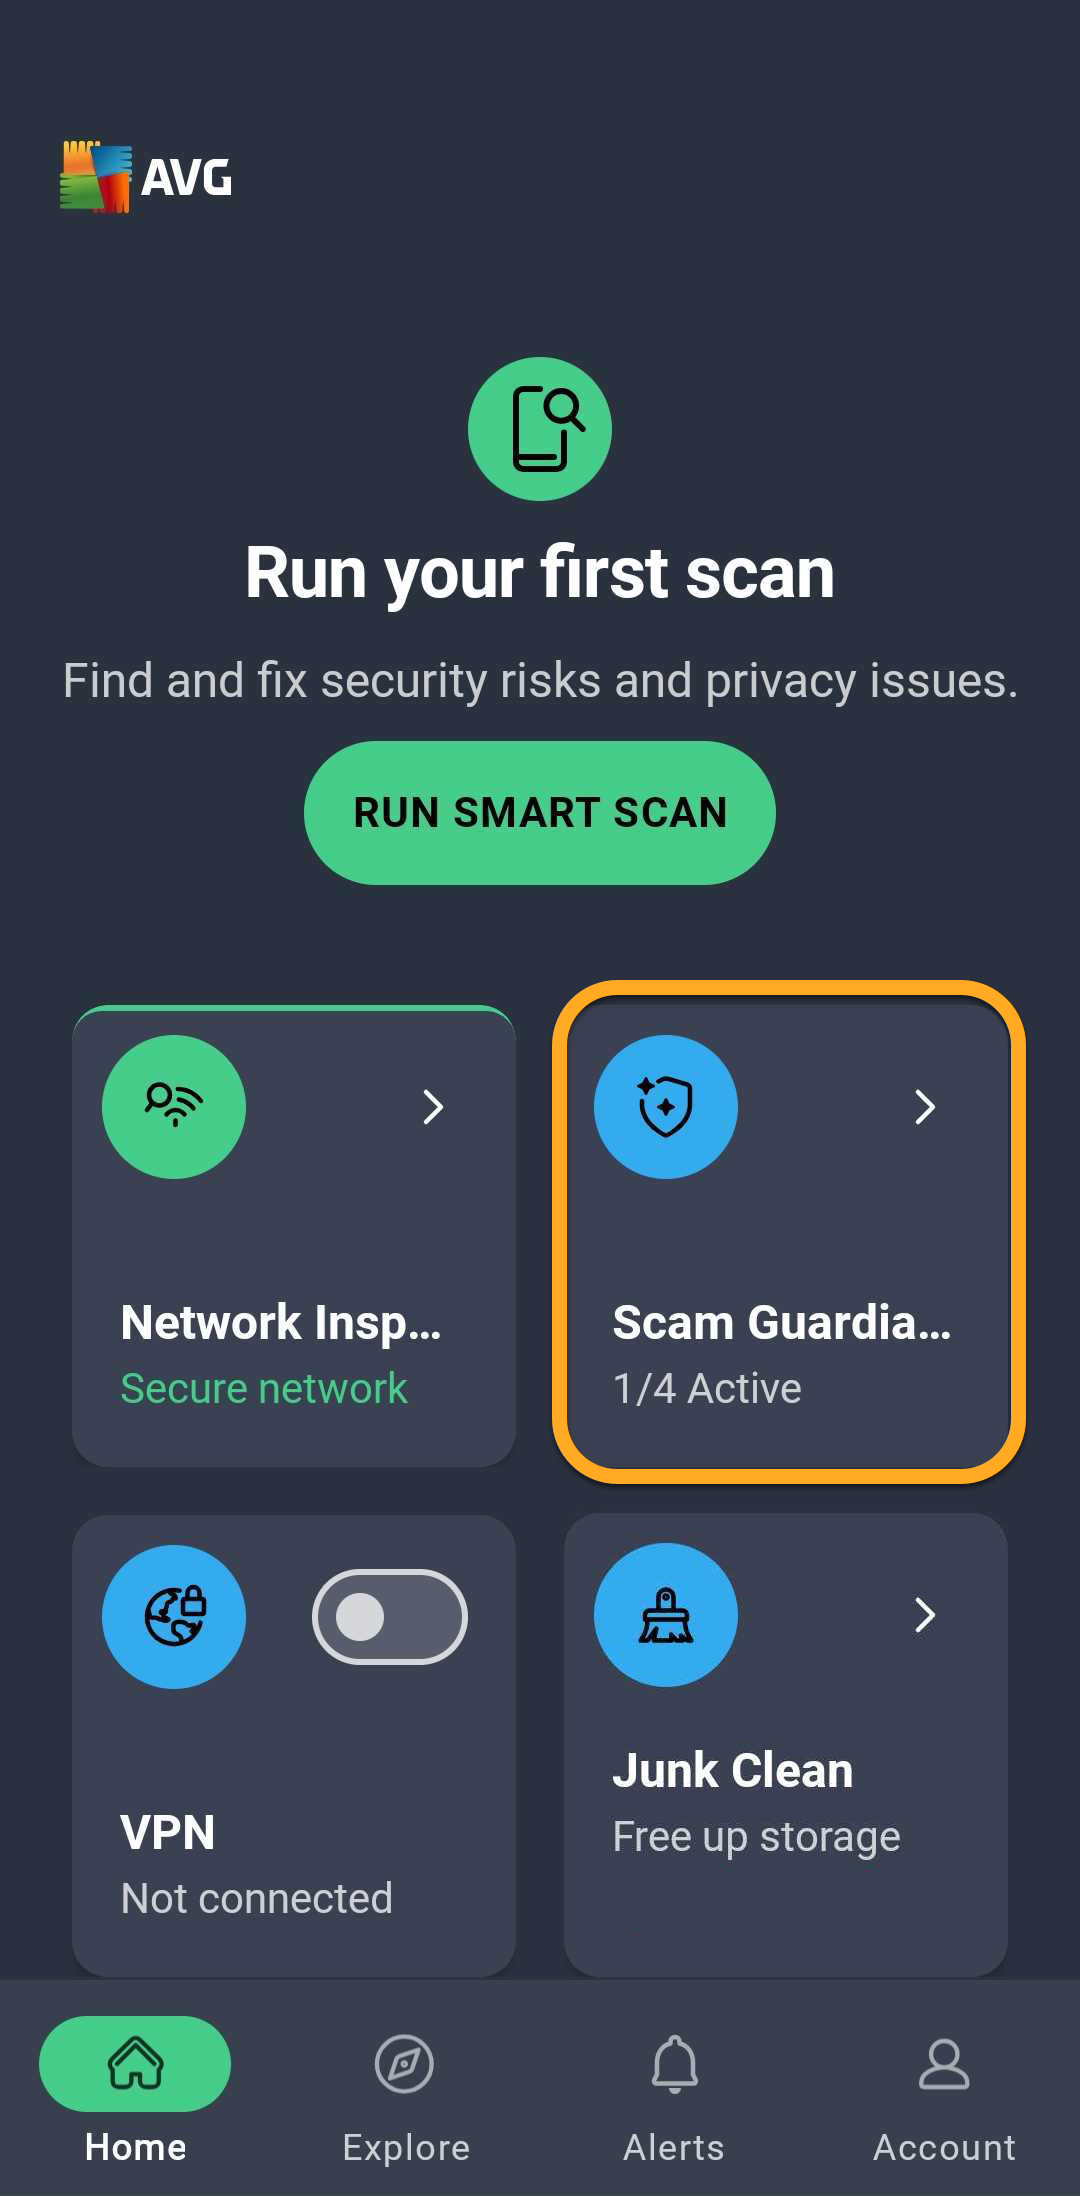
To learn about how to set up and use these features, refer to the following article: AVG AntiVirus for Android - Scam Guardian Pro.
Enable VPN Secure Connection
- AVG Ultimate for Android
- AVG Ultimate Multi-Device
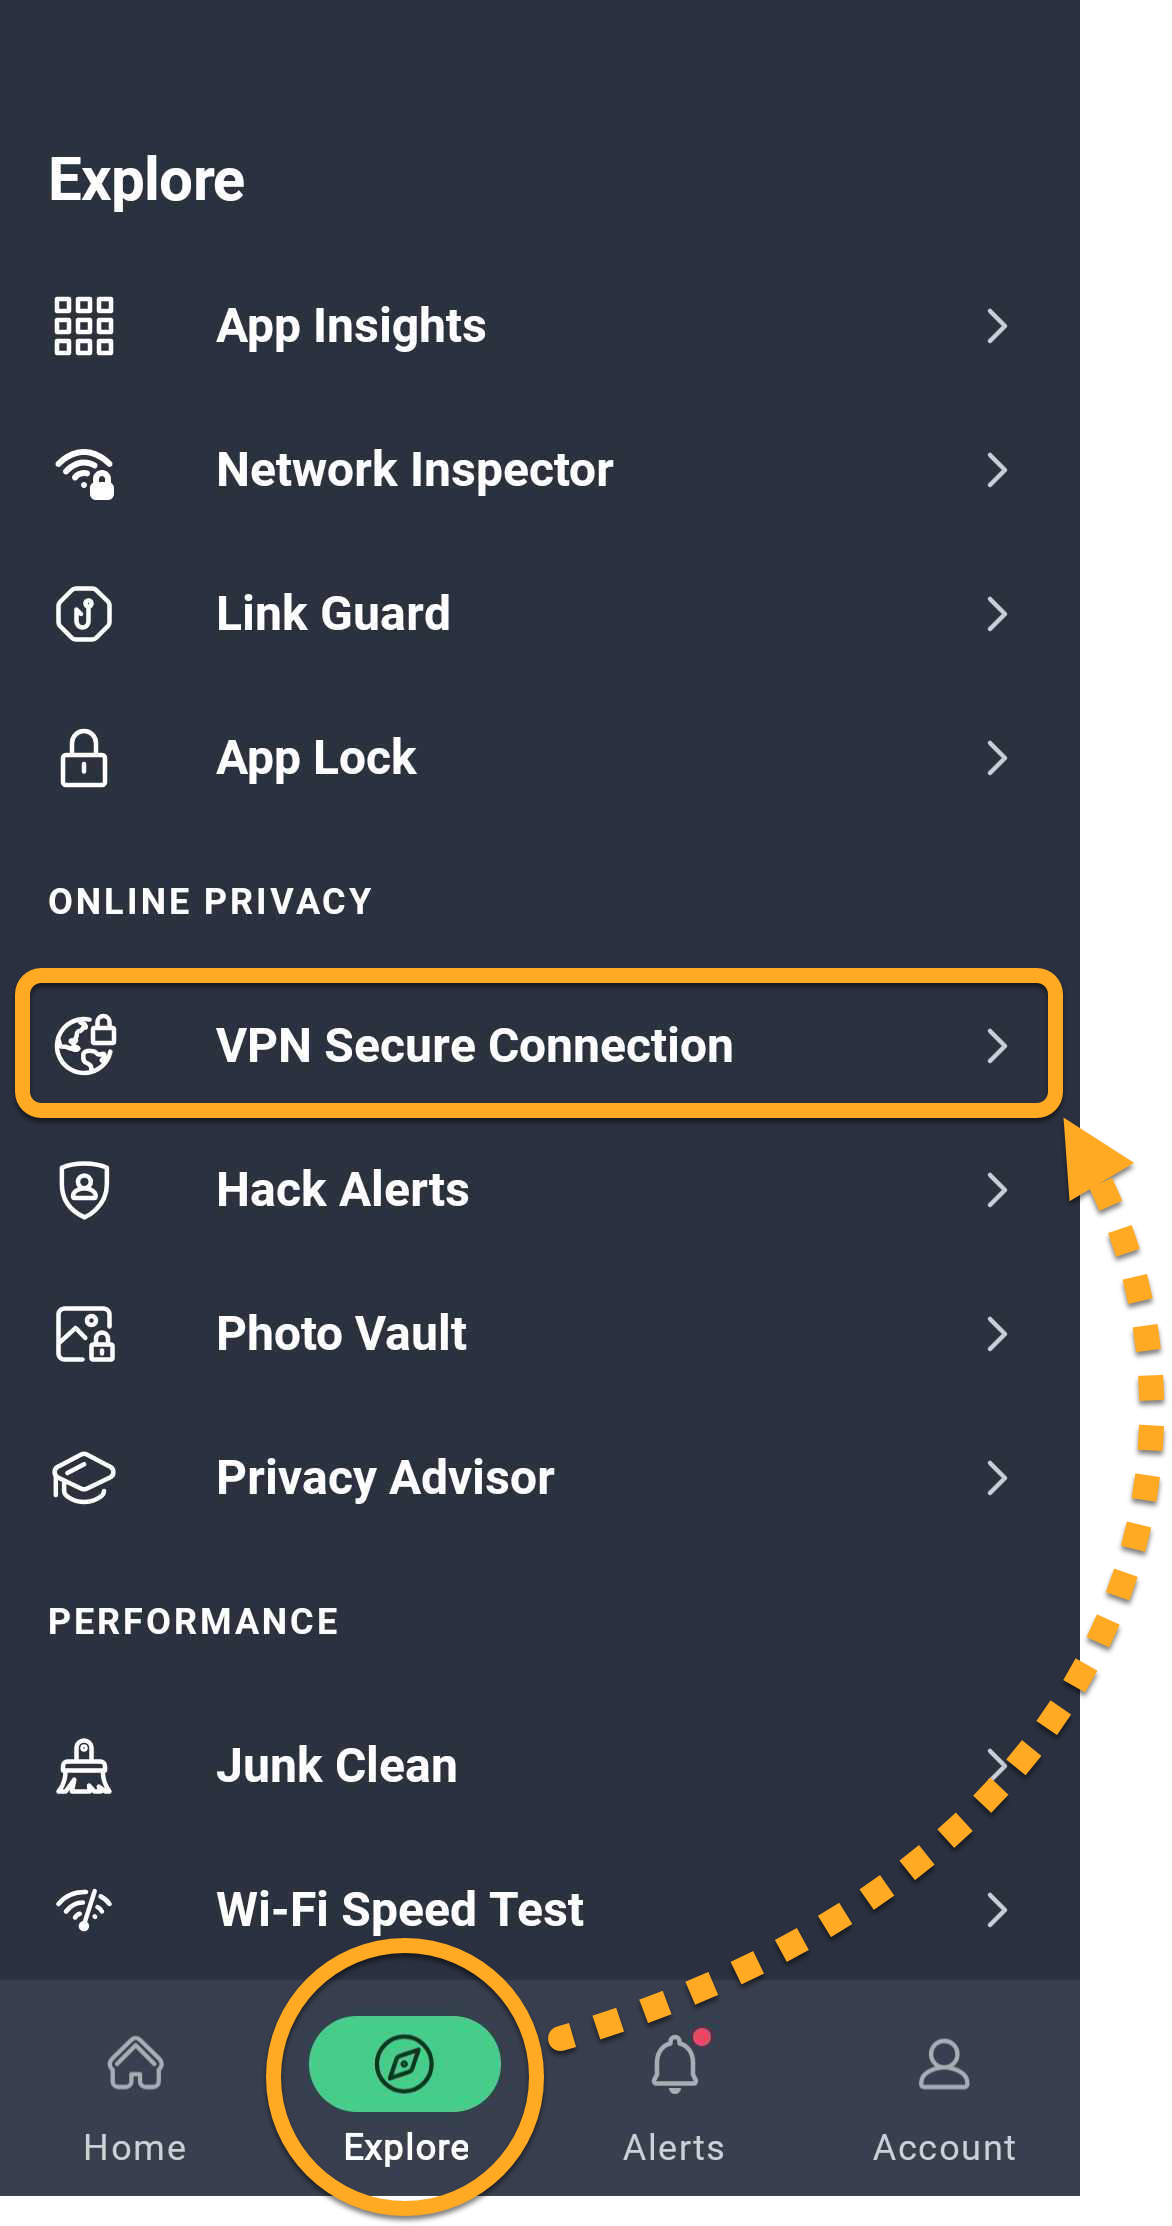
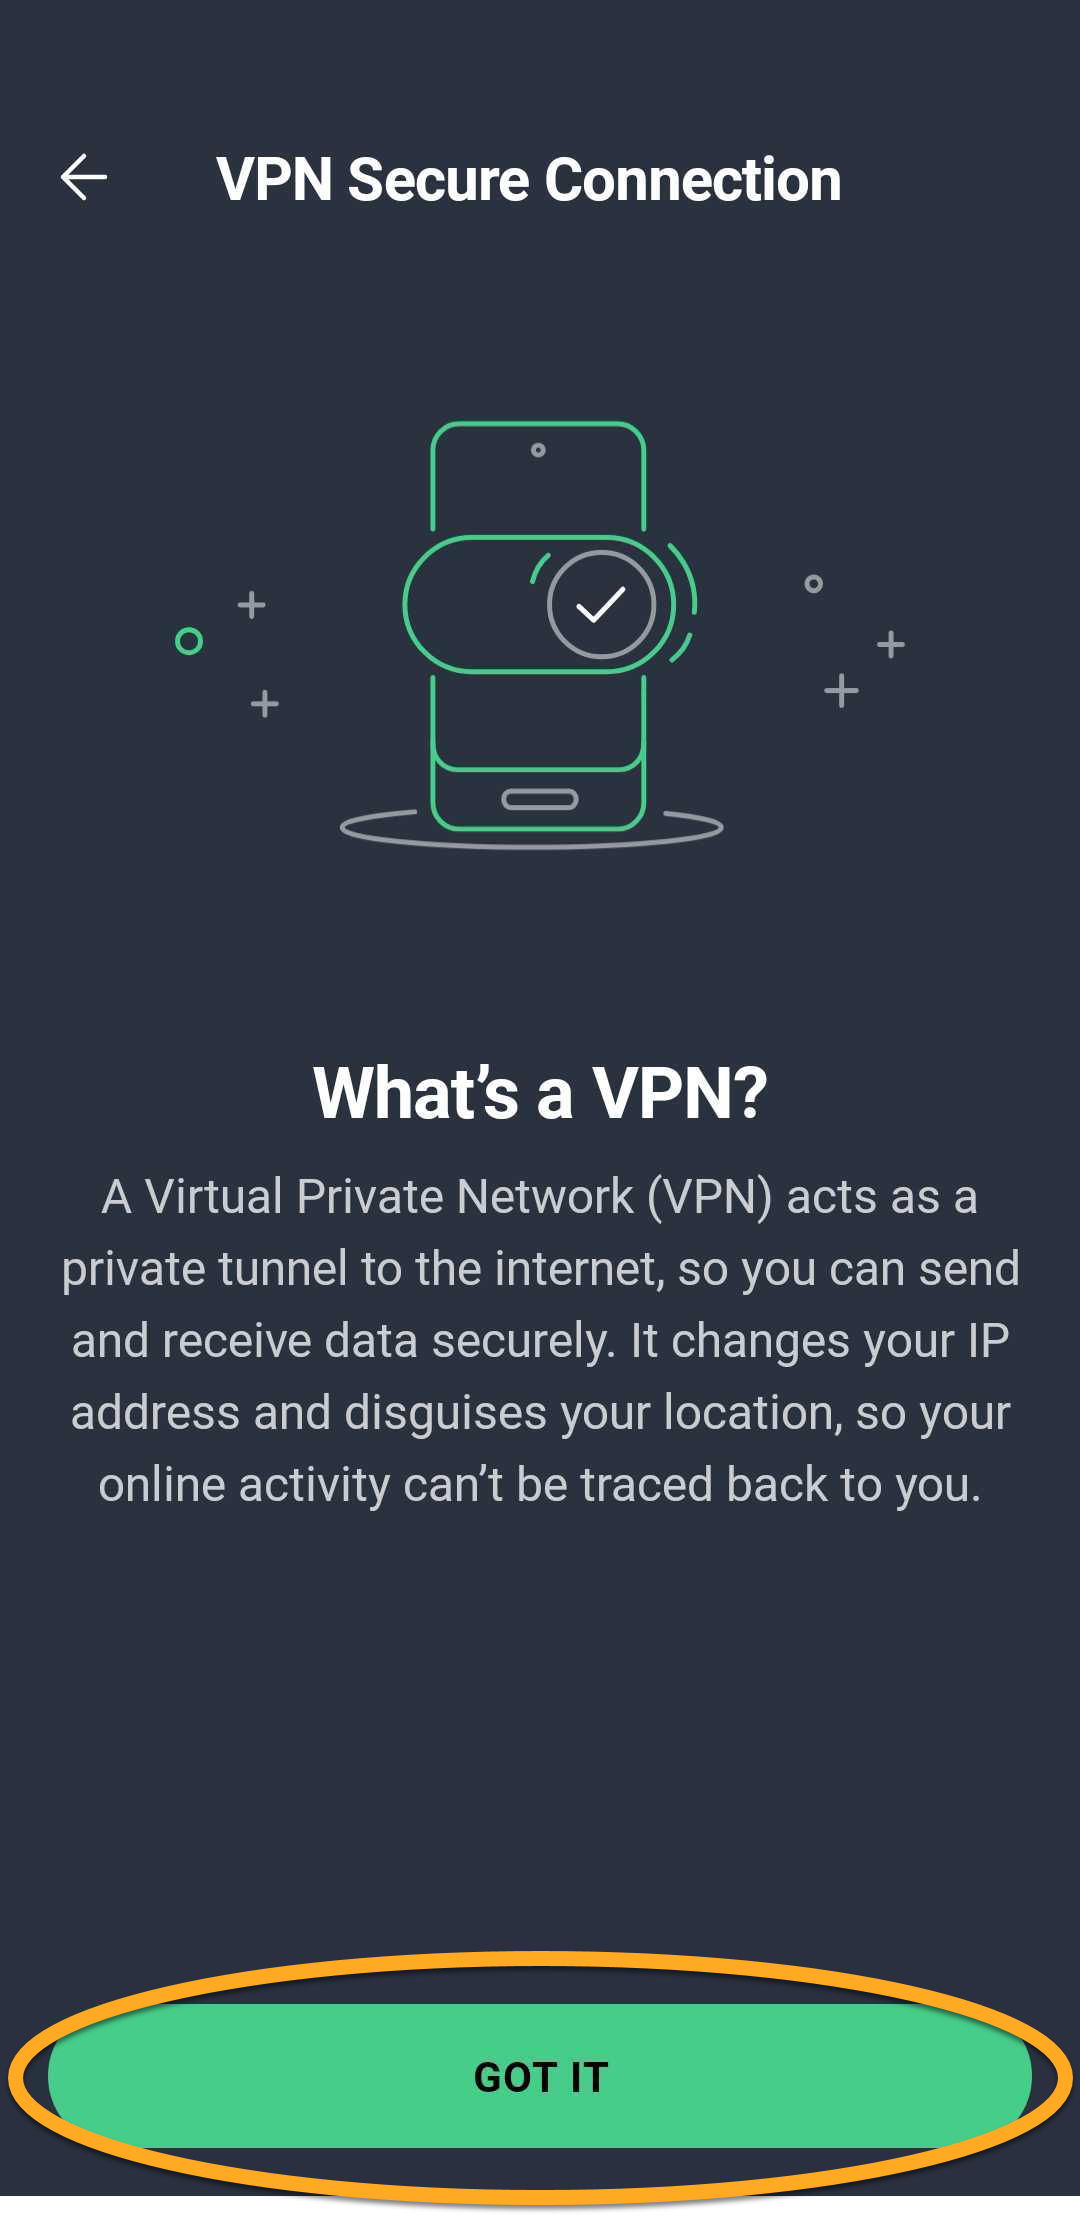
VPN Secure Connection uses Virtual Private Network (VPN) technology to create an encrypted, private connection, helping protect the data you send and receive over the internet and keeping your online activity private. To activate VPN Secure Connection:
- Open AVG AntiVirus and tap Explore ▸ VPN Secure Connection.
- Tap Got it.
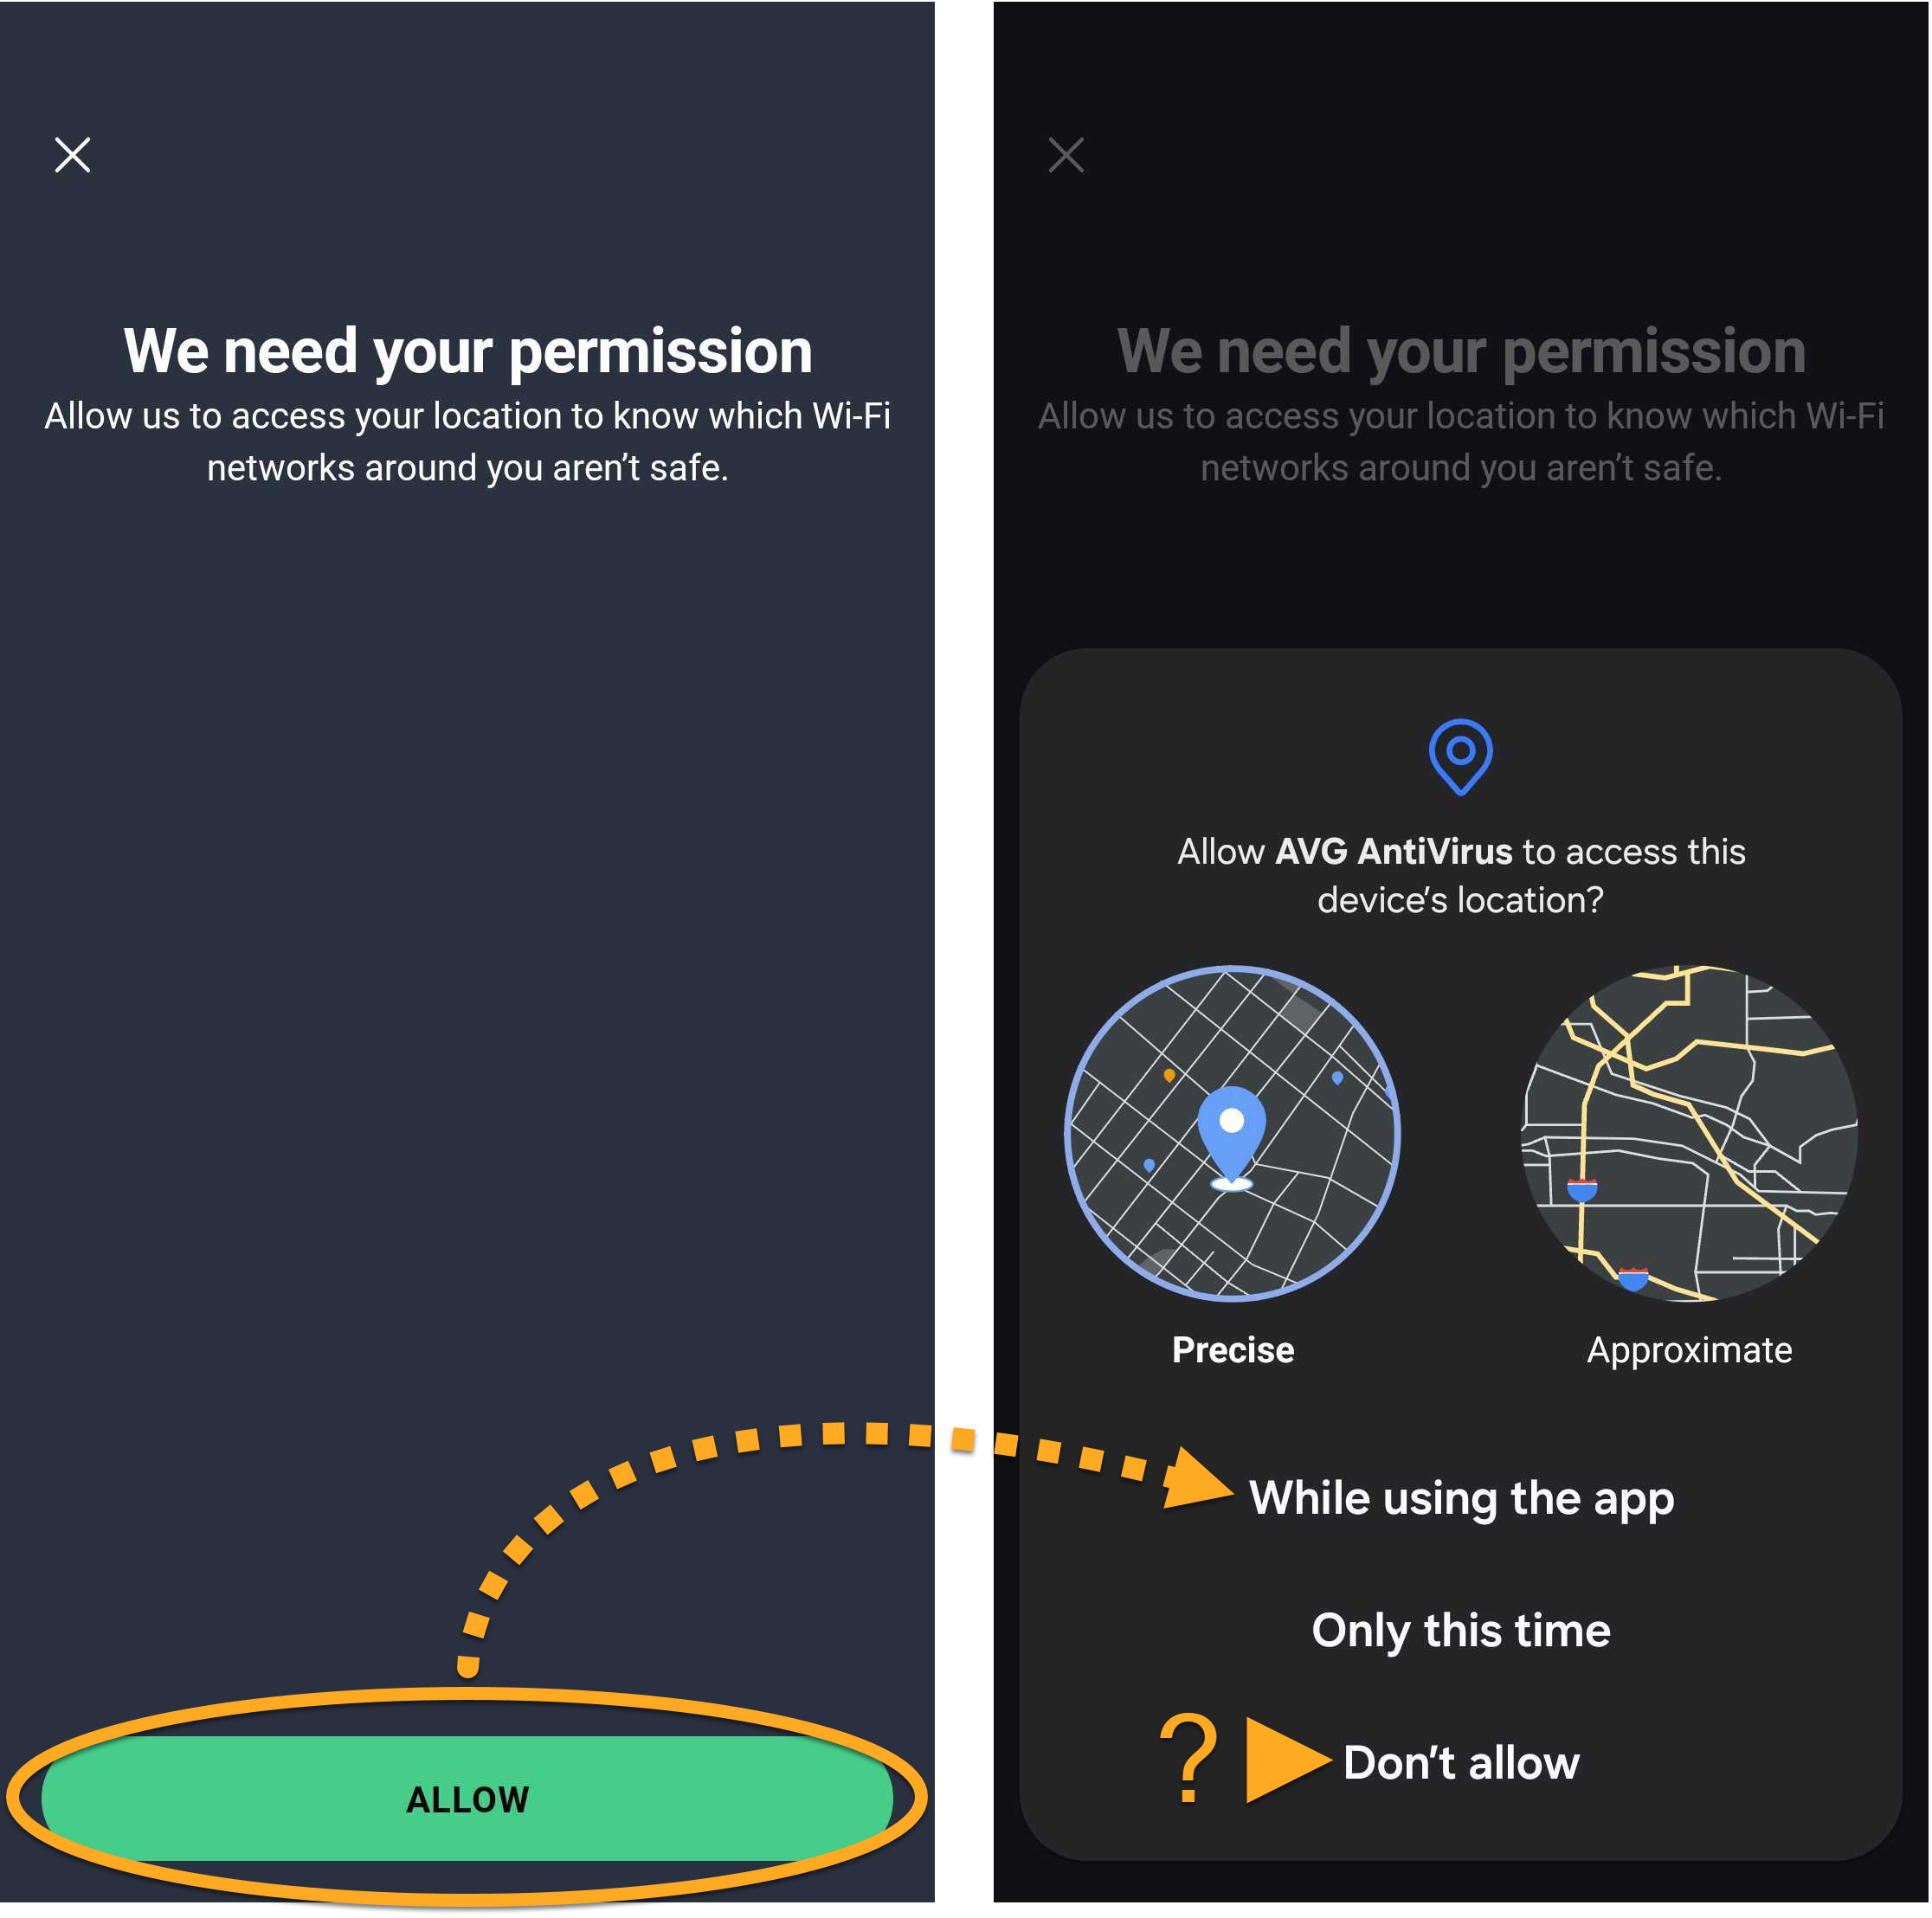
- Tap Allow, then tap Allow again to grant AVG AntiVirus access to your location to know which Wi-Fi networks around you are not safe. Optionally, tap Don't allow.
- Tap the red (OFF) slider so that it changes to green (ON). If prompted, tap OK to give AVG AntiVirus permission to set up a VPN connection.
 Explore ▸ VPN Secure Connection.
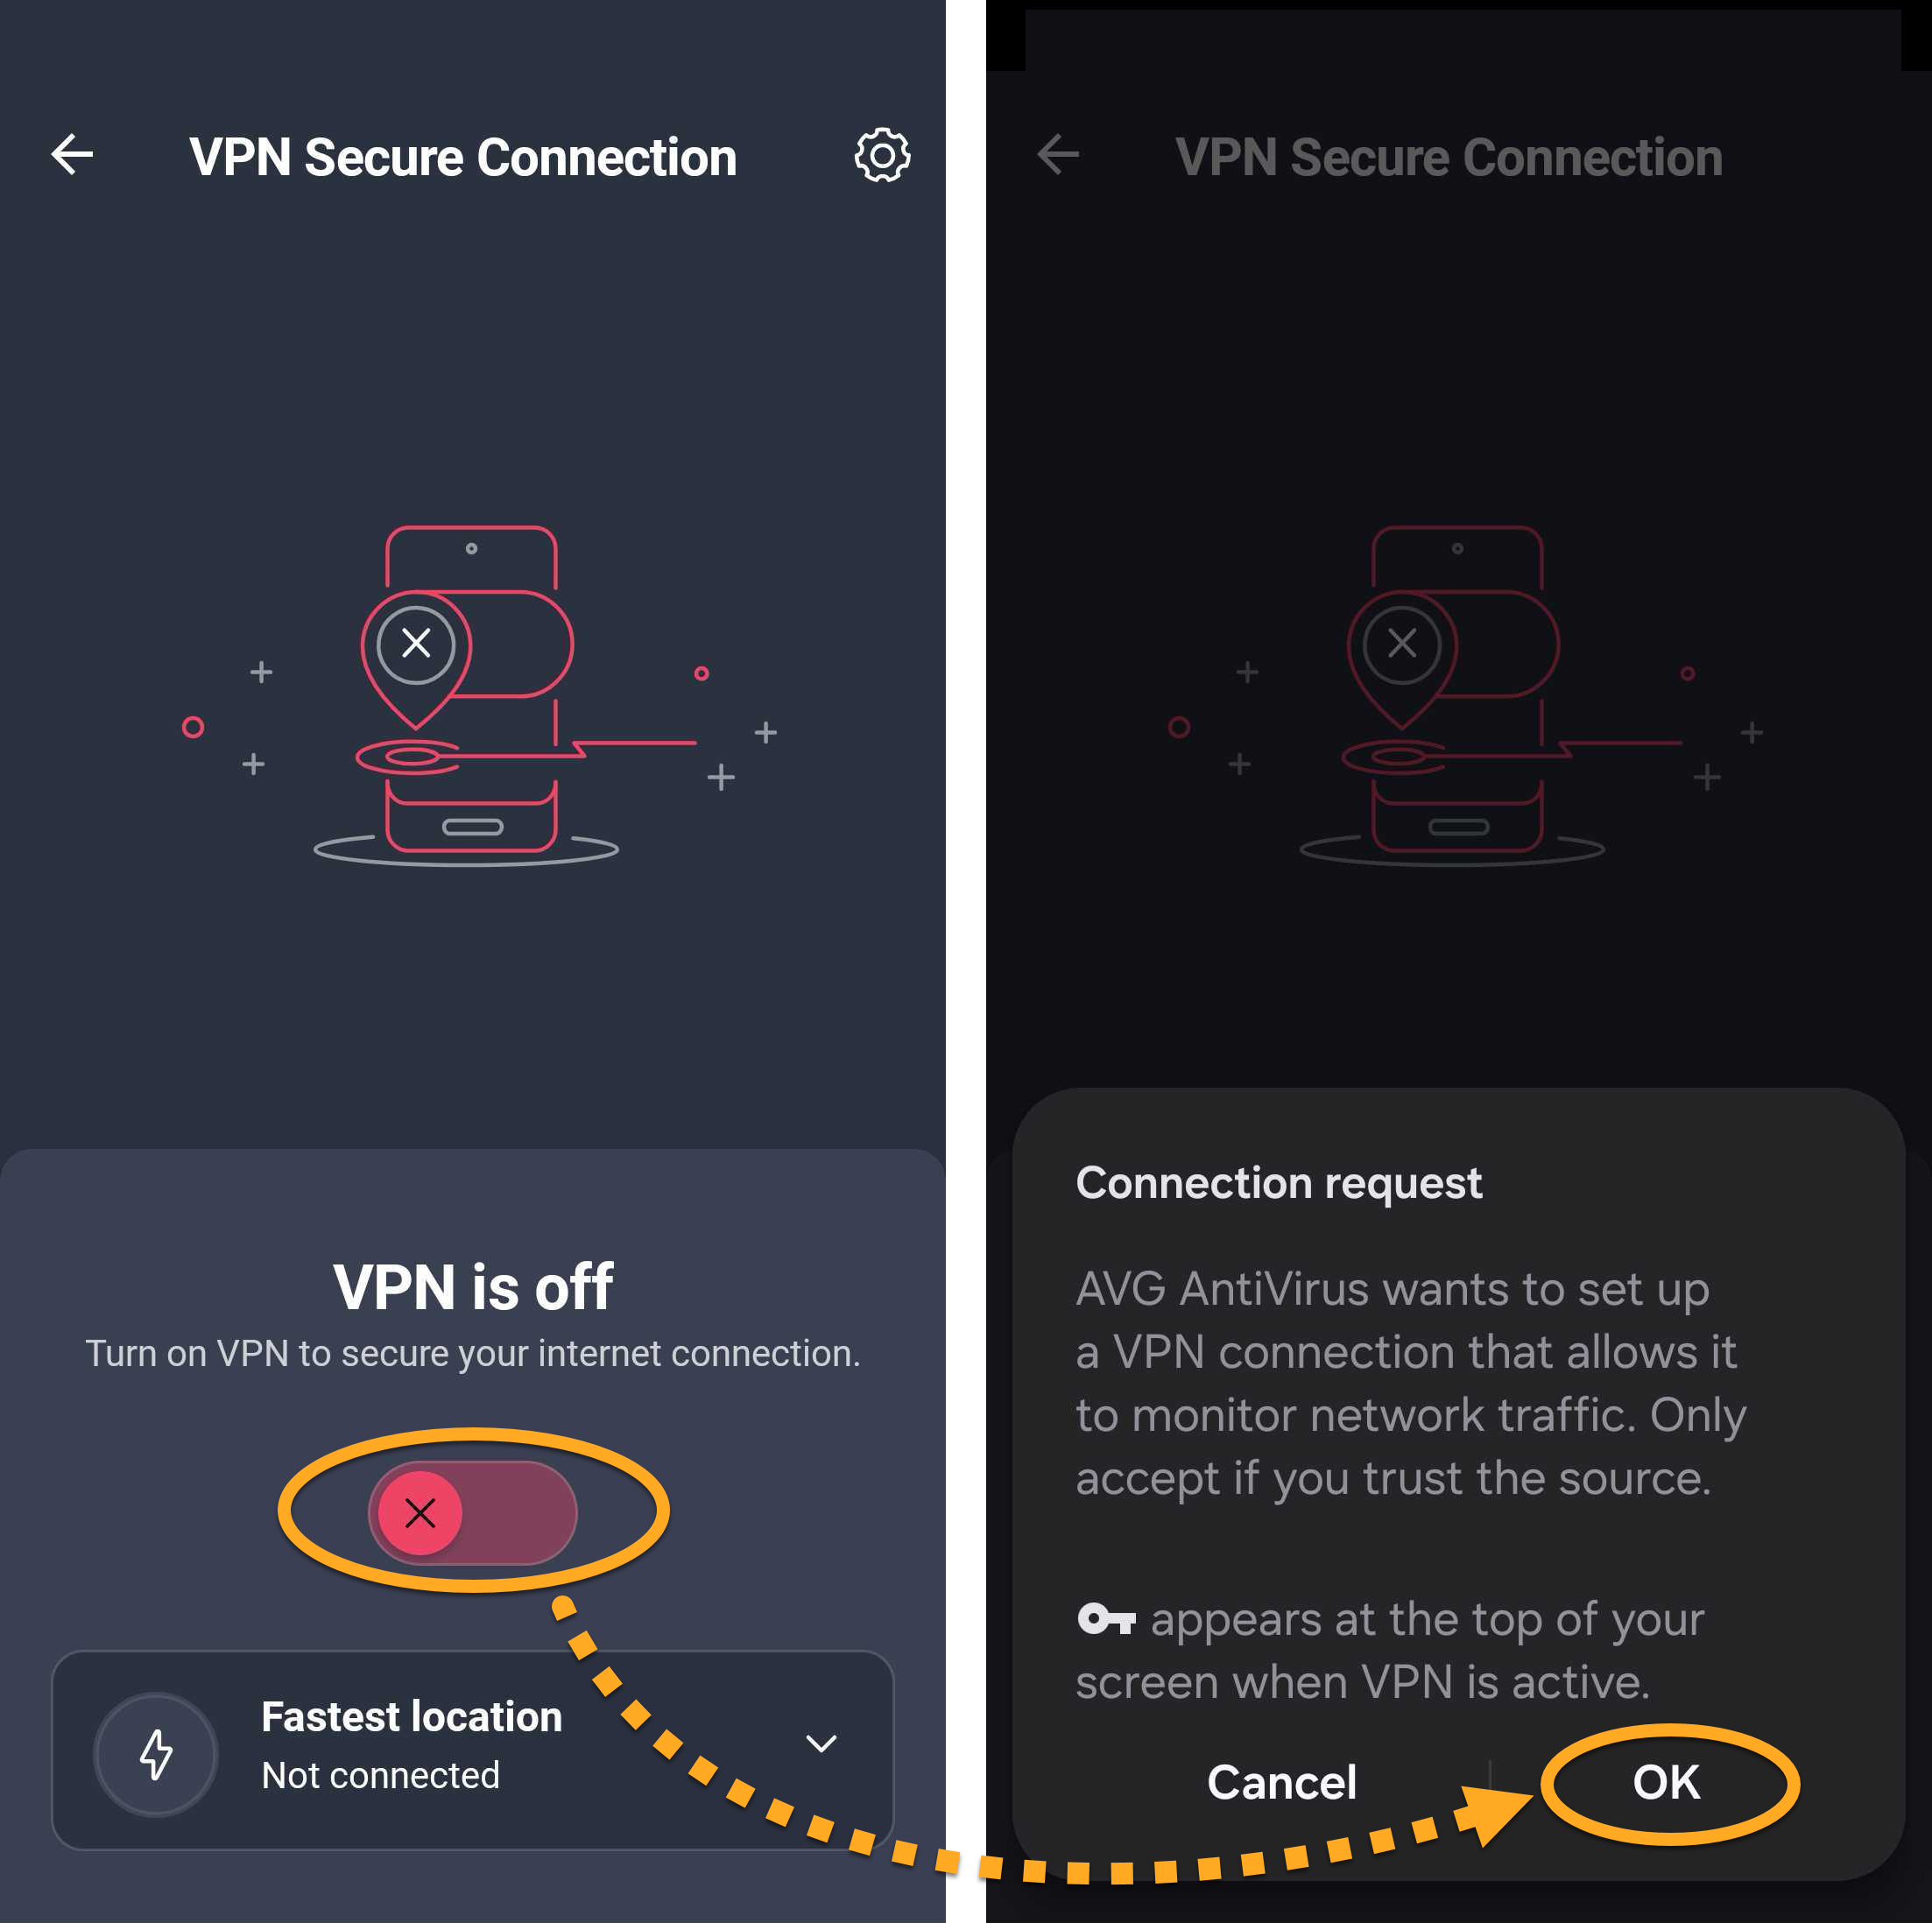
VPN Secure Connection is now active.
Connect to another server
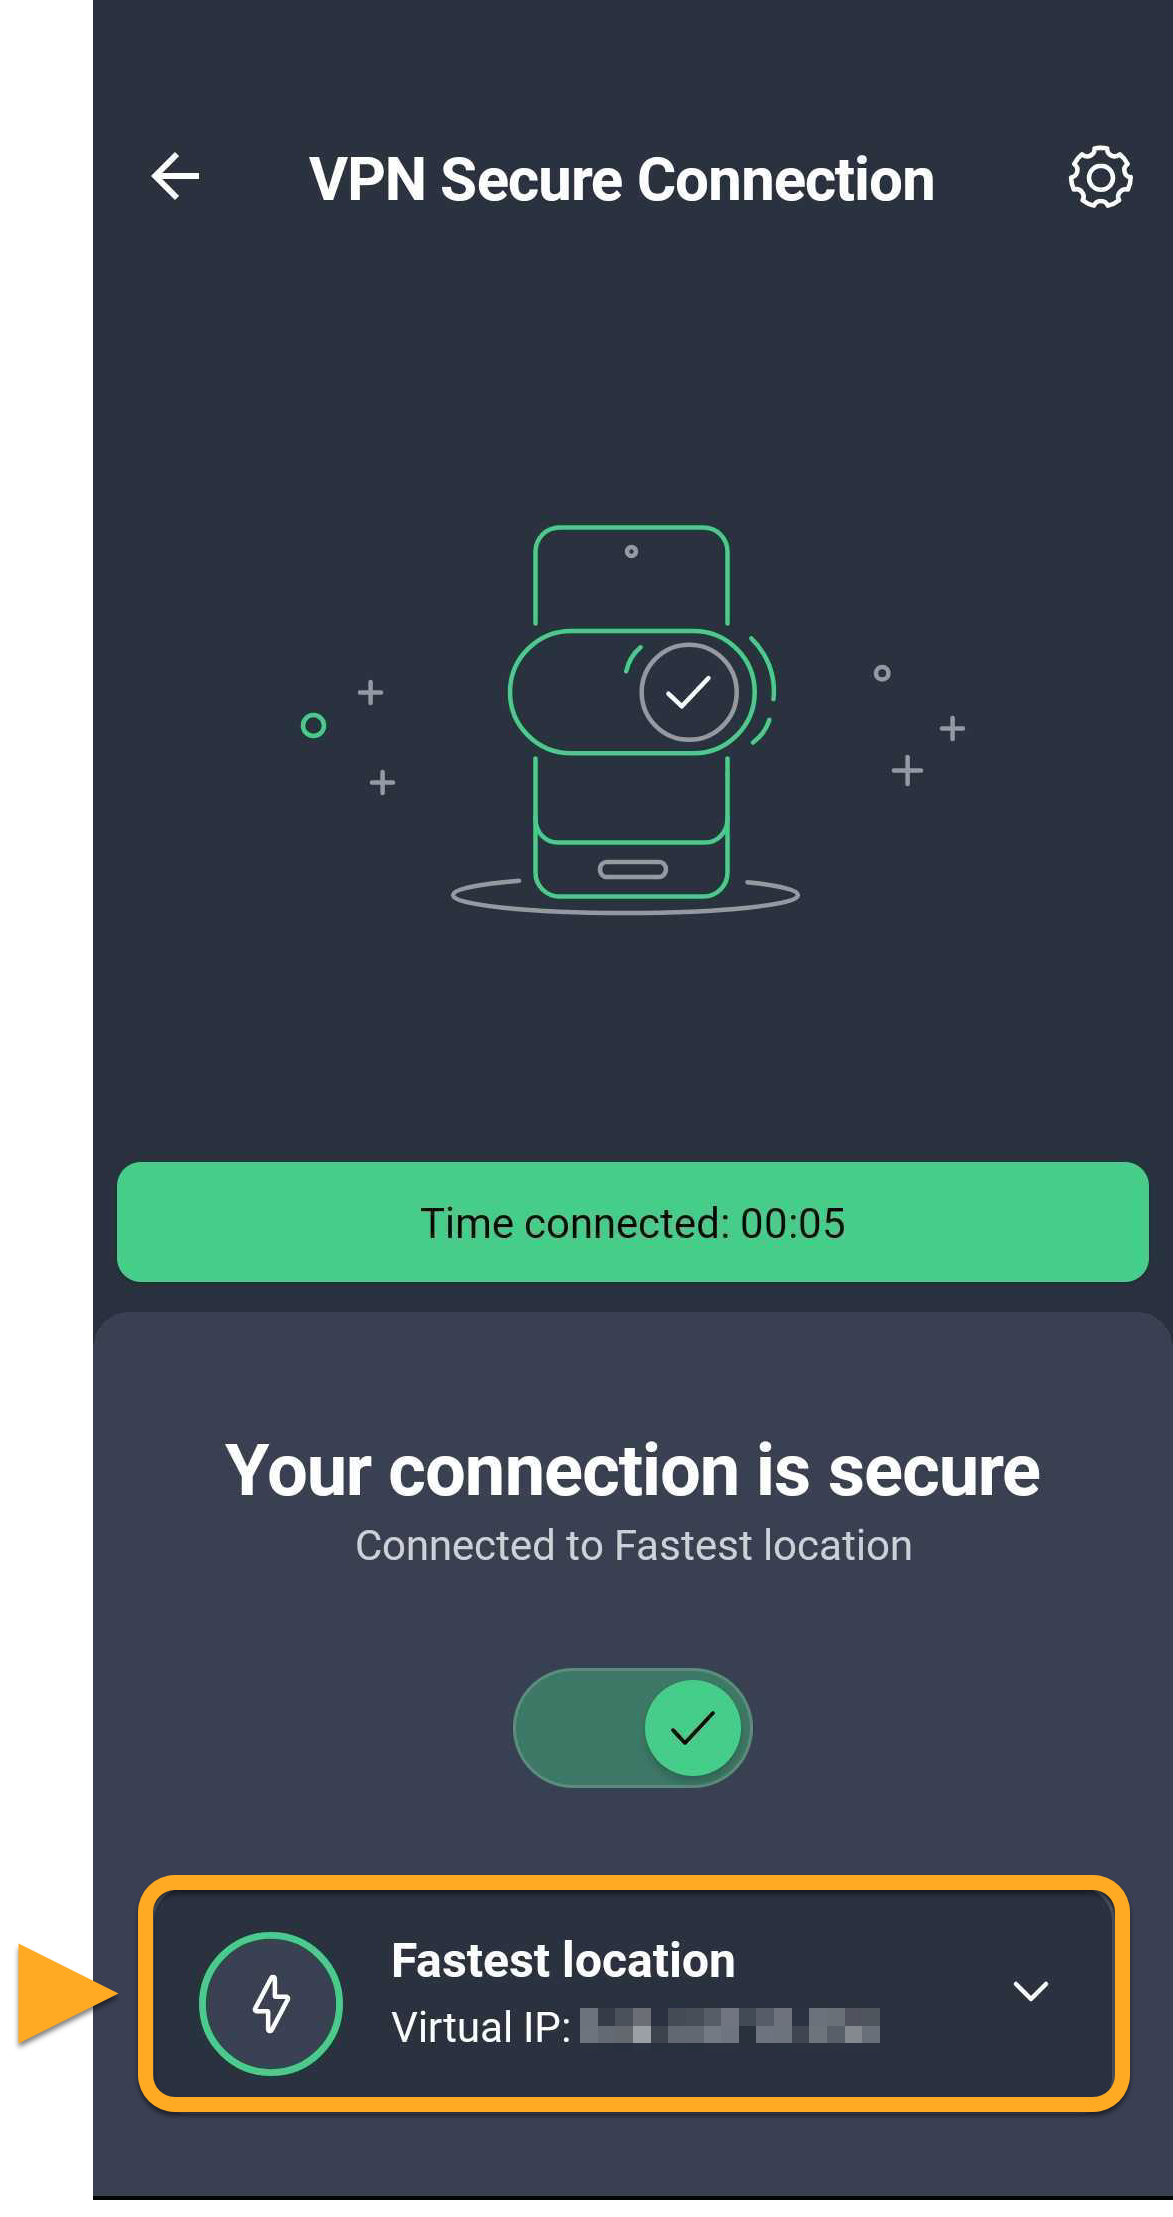
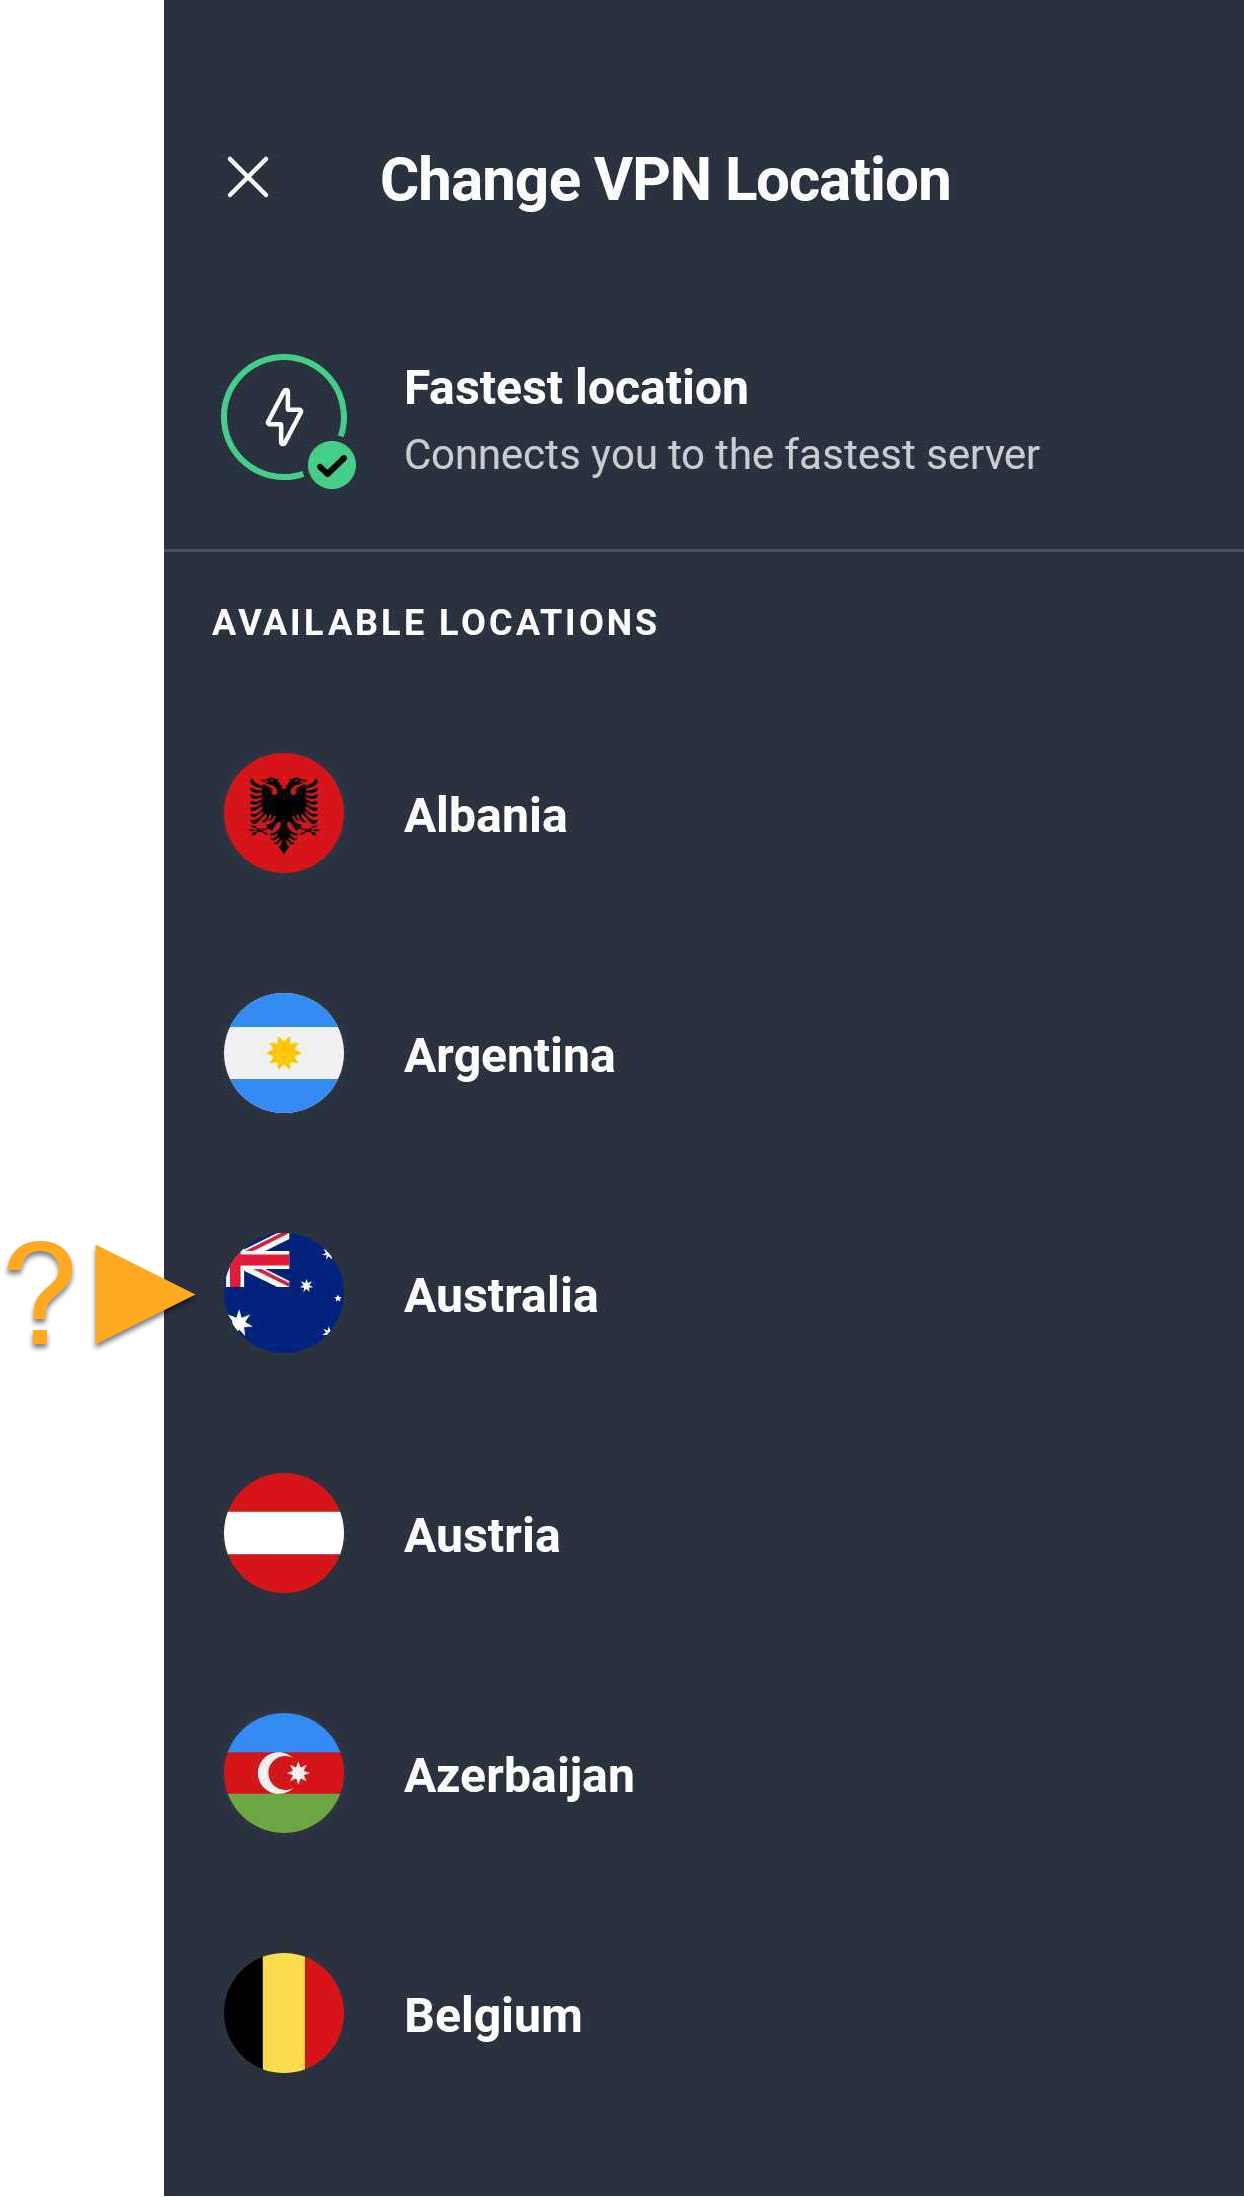
By default, VPN Secure Connection connects to the fastest available server. You can also choose a specific server location. To connect to another server:
- Open AVG AntiVirus and tap Explore ▸ VPN Secure Connection.
- Tap the location selector at the bottom of the VPN screen.
- Use the search box or browse the list to find a location.
Manage Auto Connect rules
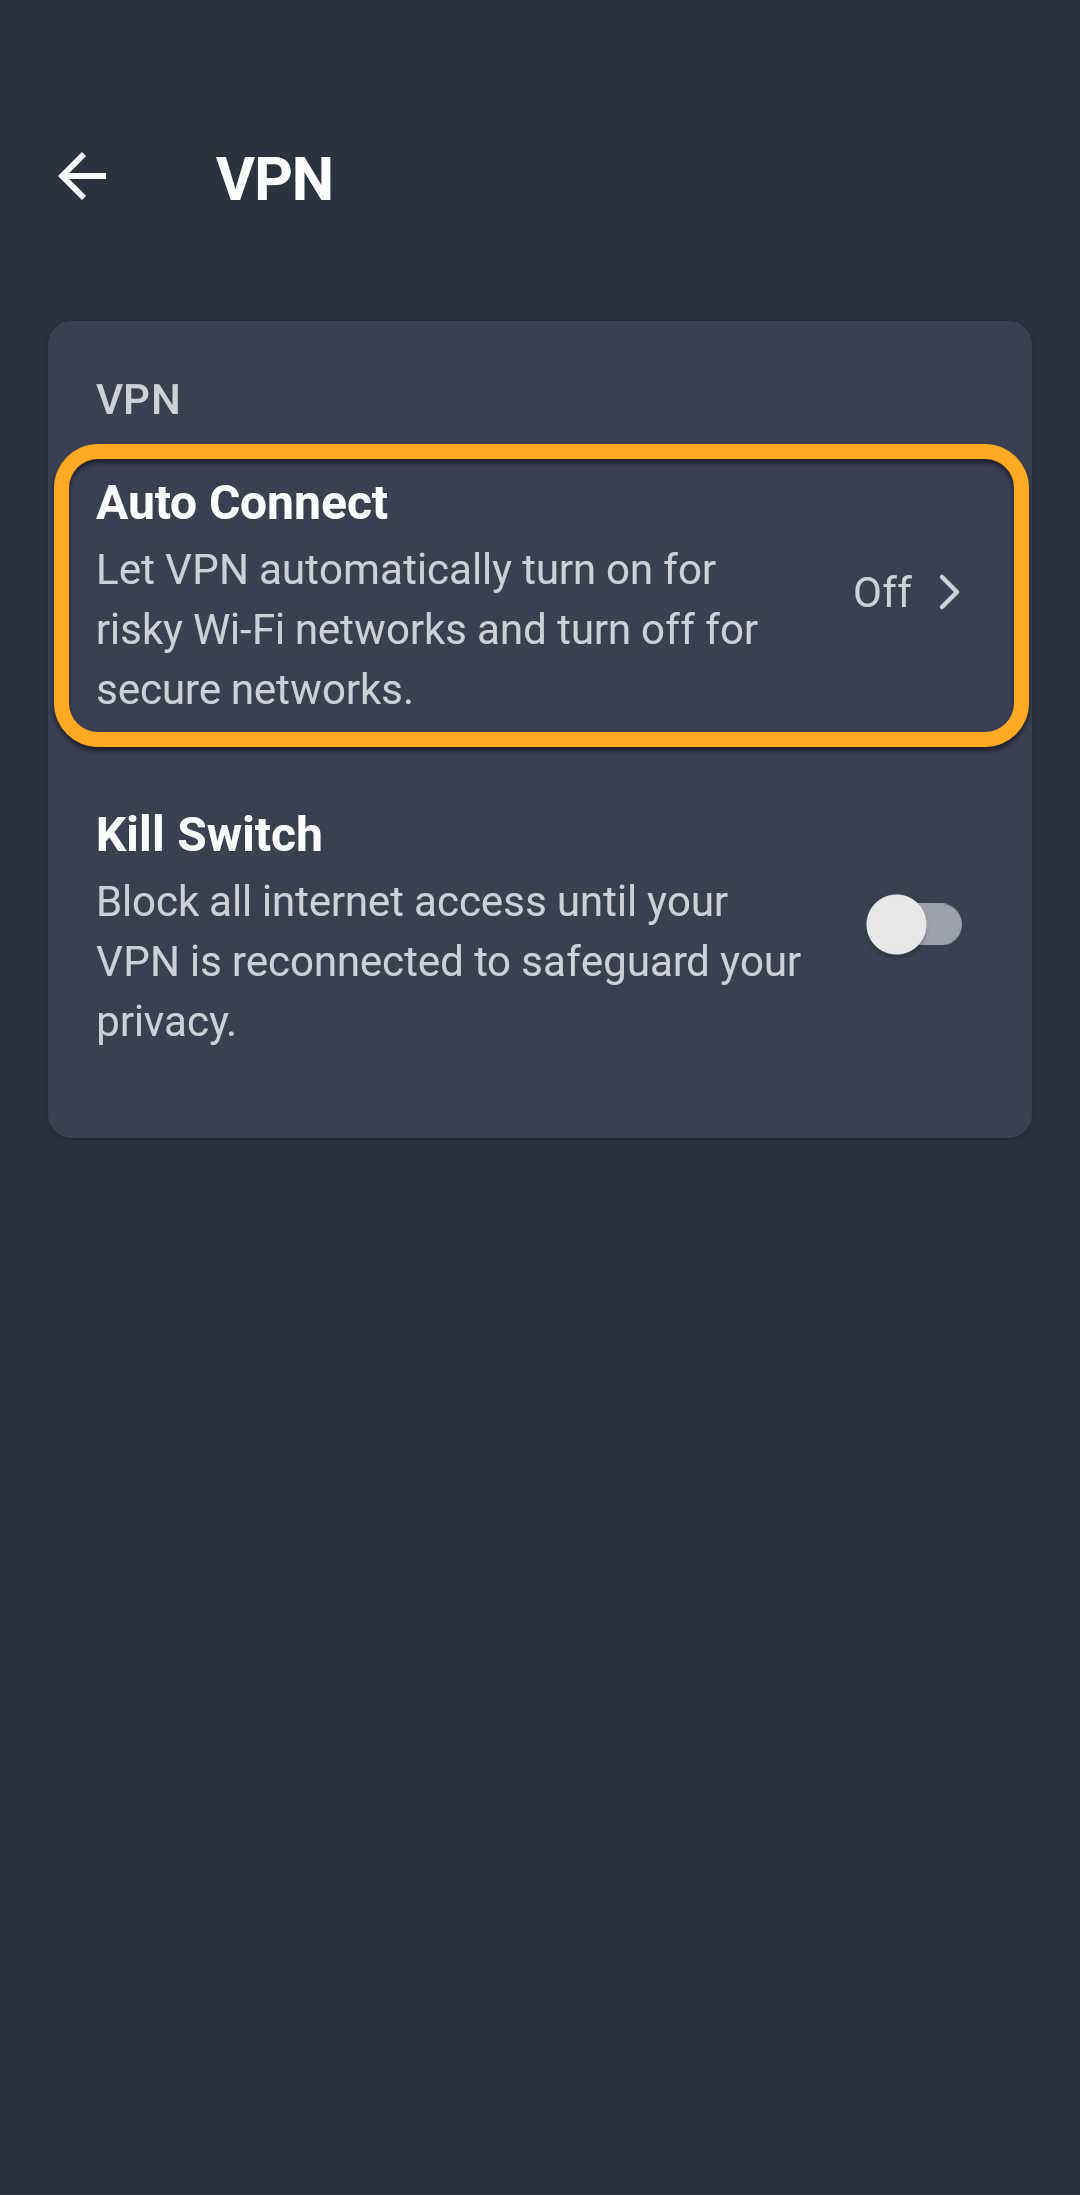
Auto Connect automatically turns on the VPN when you connect to an unsecured network. To configure Auto Connect:
- Open AVG AntiVirus and tap Explore ▸ VPN Secure Connection.
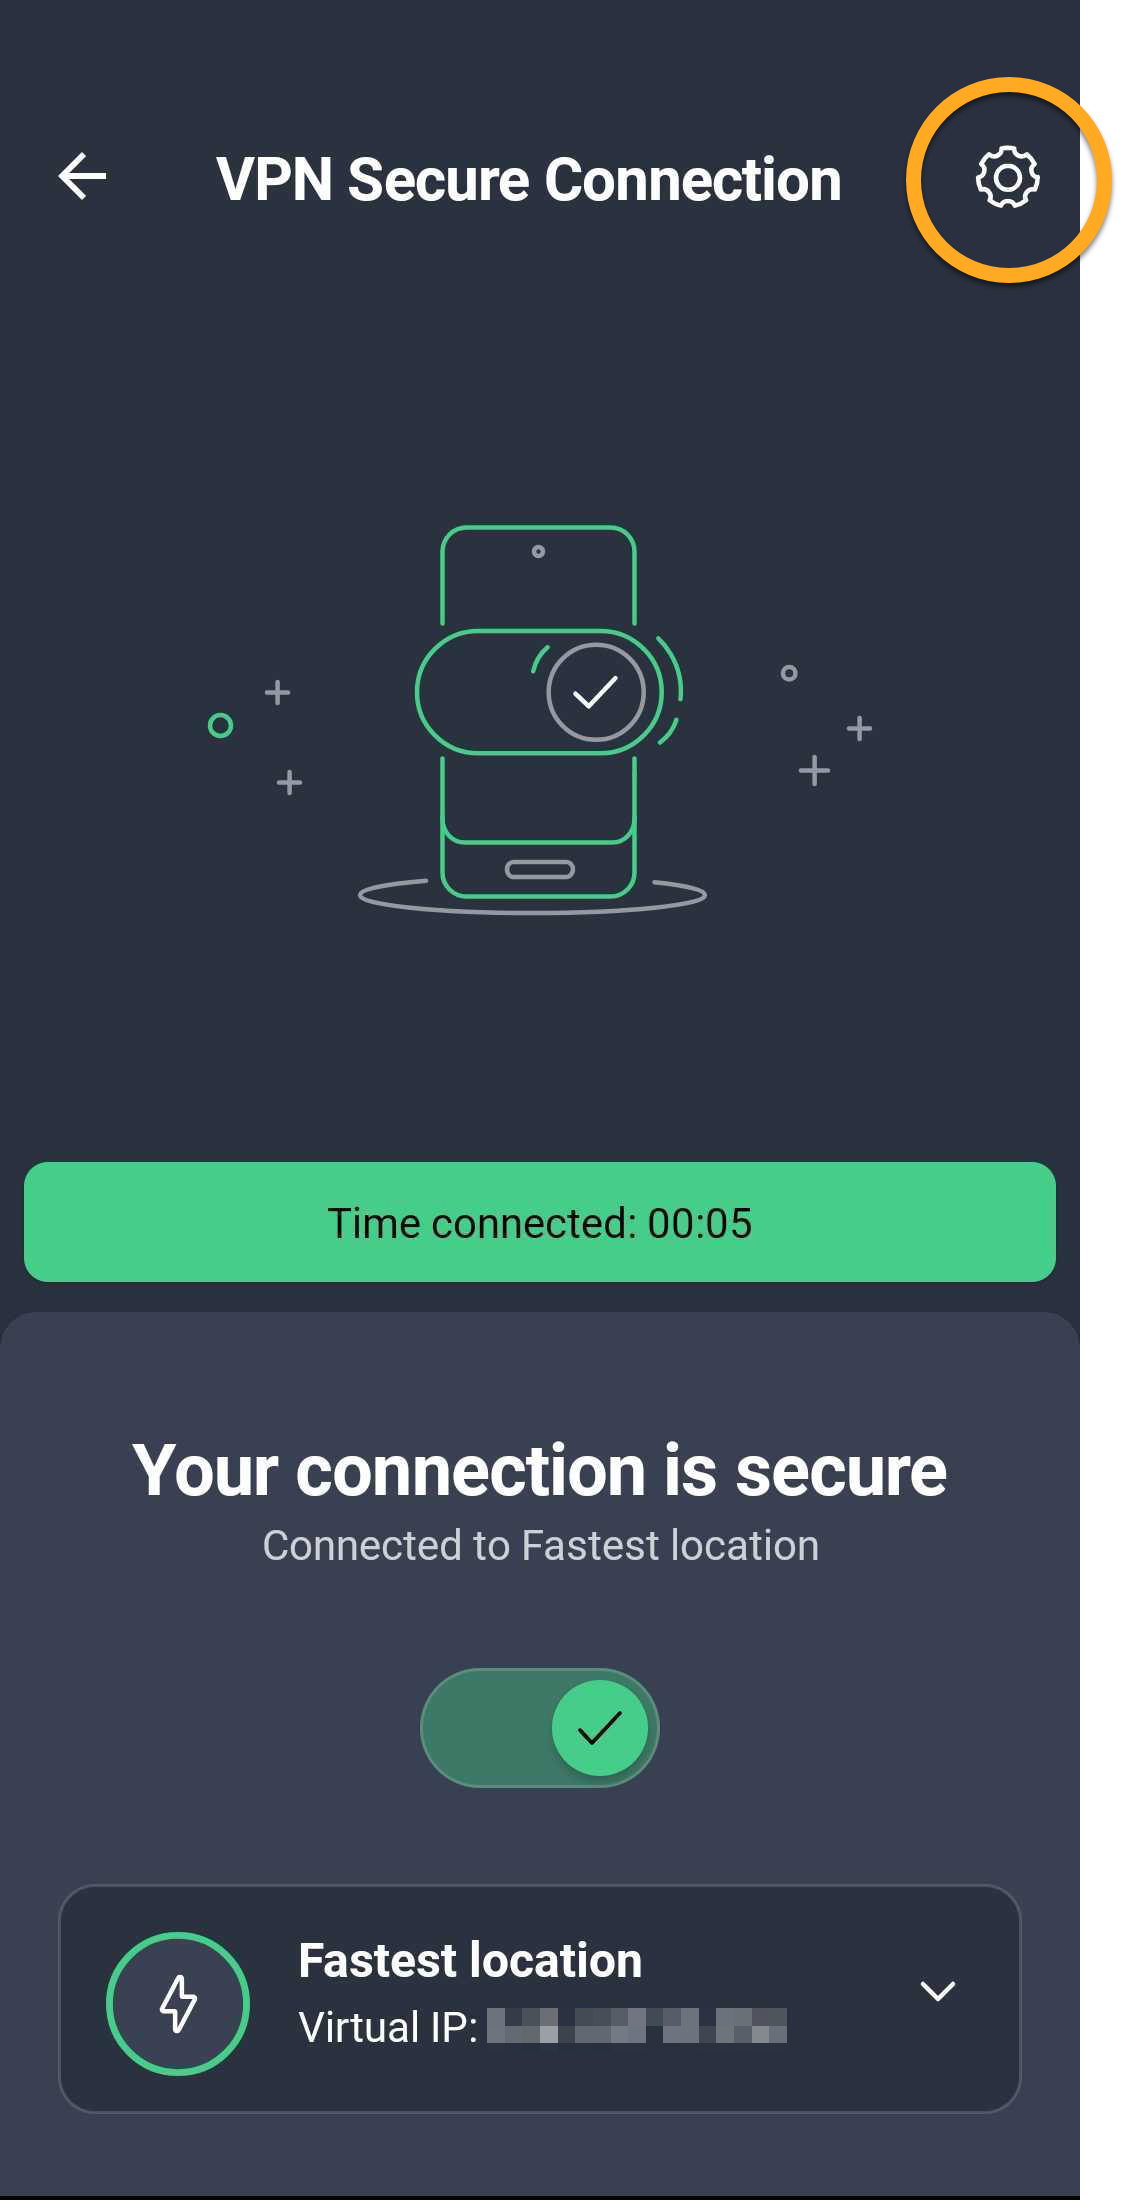
- Tap Settings (the gear icon) at the top-right corner of the VPN screen.
- Tap Auto Connect.
- If prompted, follow the steps below to grant AVG AntiVirus Location permissions:
The exact steps may be different based on your device model and/or Android version.
- Tap Allow.
- Tap Permissions.
- Tap Location ▸ Allow all the time.
- Tap Allow.
- Choose Unsecured Wi-Fi, then tap Allow to have VPN Secure Connection always Auto Connect on non-Private Networks.
- Optionally, to add a Private Network, ensure that Unsecured Wi-Fi option is enabled, then tap Private Networks ▸
+(the plus icon) to add the current network to the list of Private Networks.
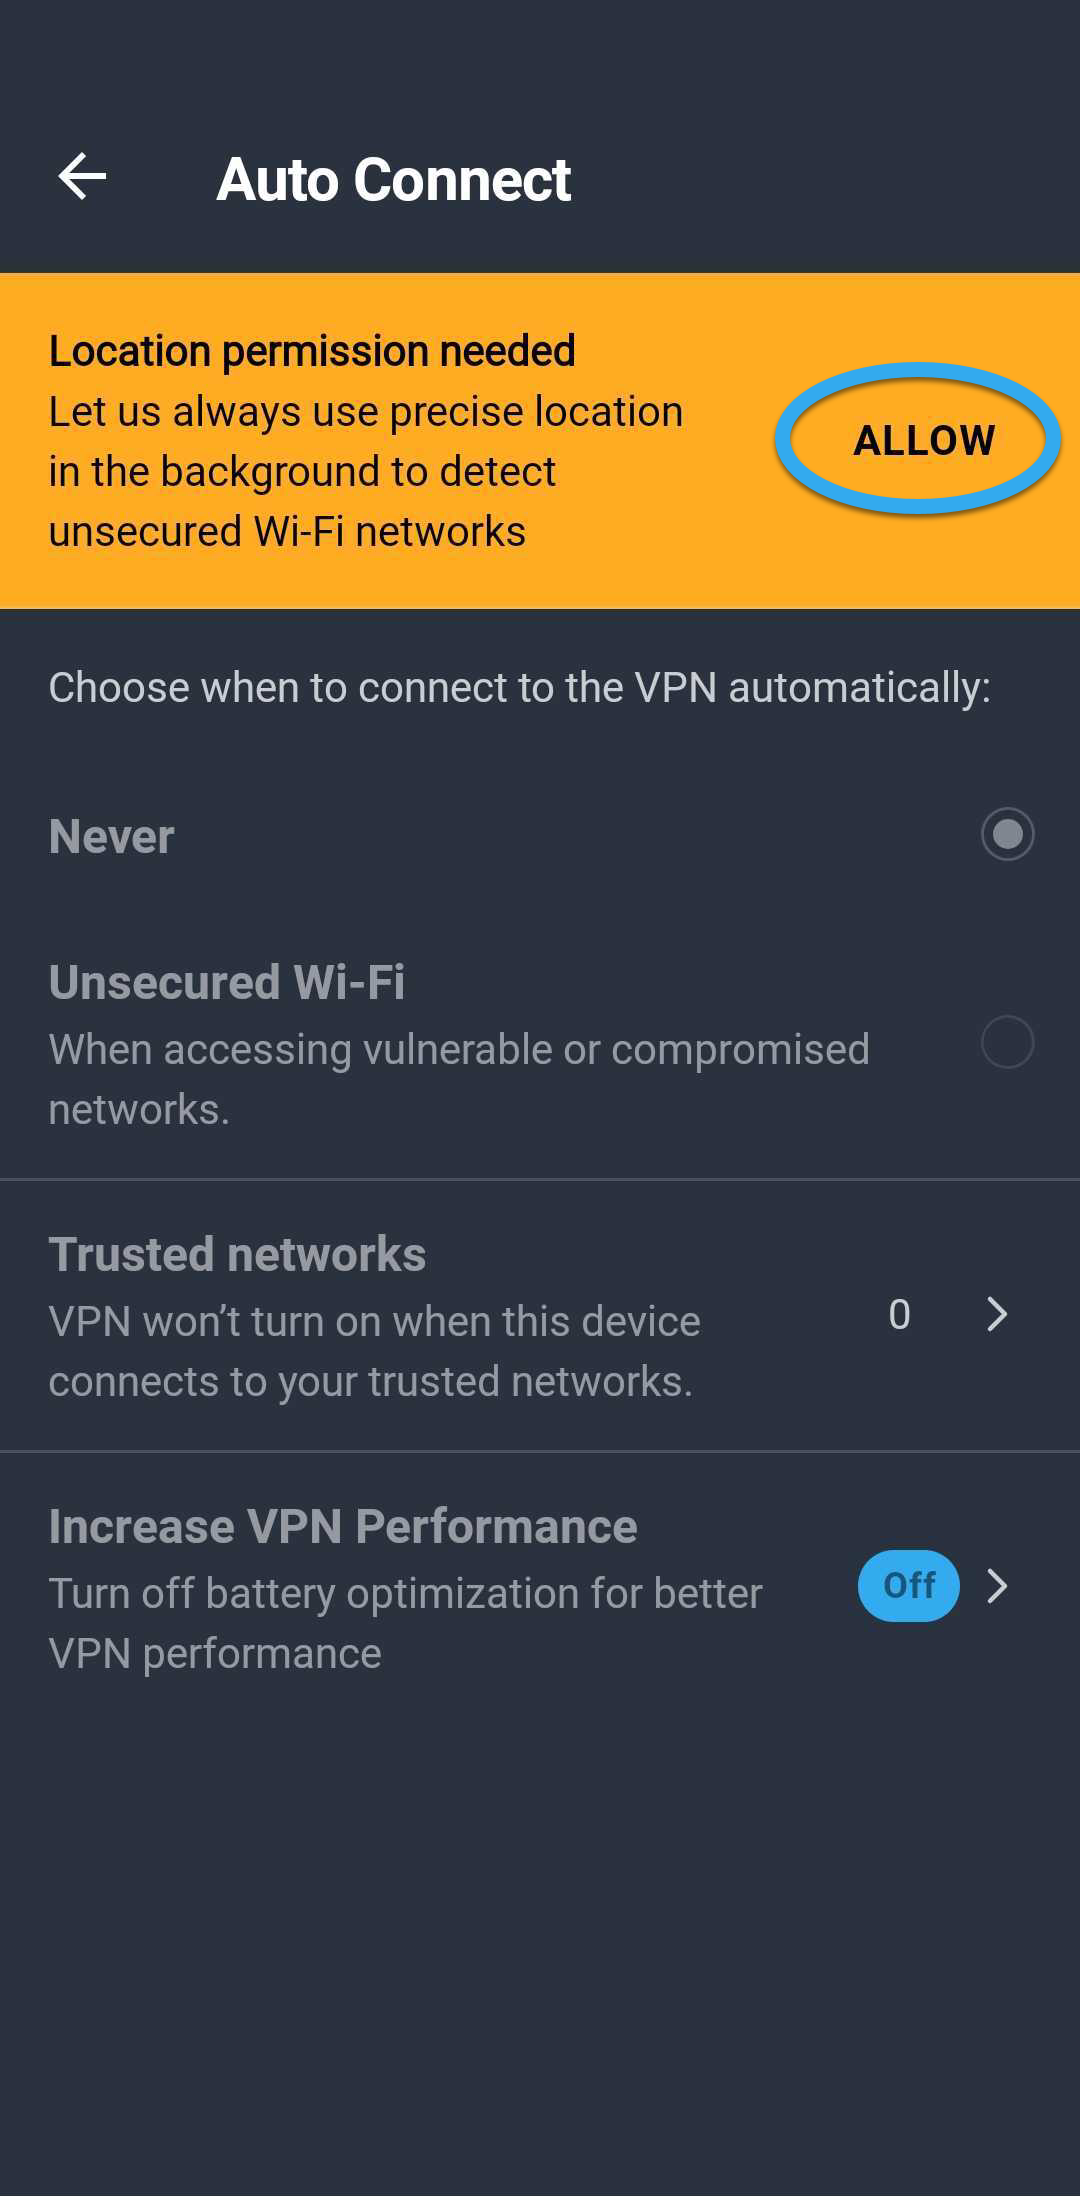
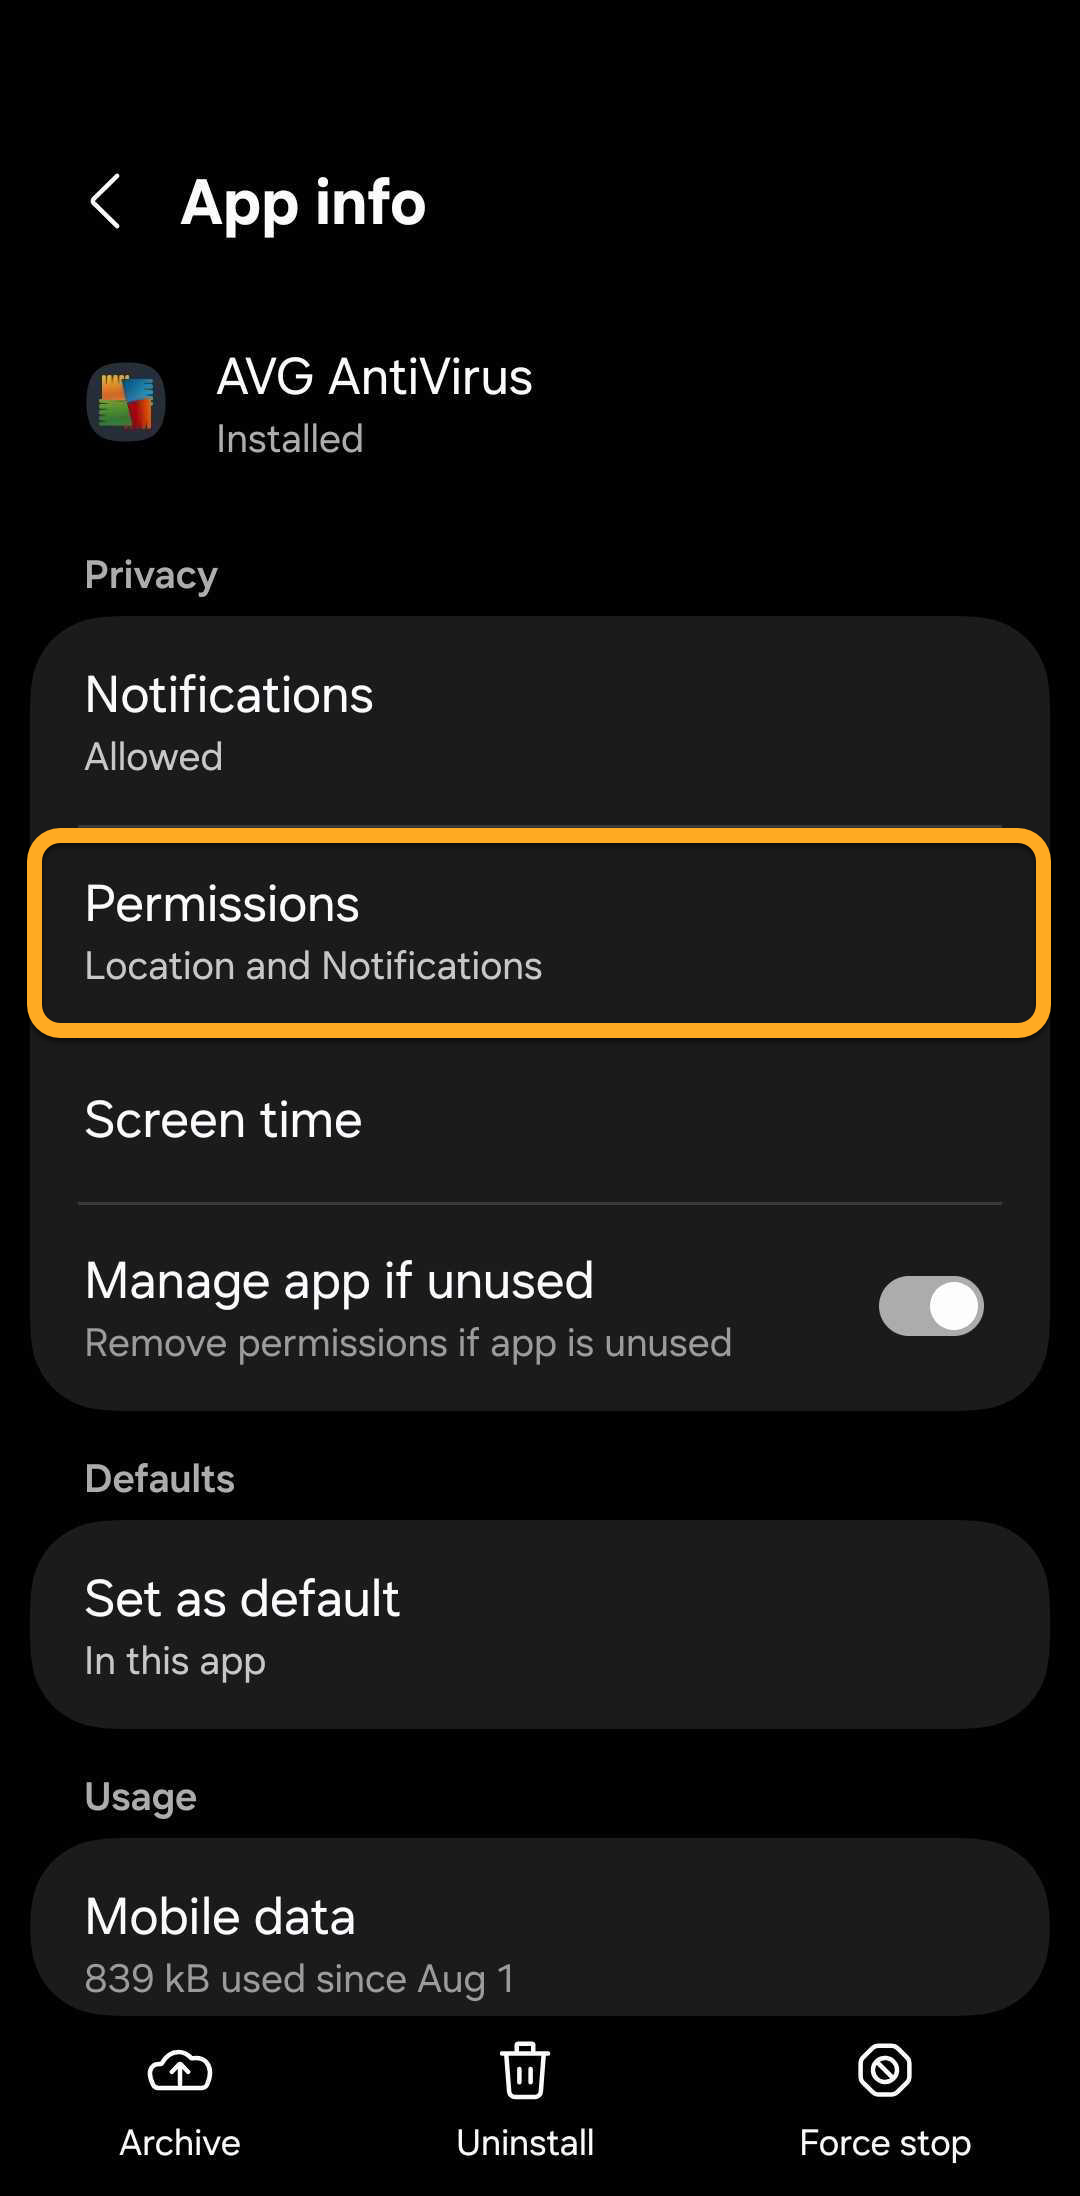
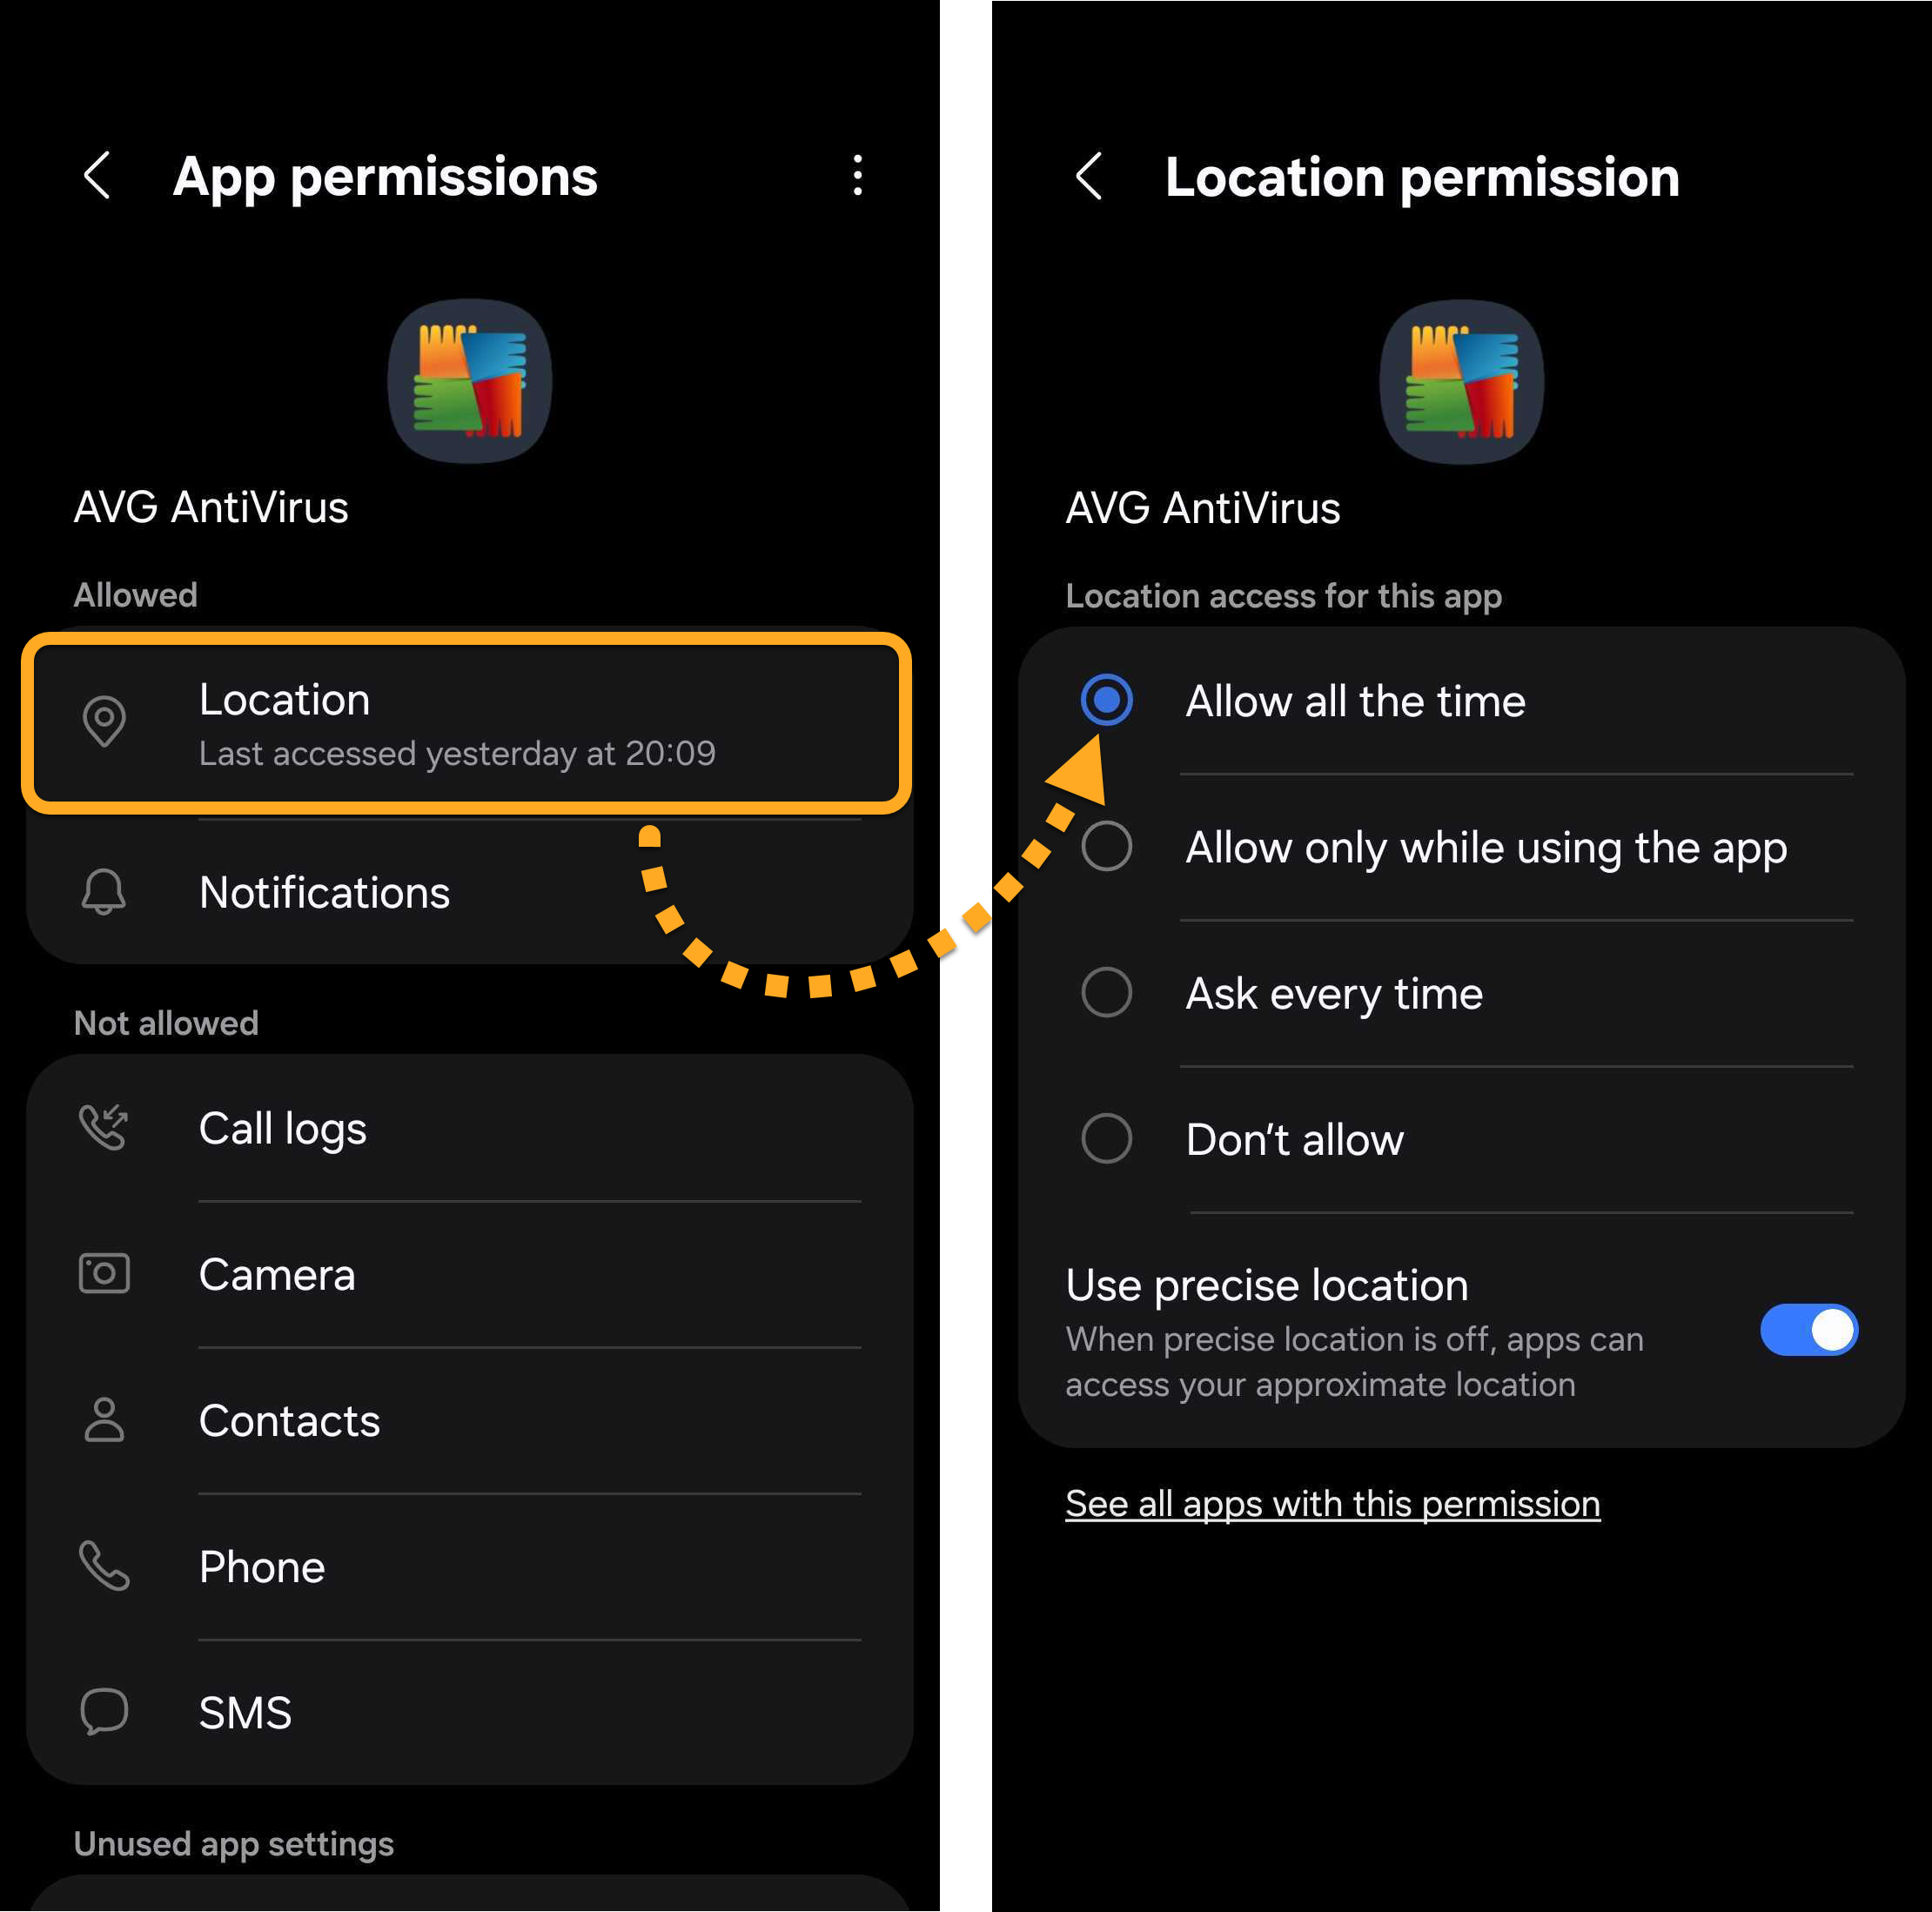
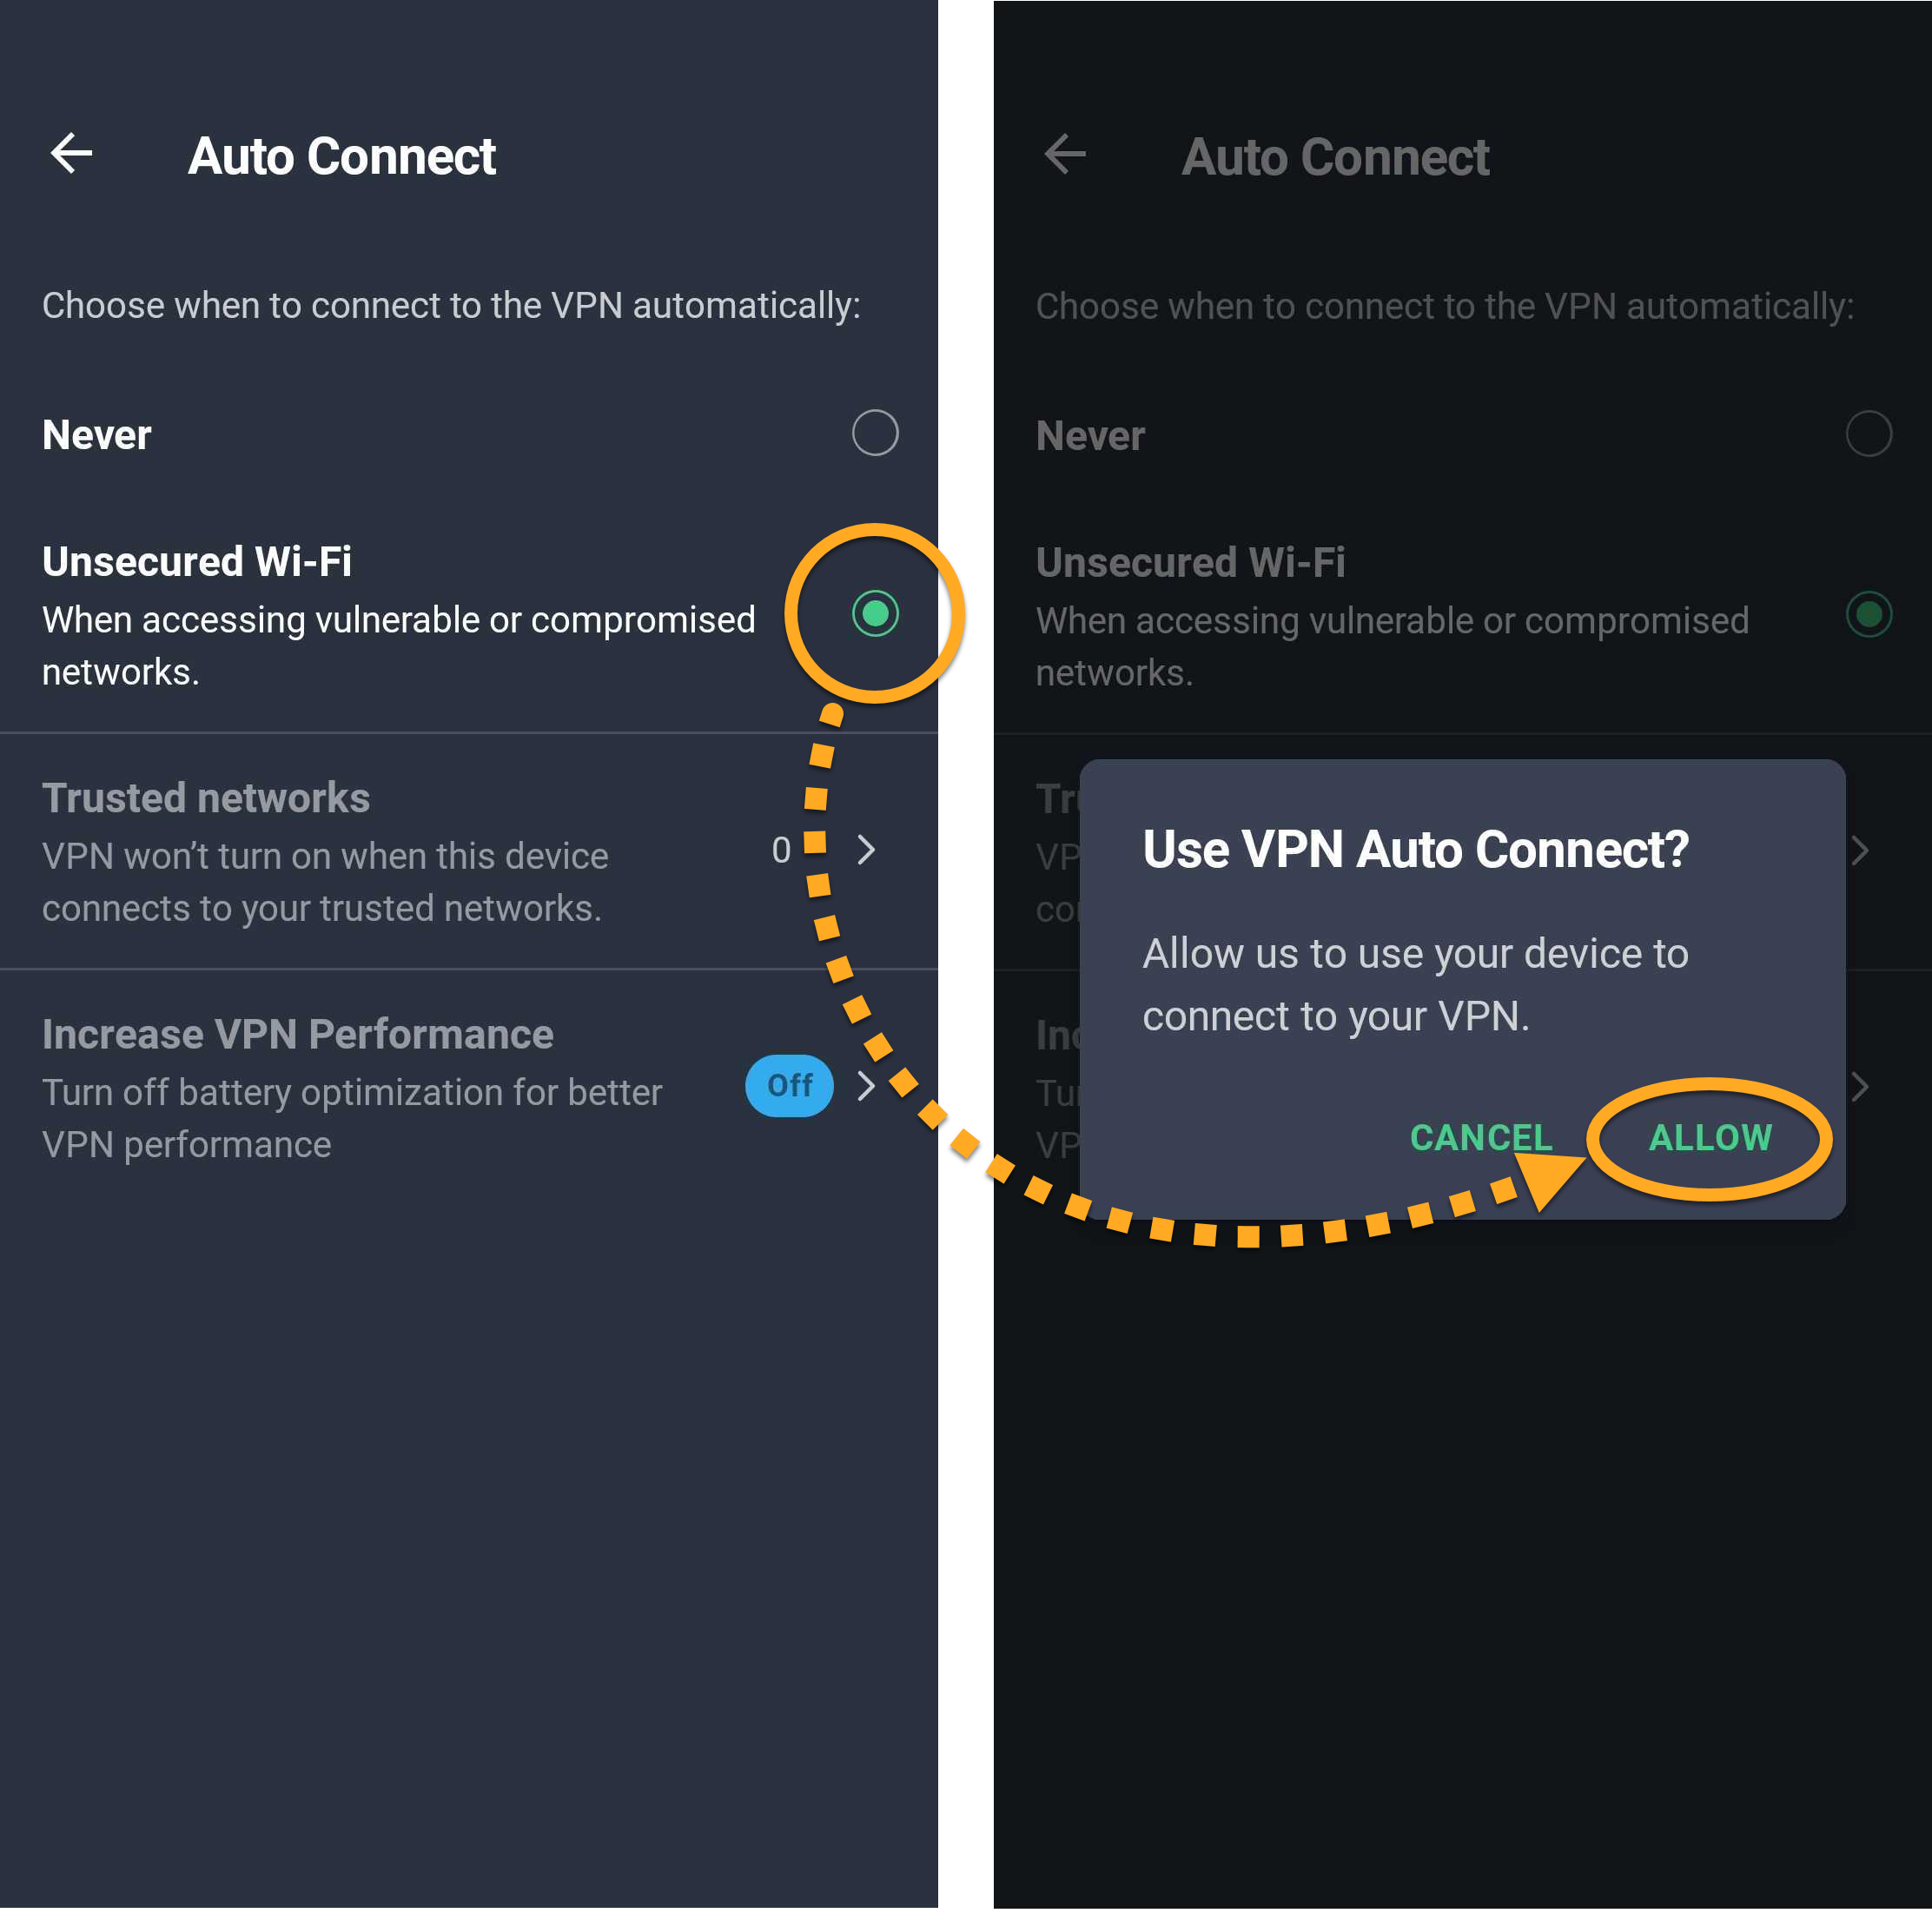
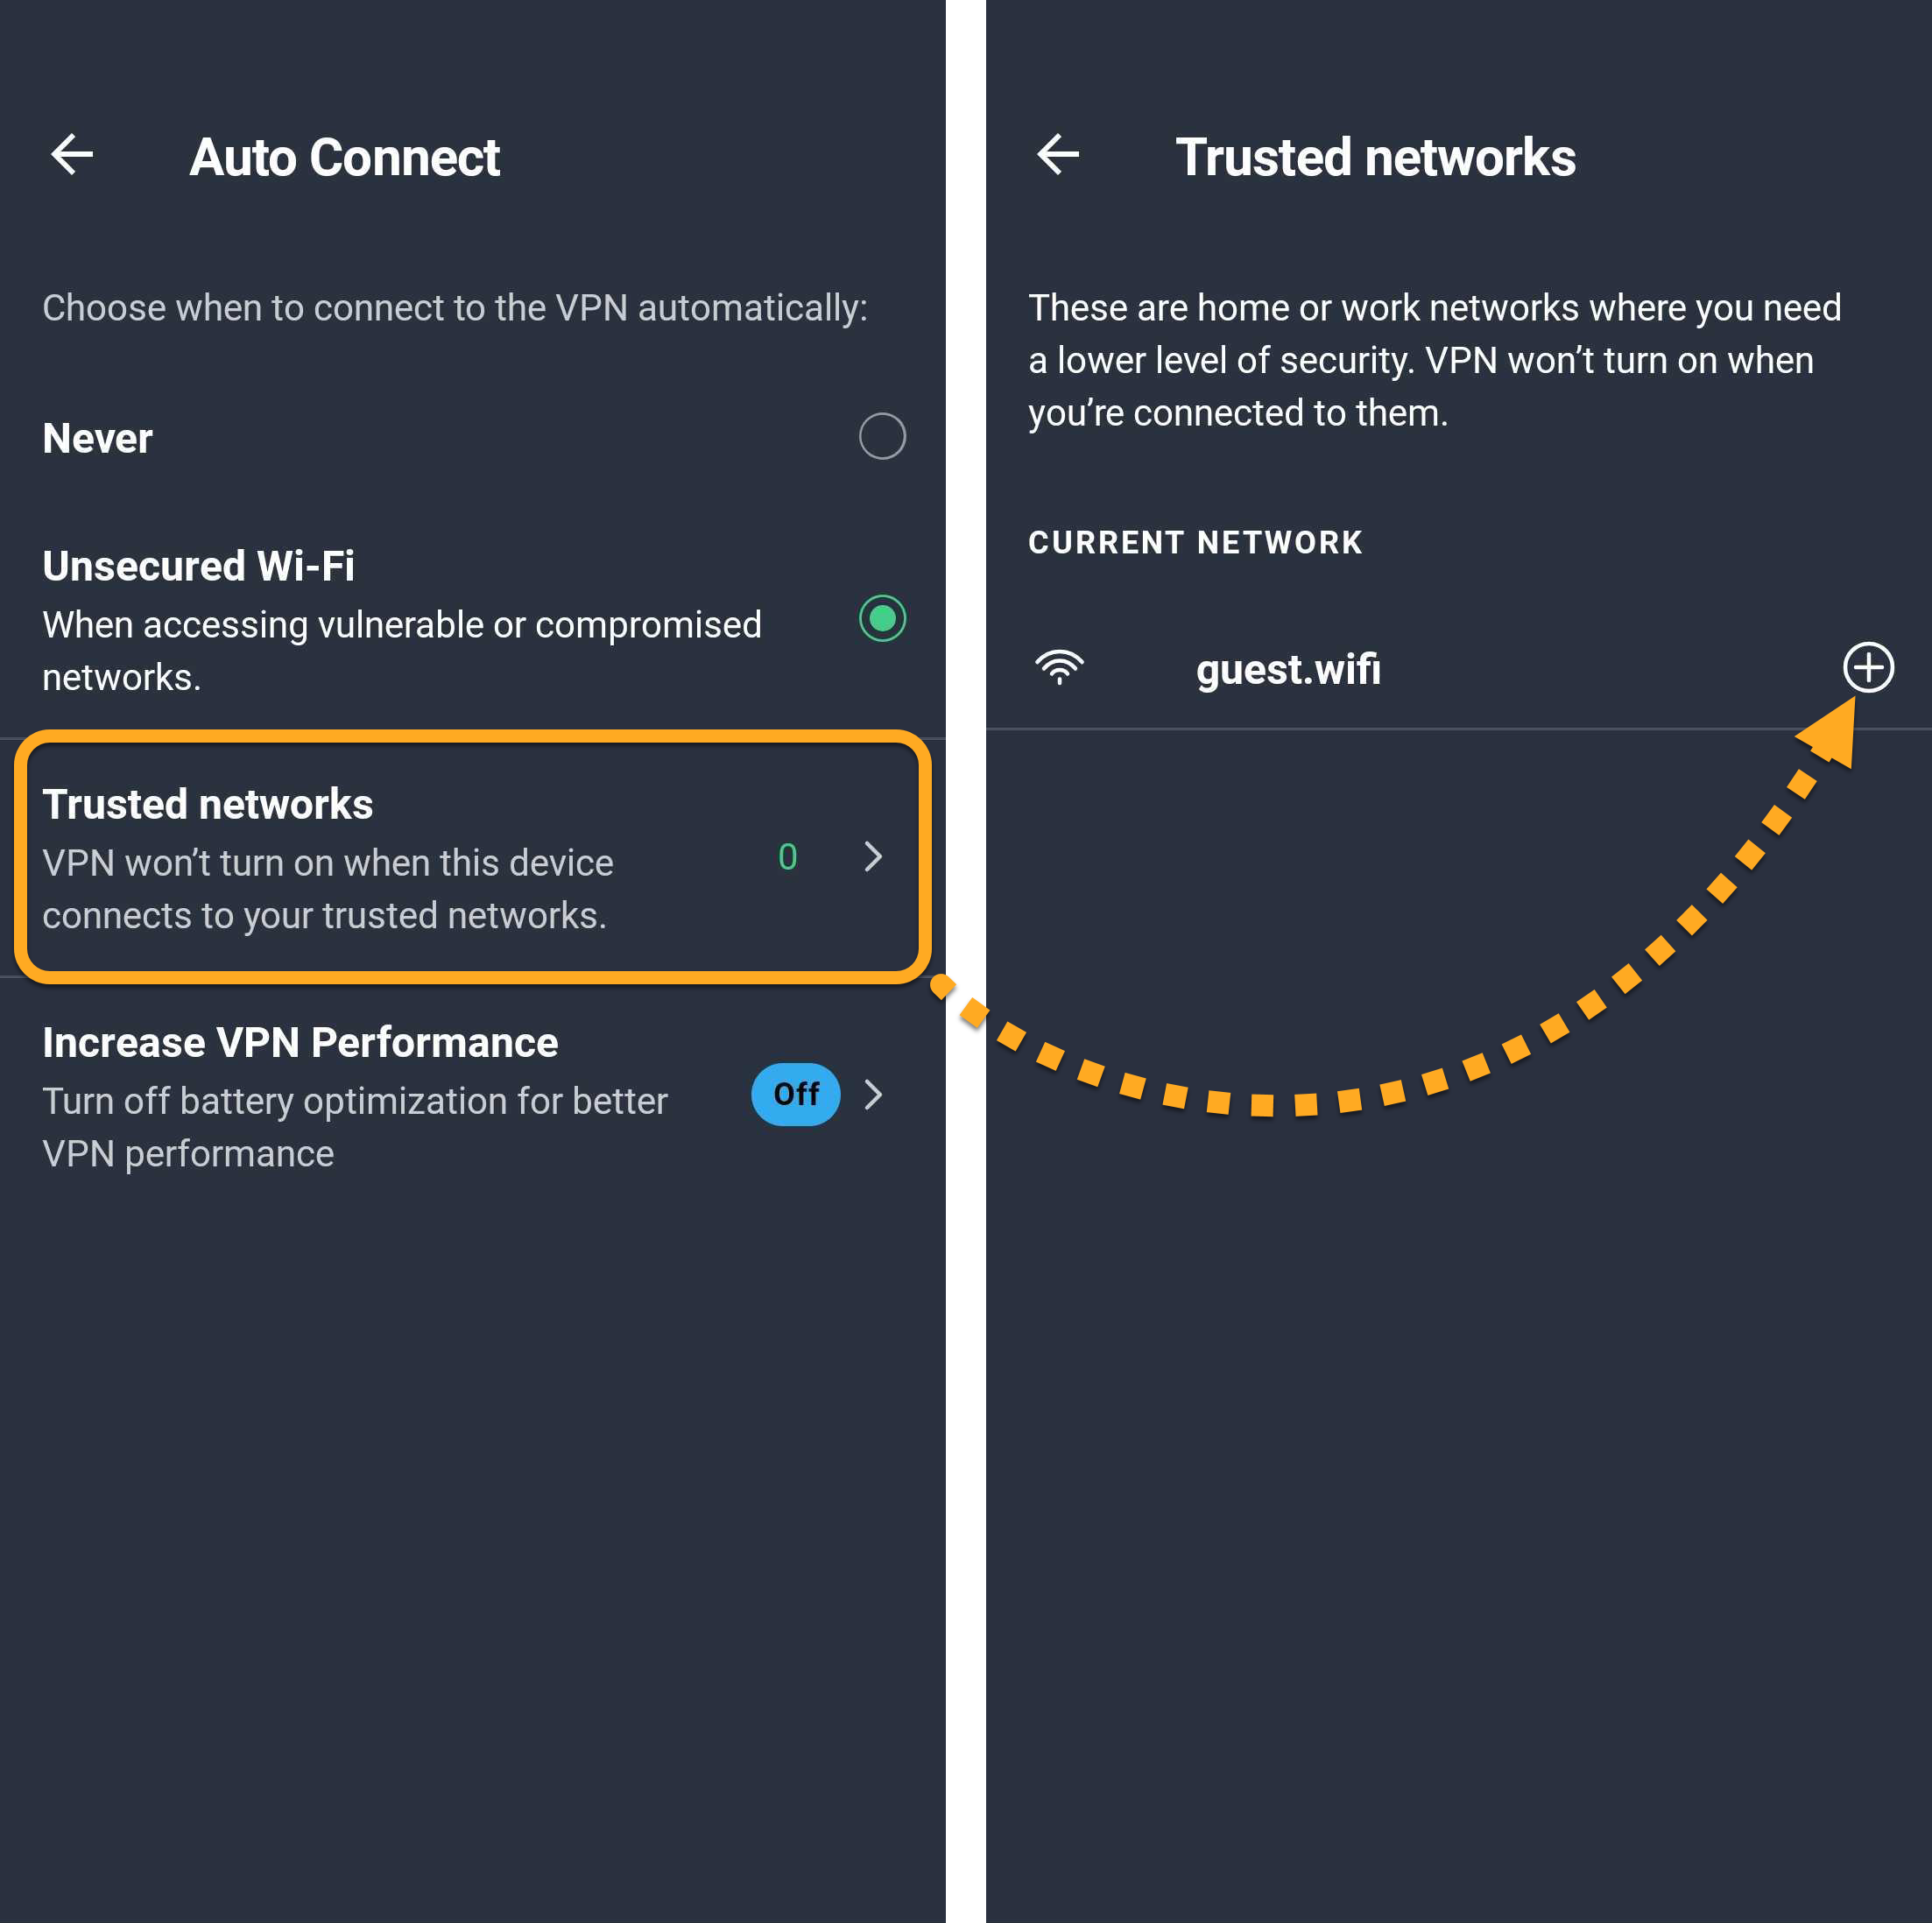
VPN Secure Connection will always auto-connect unless you are connected to a Private Network.
Turn on Kill Switch
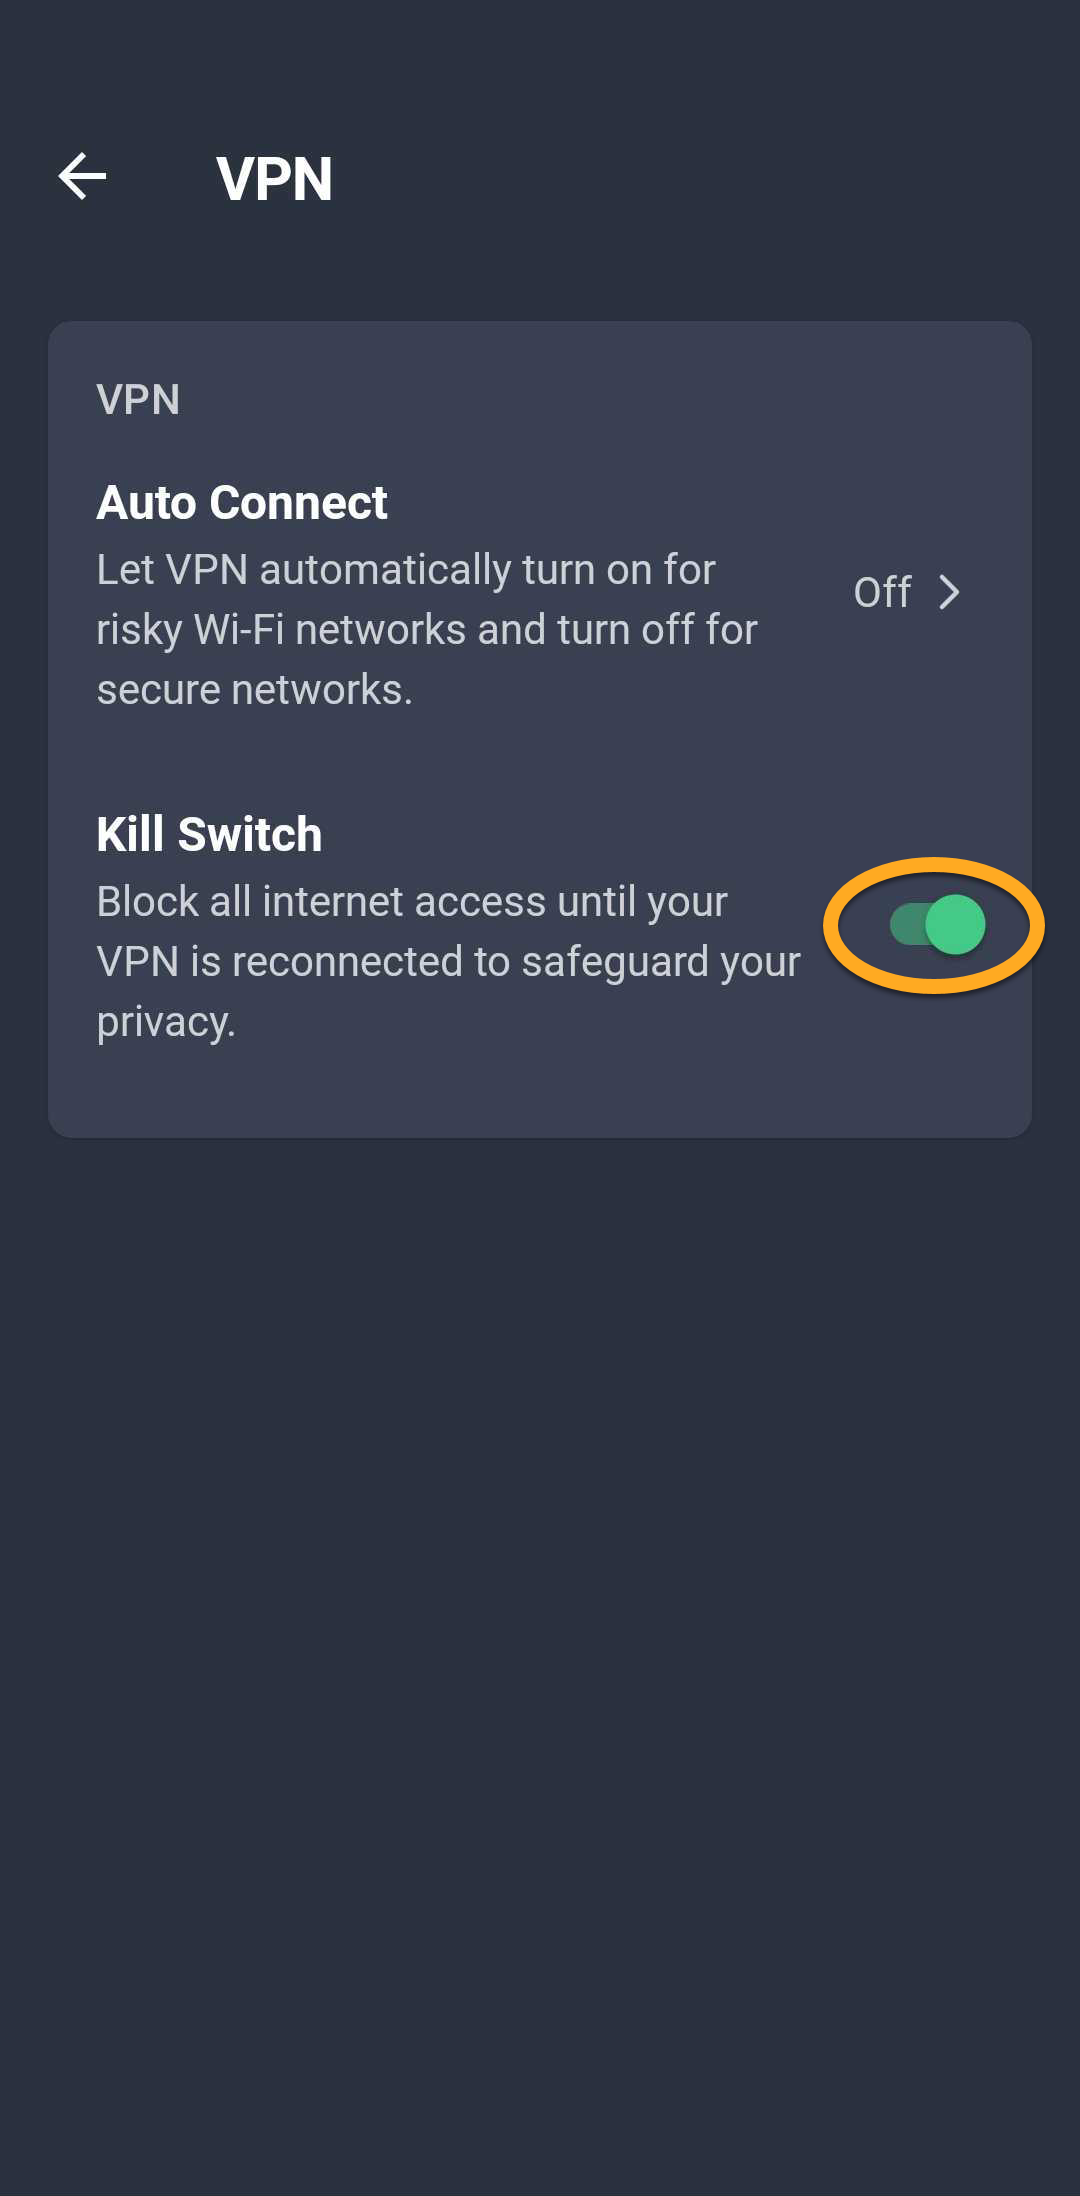
The Kill Switch blocks all internet traffic if the VPN connection unexpectedly disconnects until it is restored, helping prevent your data from being exposed. To turn on the Kill Switch:
- Open AVG AntiVirus and tap Explore ▸ VPN Secure Connection.
- Tap Settings (the gear icon) at the top-right corner of the VPN screen.
- Turn on the Kill Switch slider.
Use App Lock
App Lock helps protect sensitive apps with a PIN, pattern, or fingerprint. To set up App Lock:
- Open AVG AntiVirus and tap Explore ▸ App Lock.
- Tap Get started.
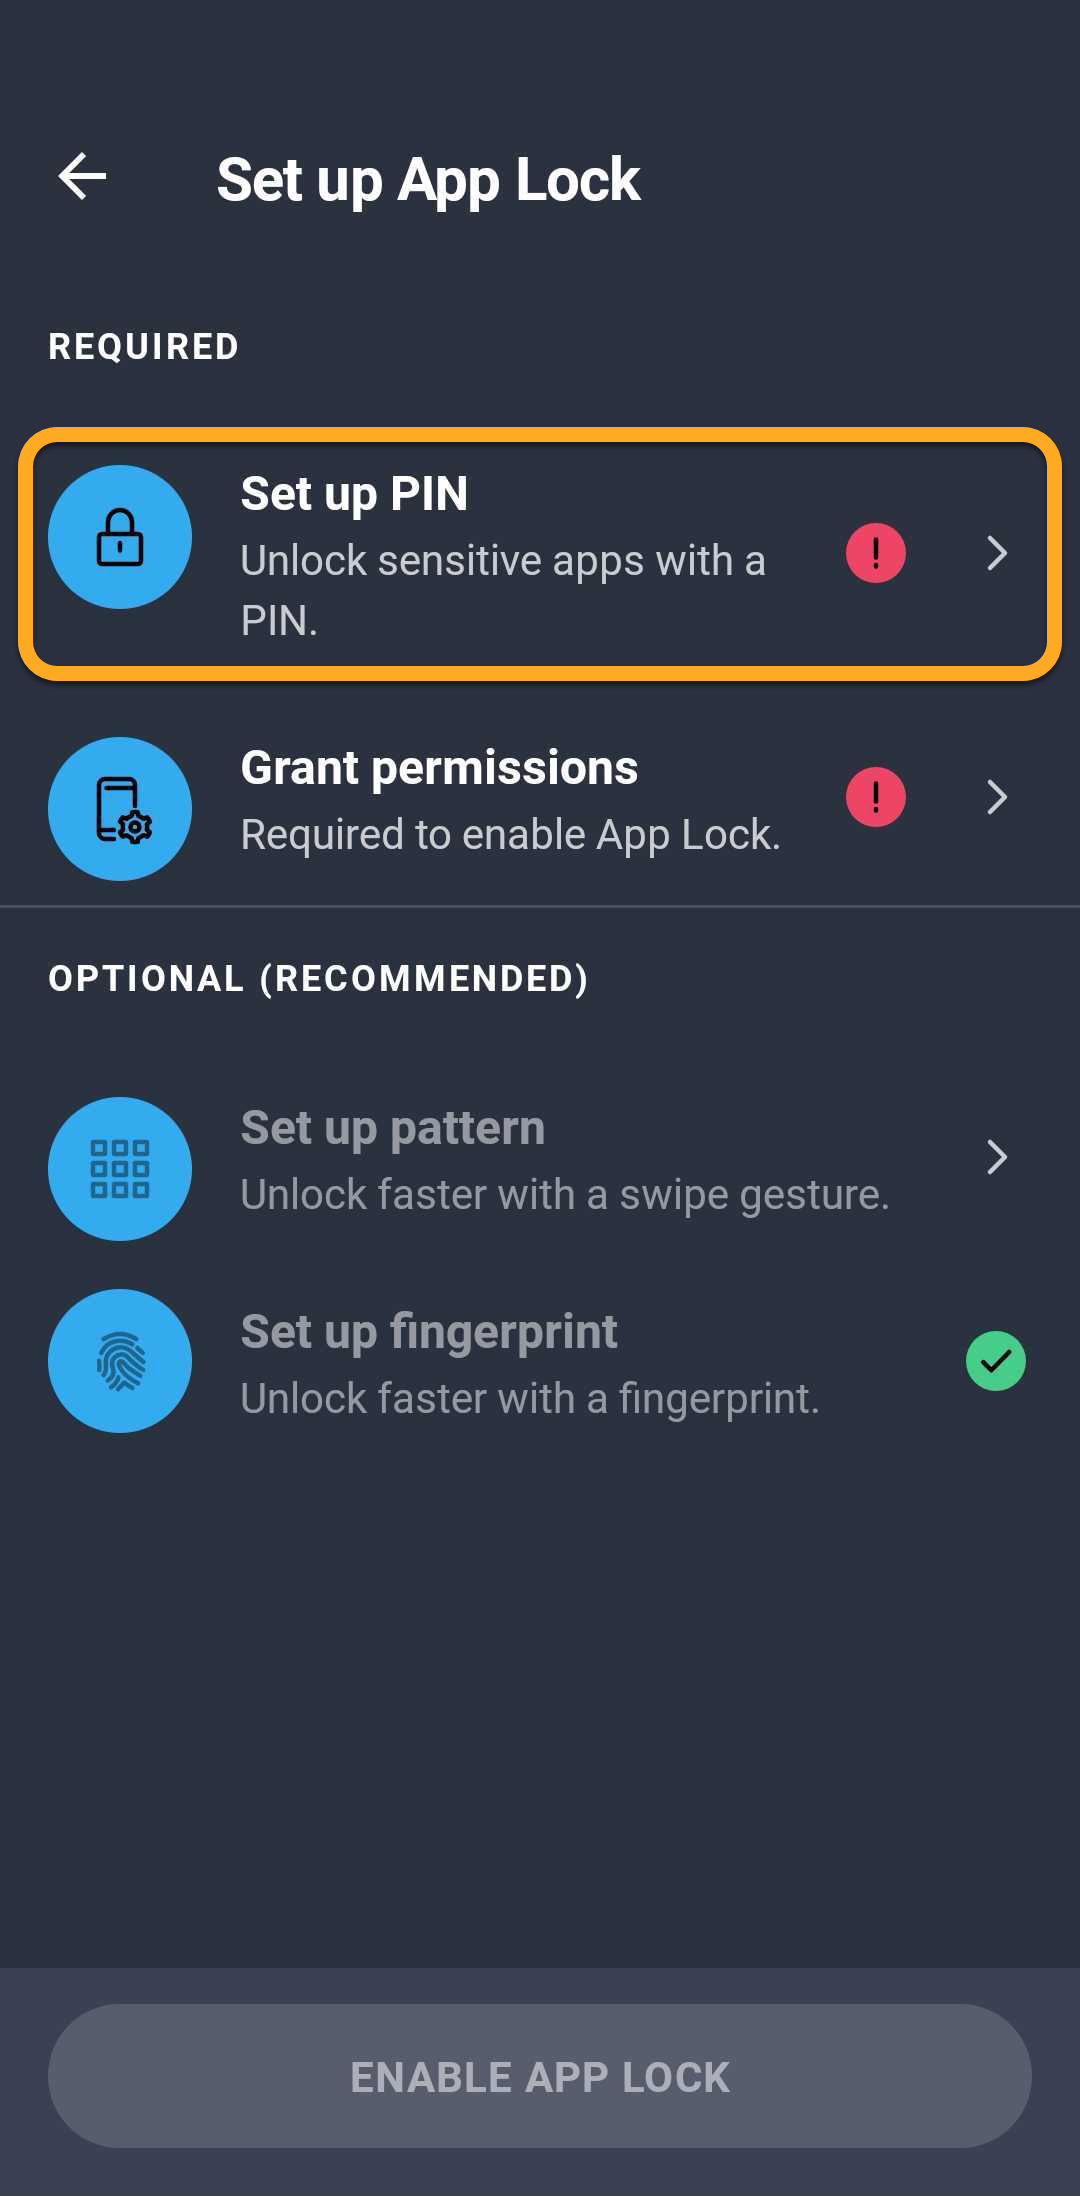
- Tap Set up PIN to create the PIN that will be used to unlock protected apps.
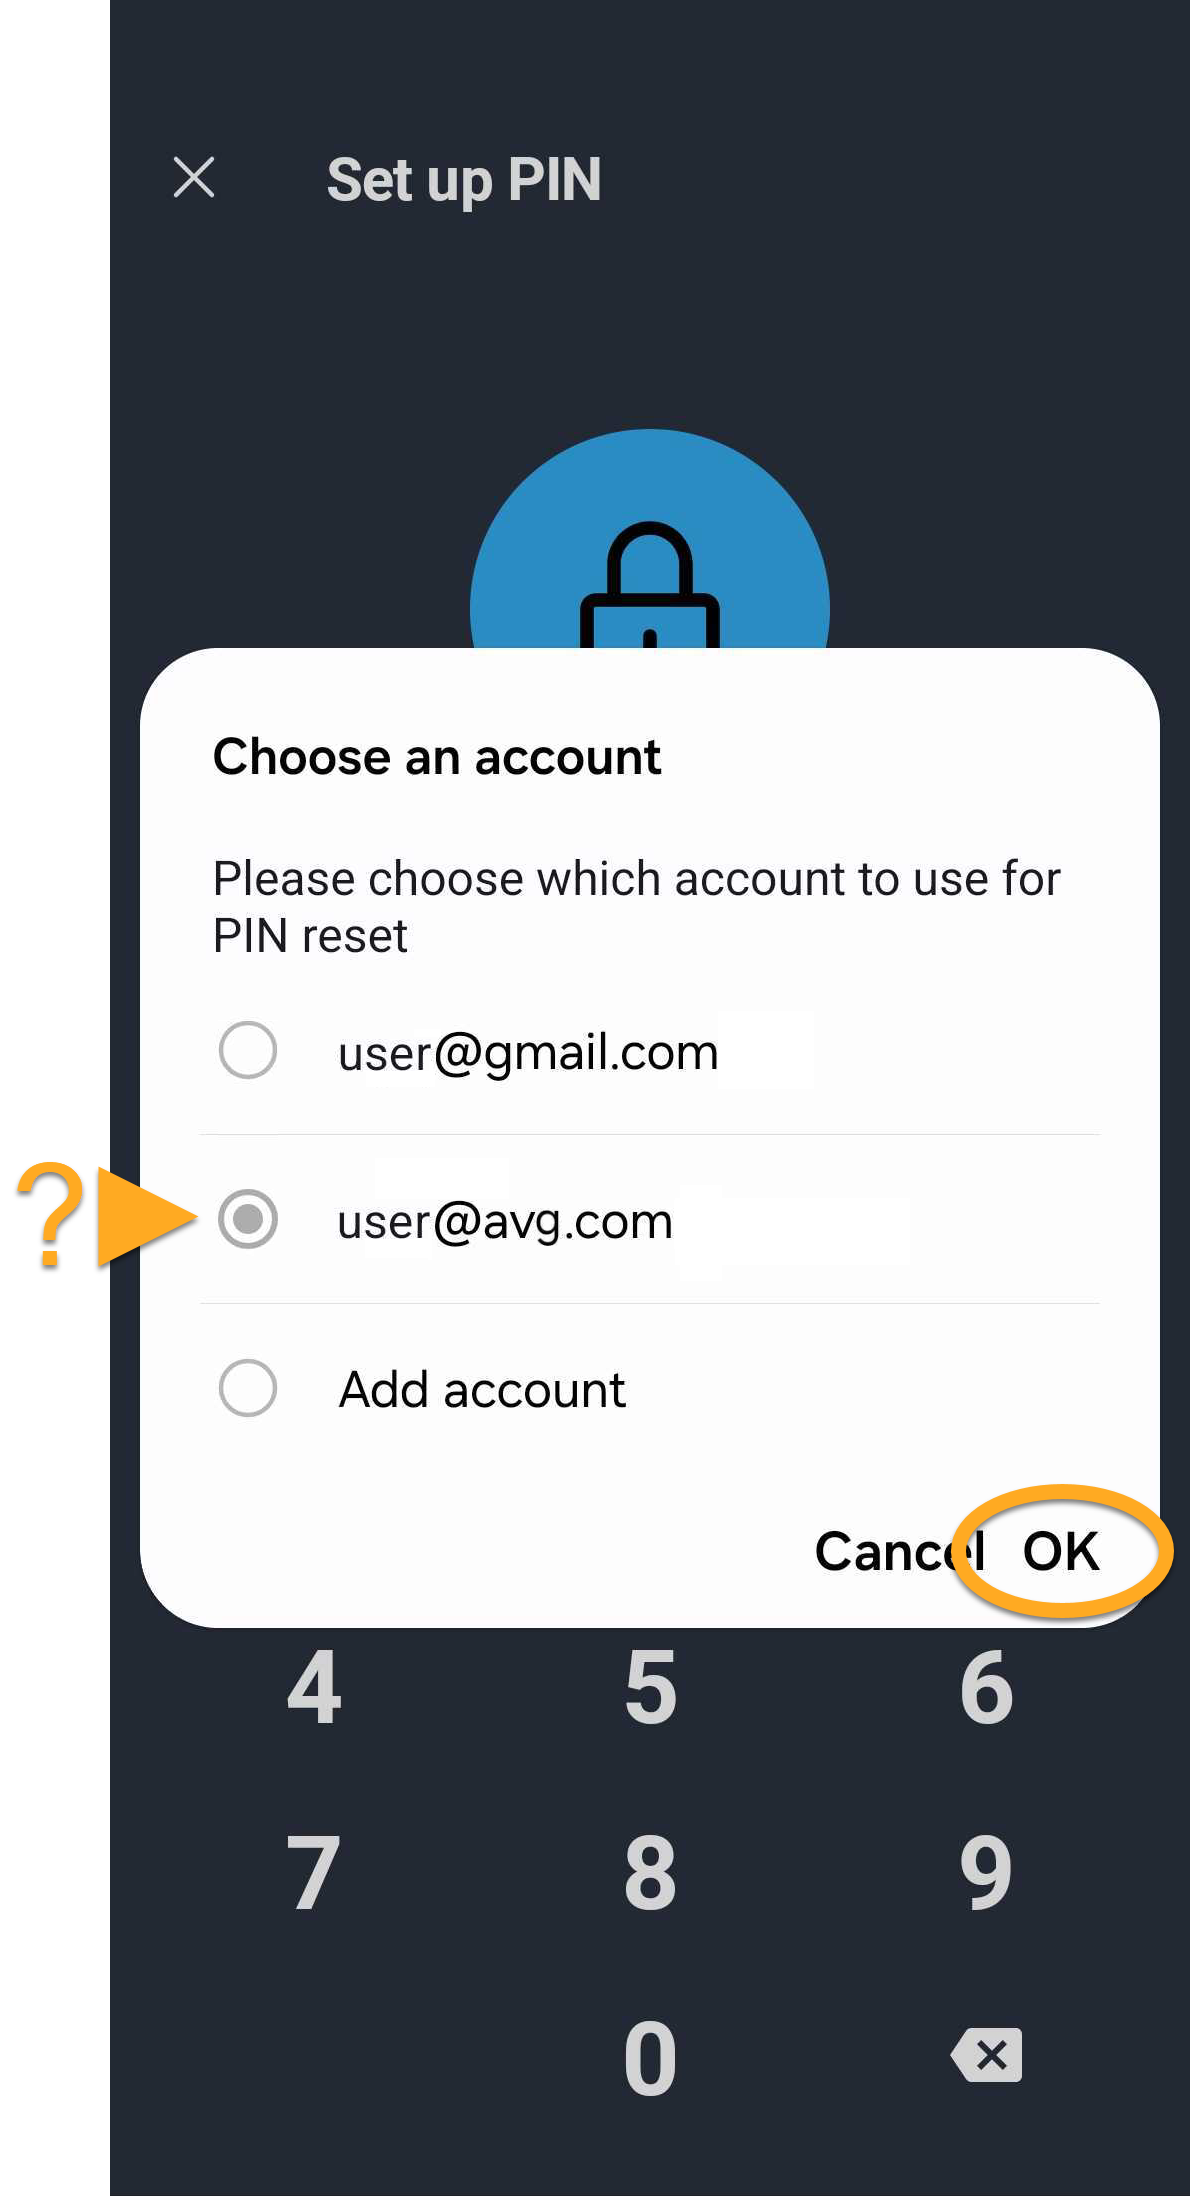
- Select the email account that will be used to reset the App Lock PIN if it is forgotten, then tap OK.
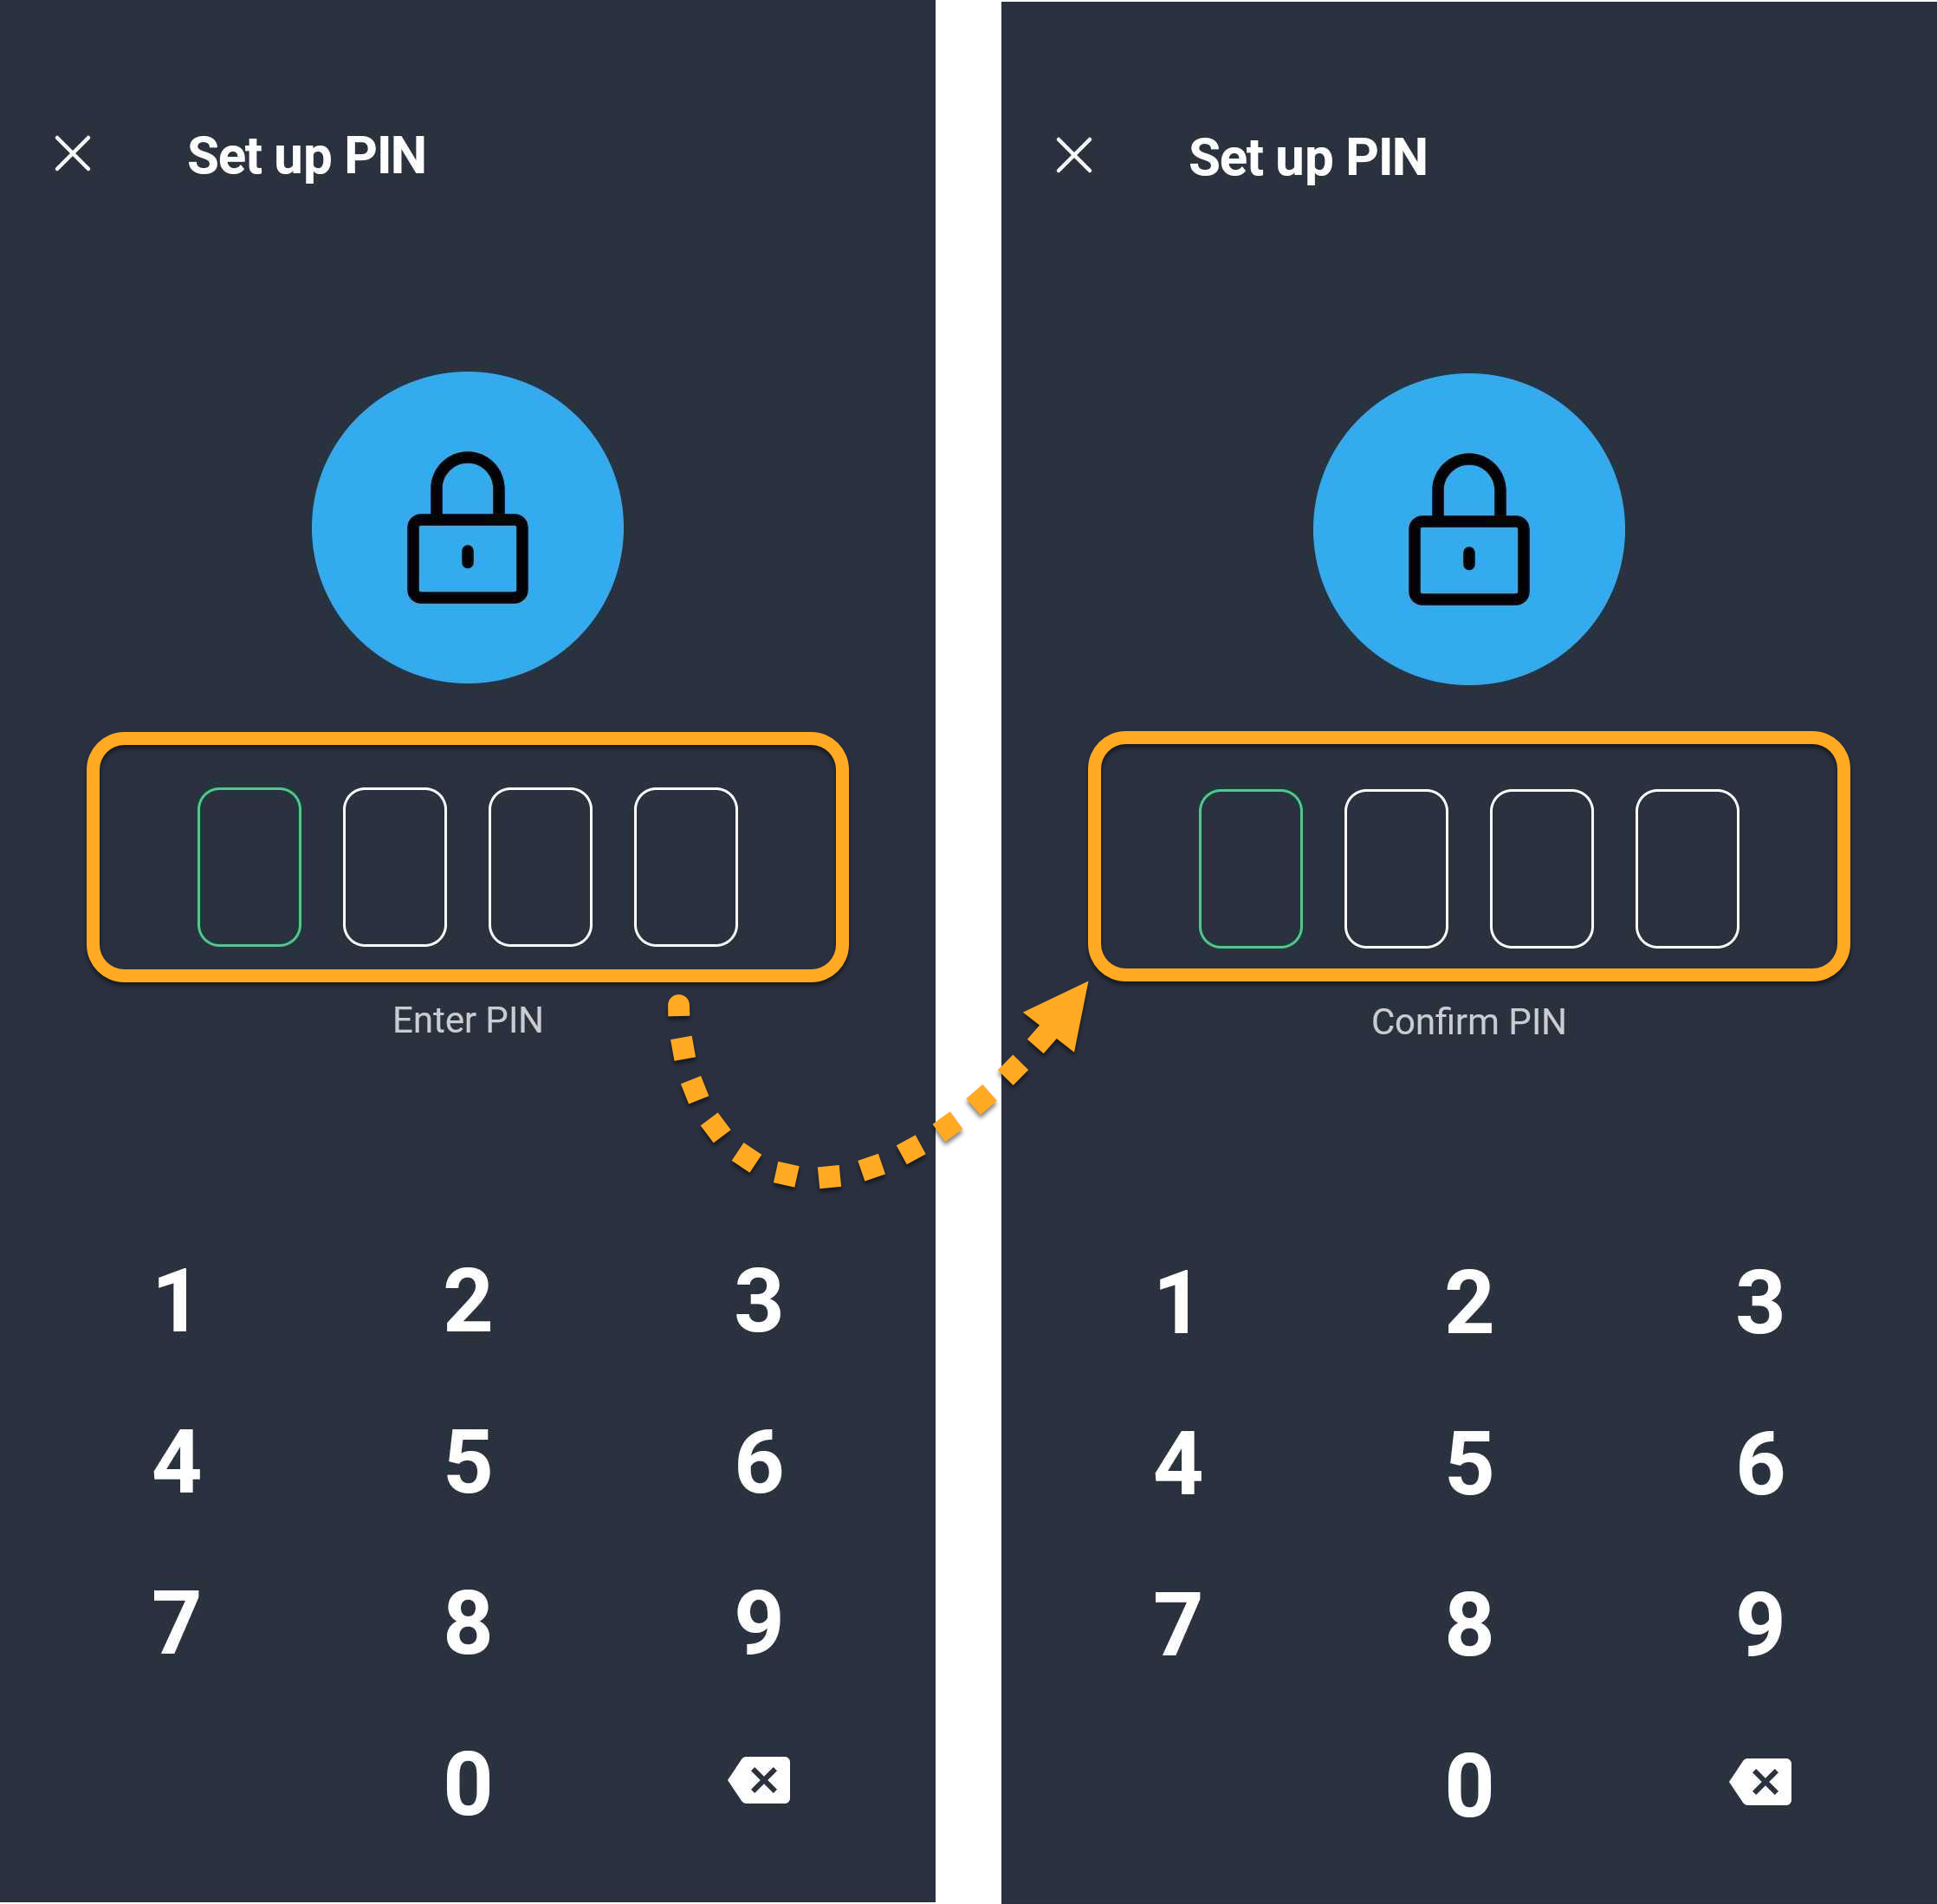
- Create a four-digit PIN, then enter it again to confirm.
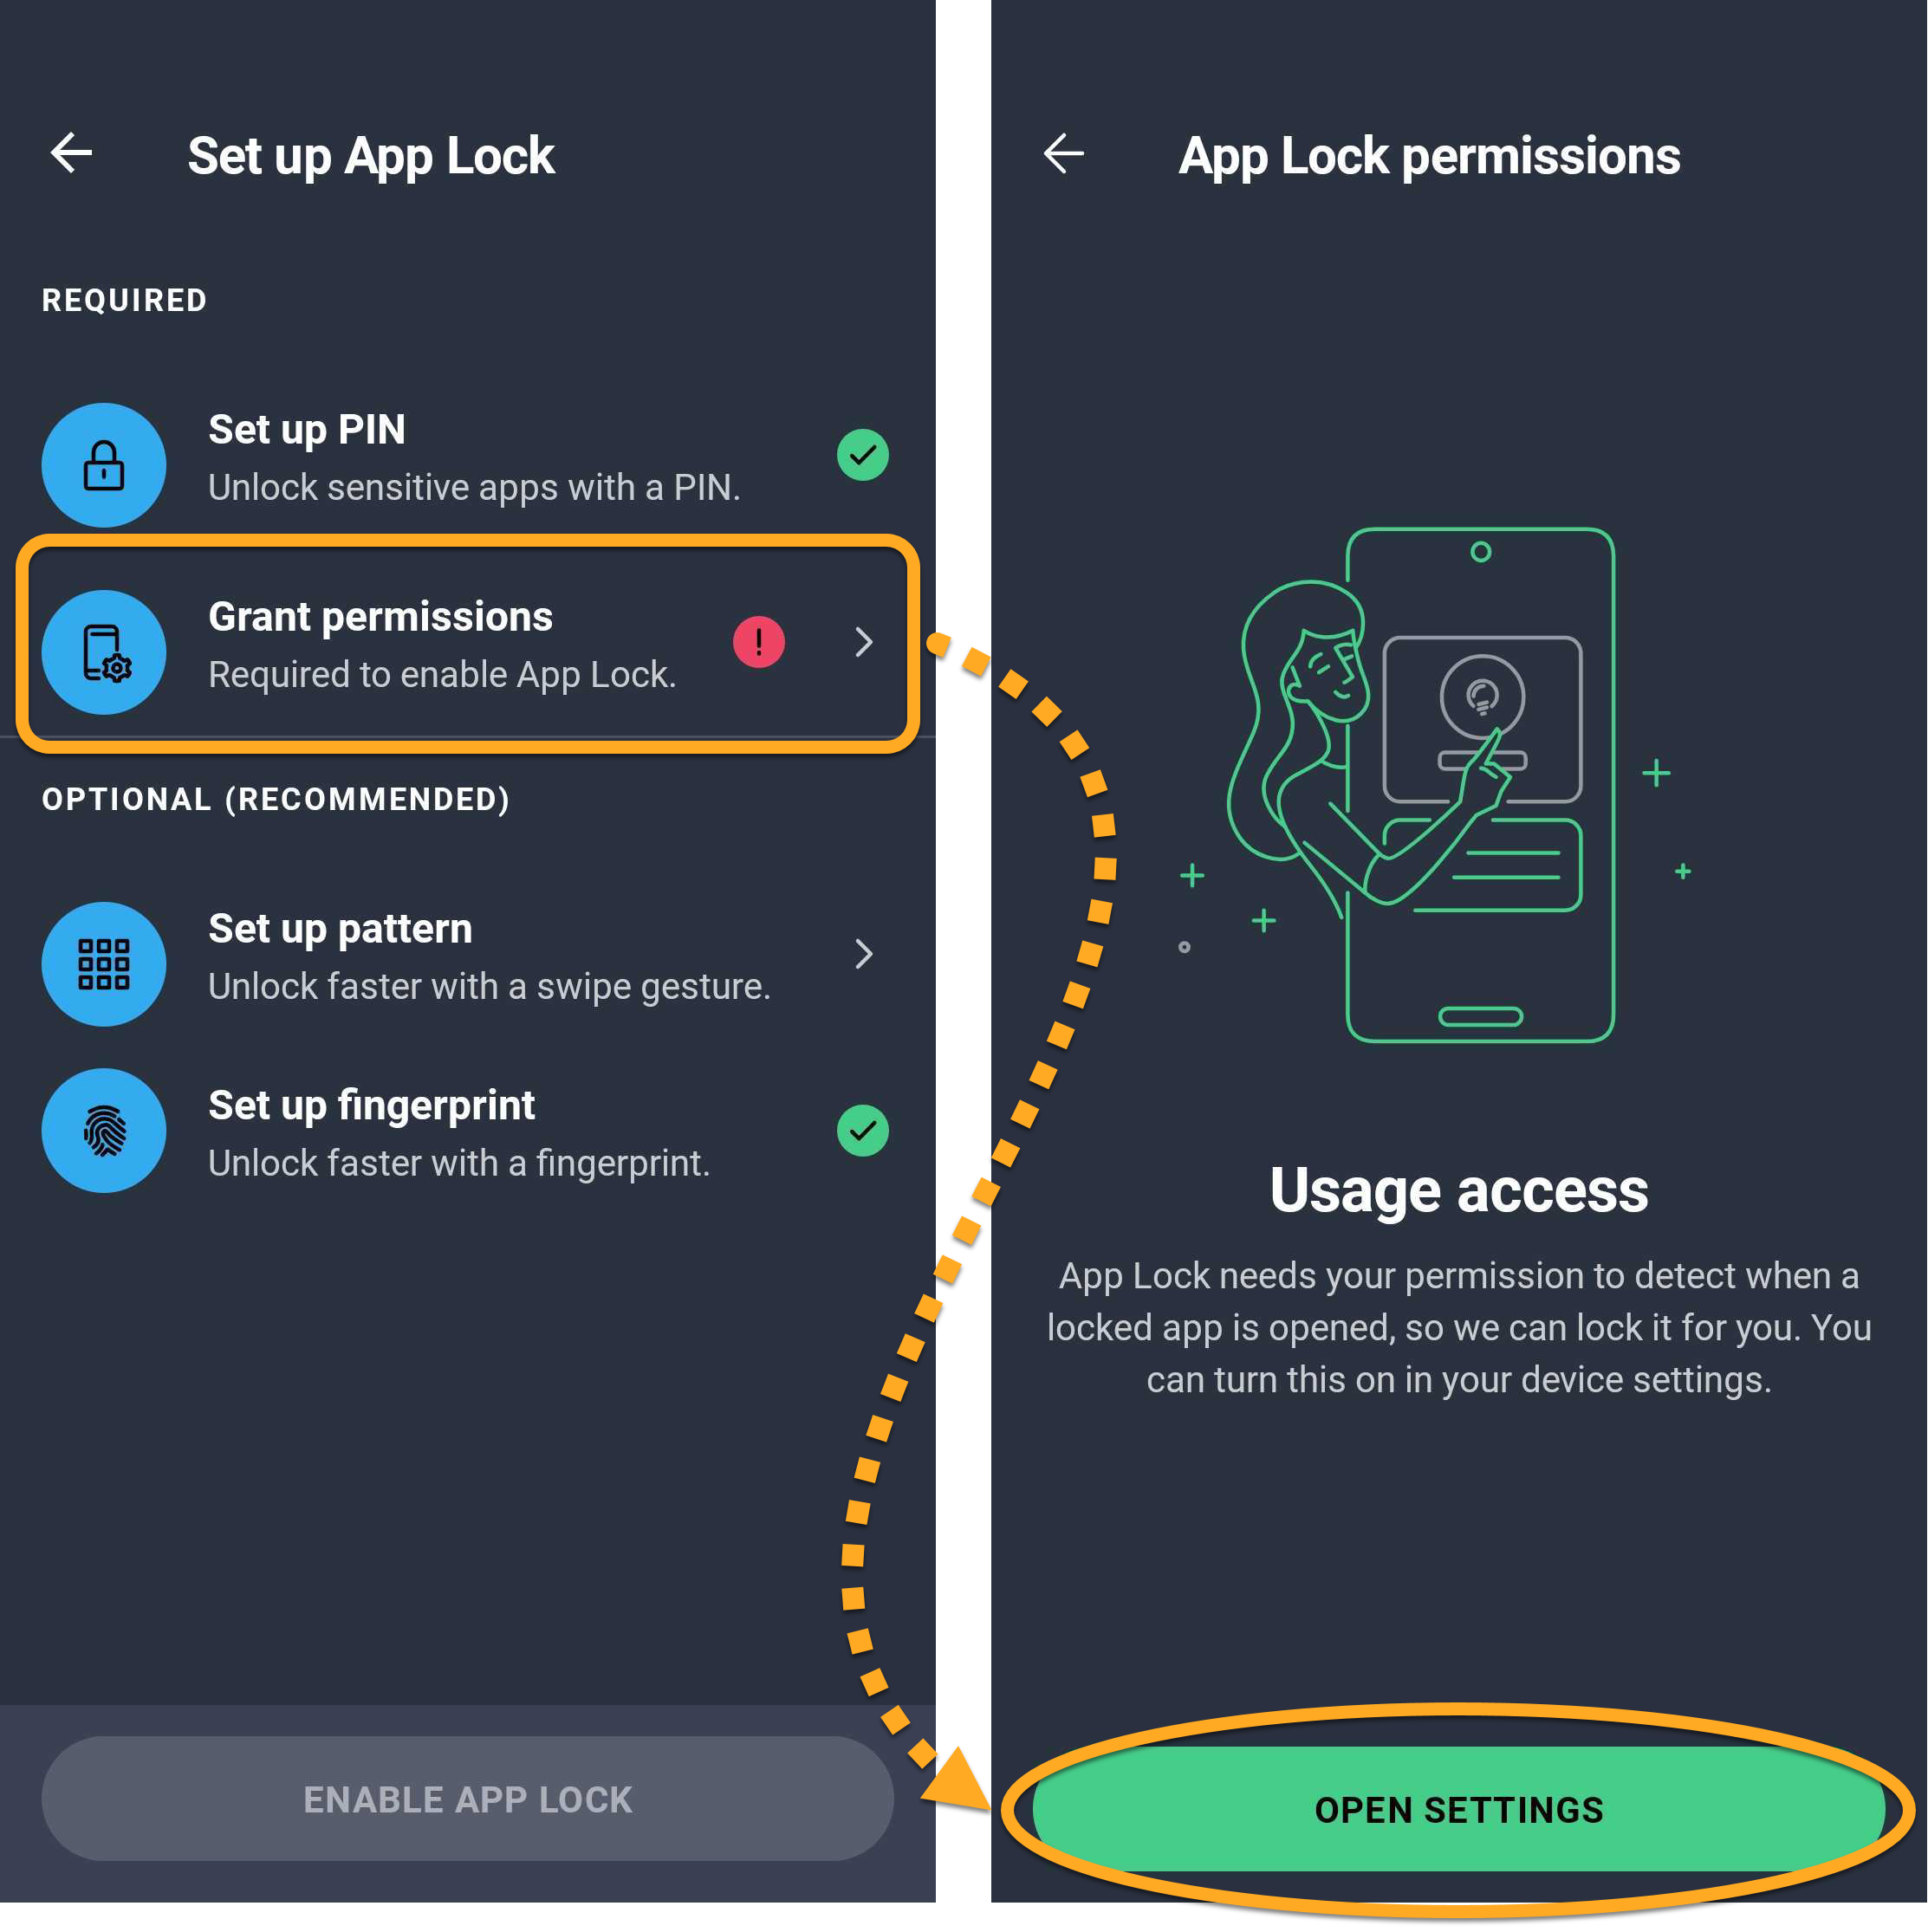
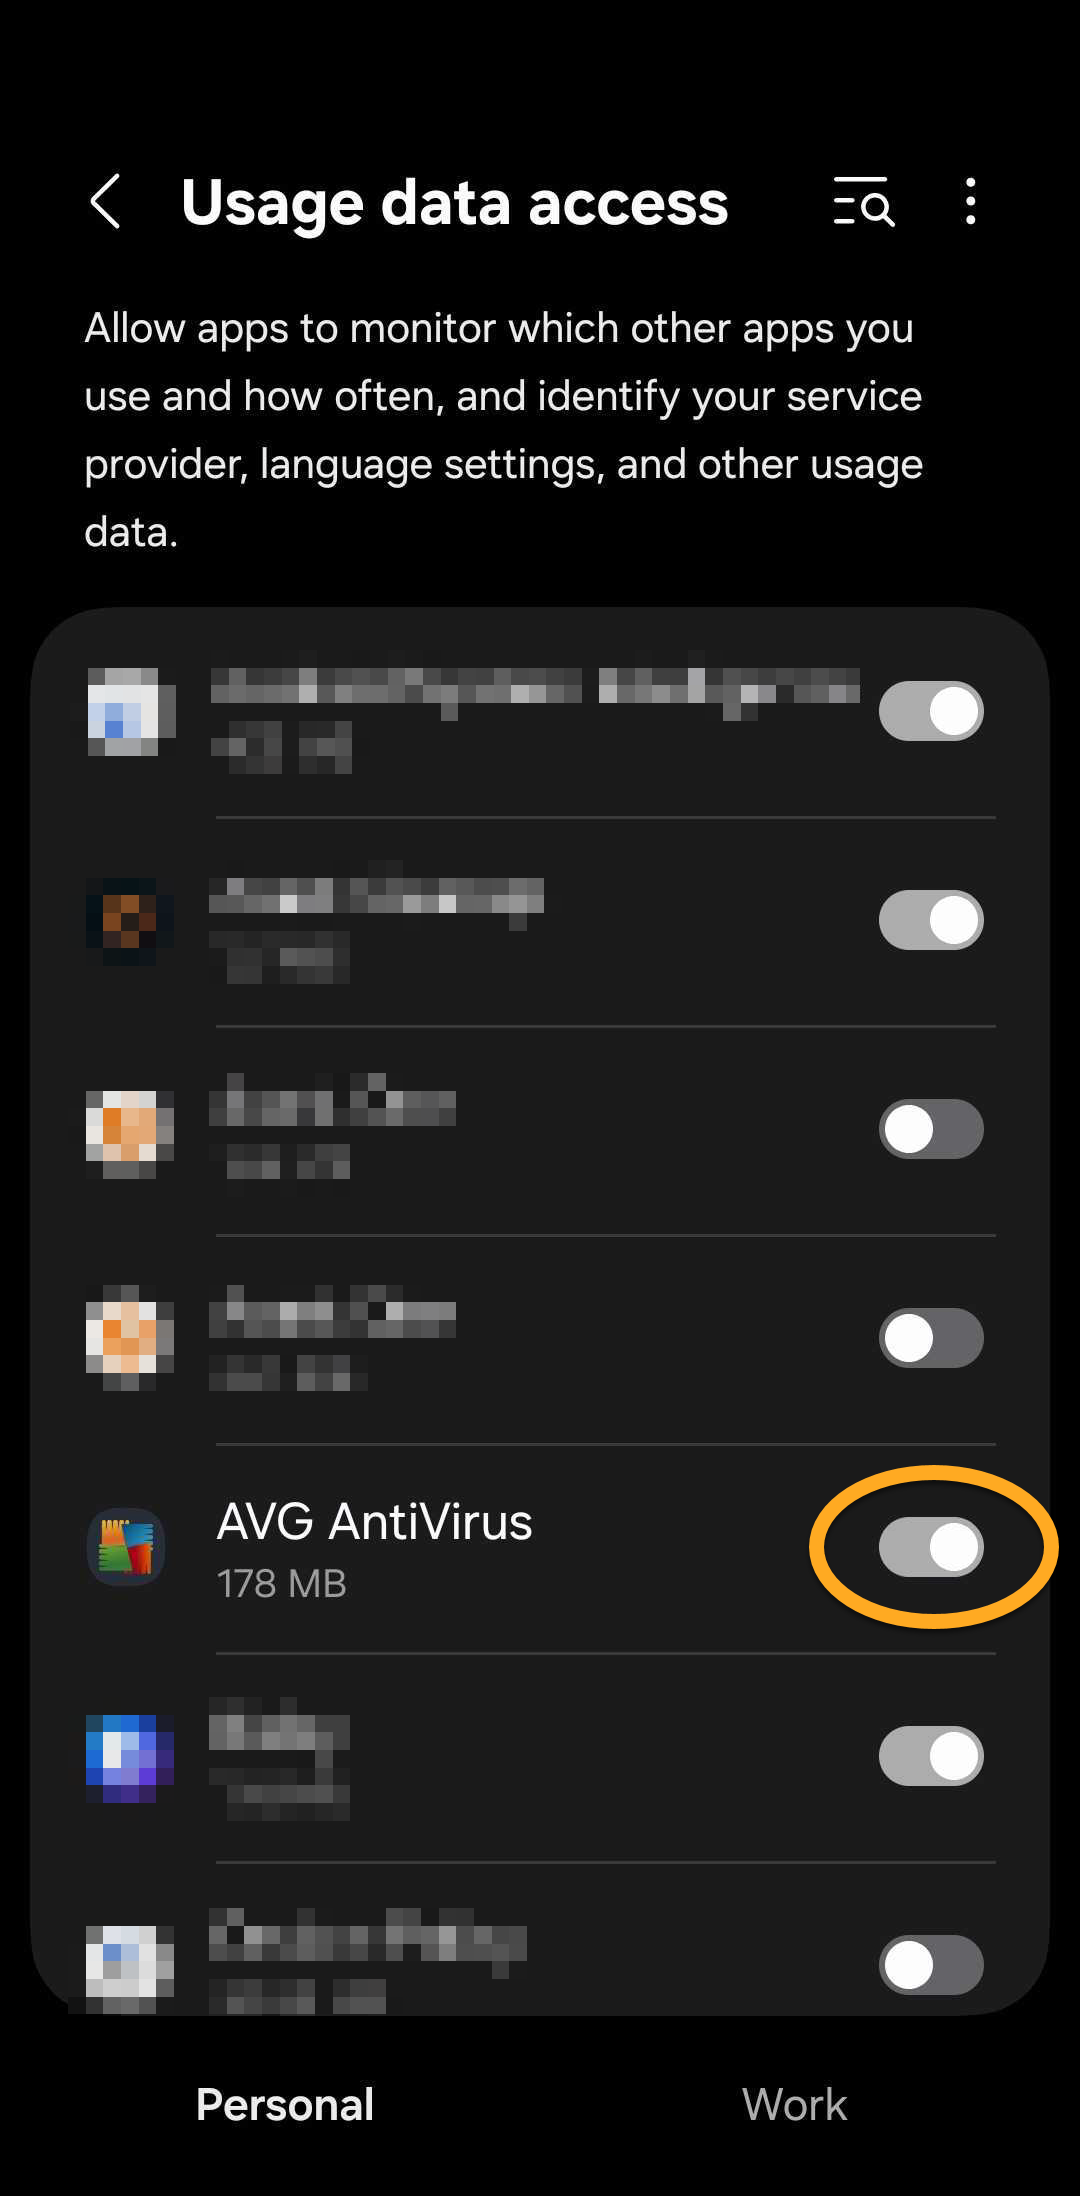
- Tap Grant permissions ▸ Open Settings.
- Ensure the slider next to AVG AntiVirus is ON to grant Usage data access.
If these permissions have not already been granted, you may also be asked to allow System overlay, Accessibility, and Run in background.
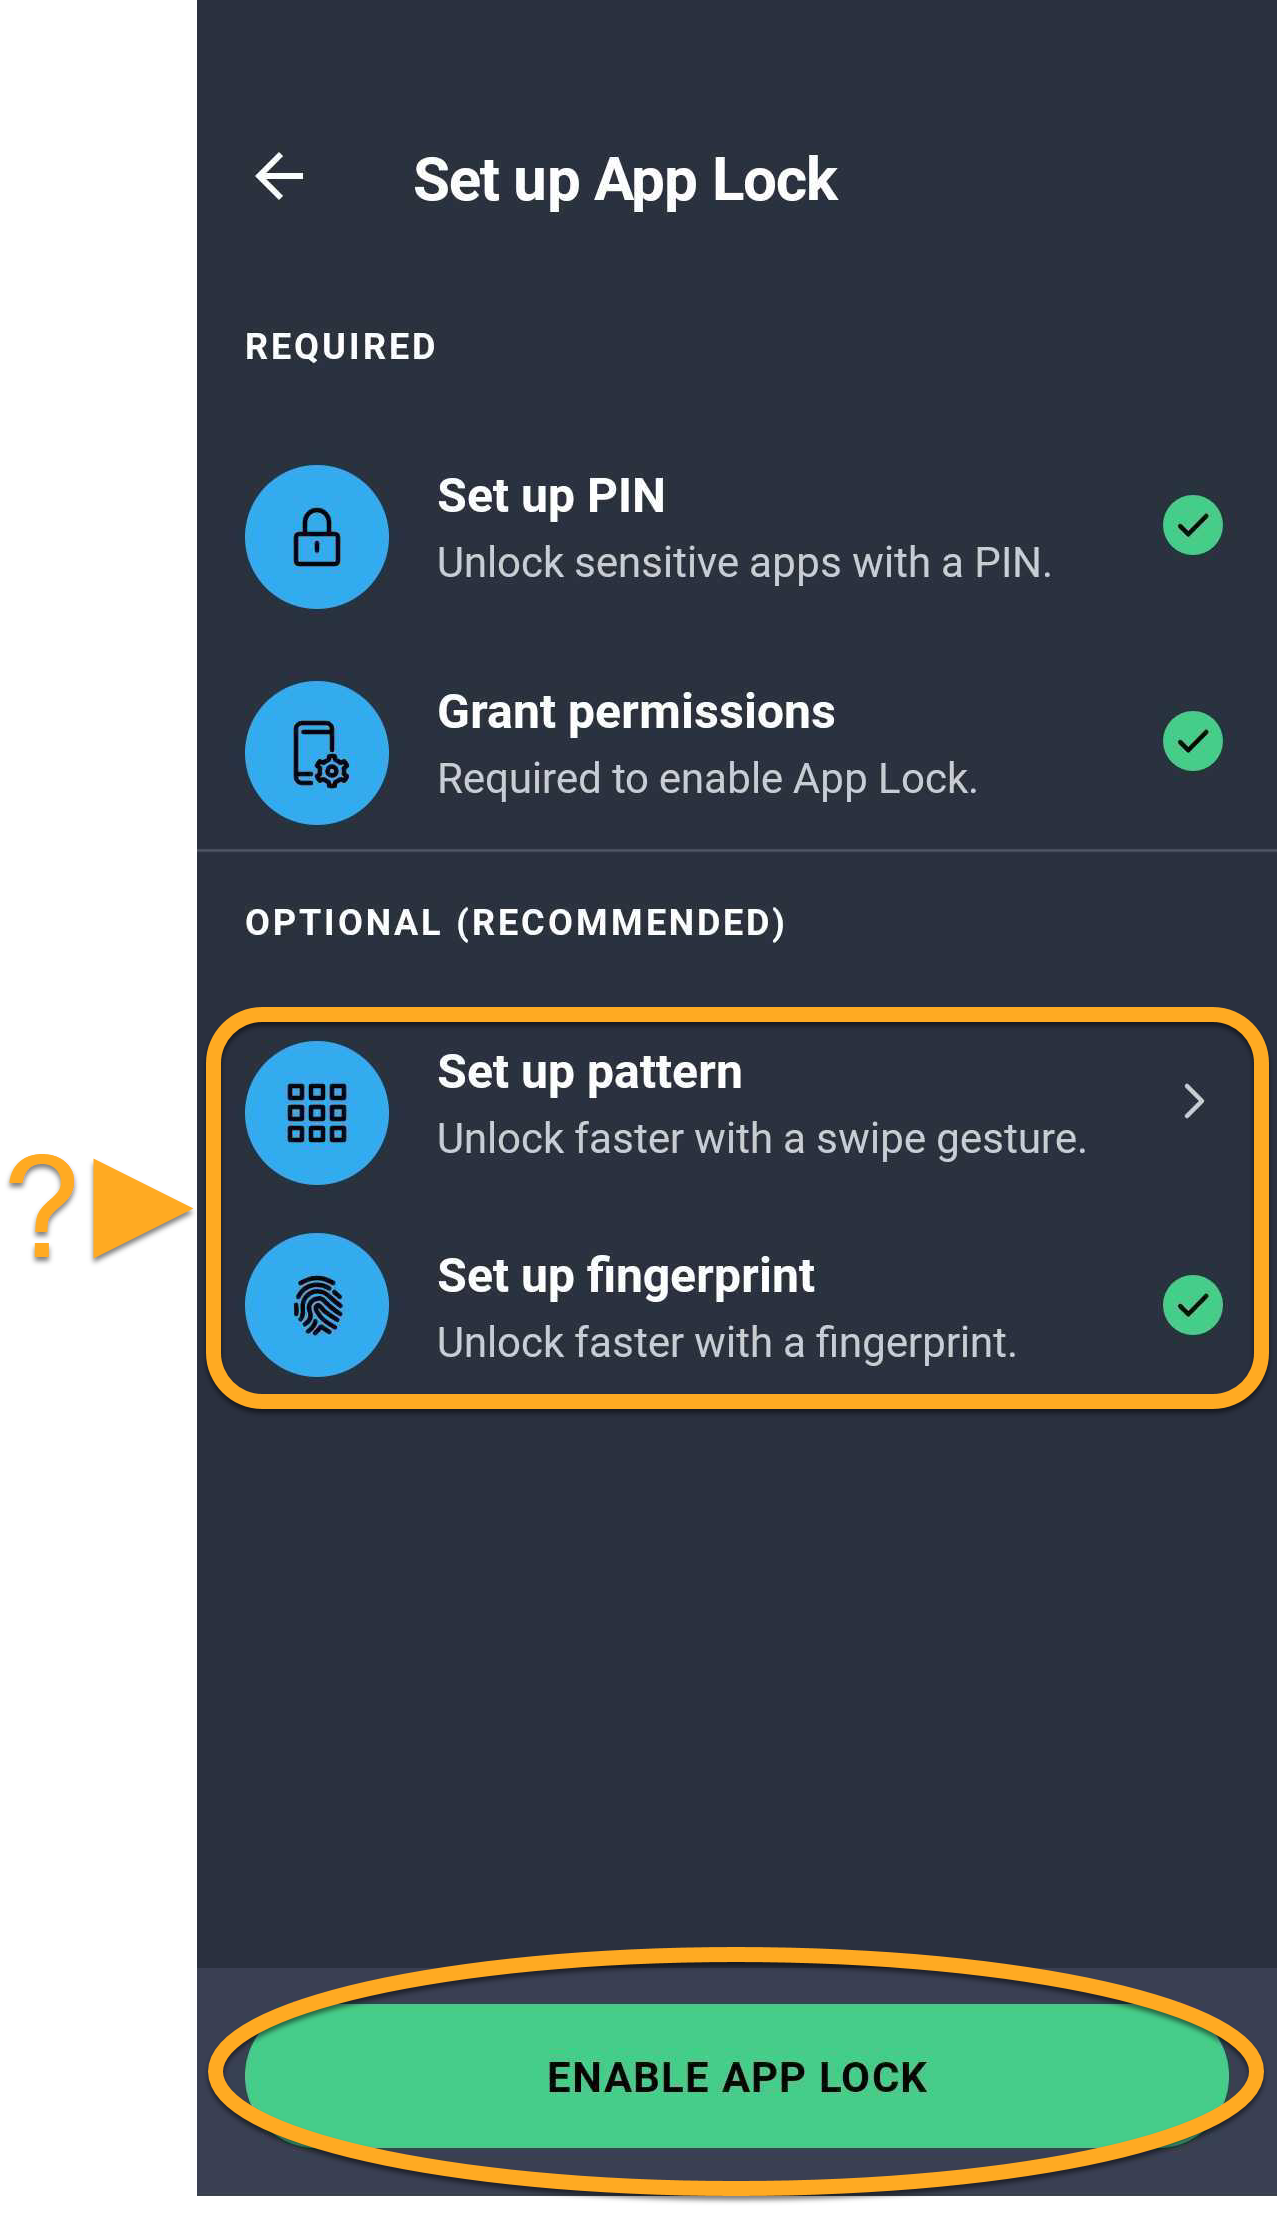
- Tap Enable App Lock. Optionally, tap Set up pattern or Set up fingerprint to use a pattern or fingerprint to unlock protected apps.
- App Lock is now enabled. On the main App Lock screen, tap the slider next to each app you want to protect so that it turns green (ON).
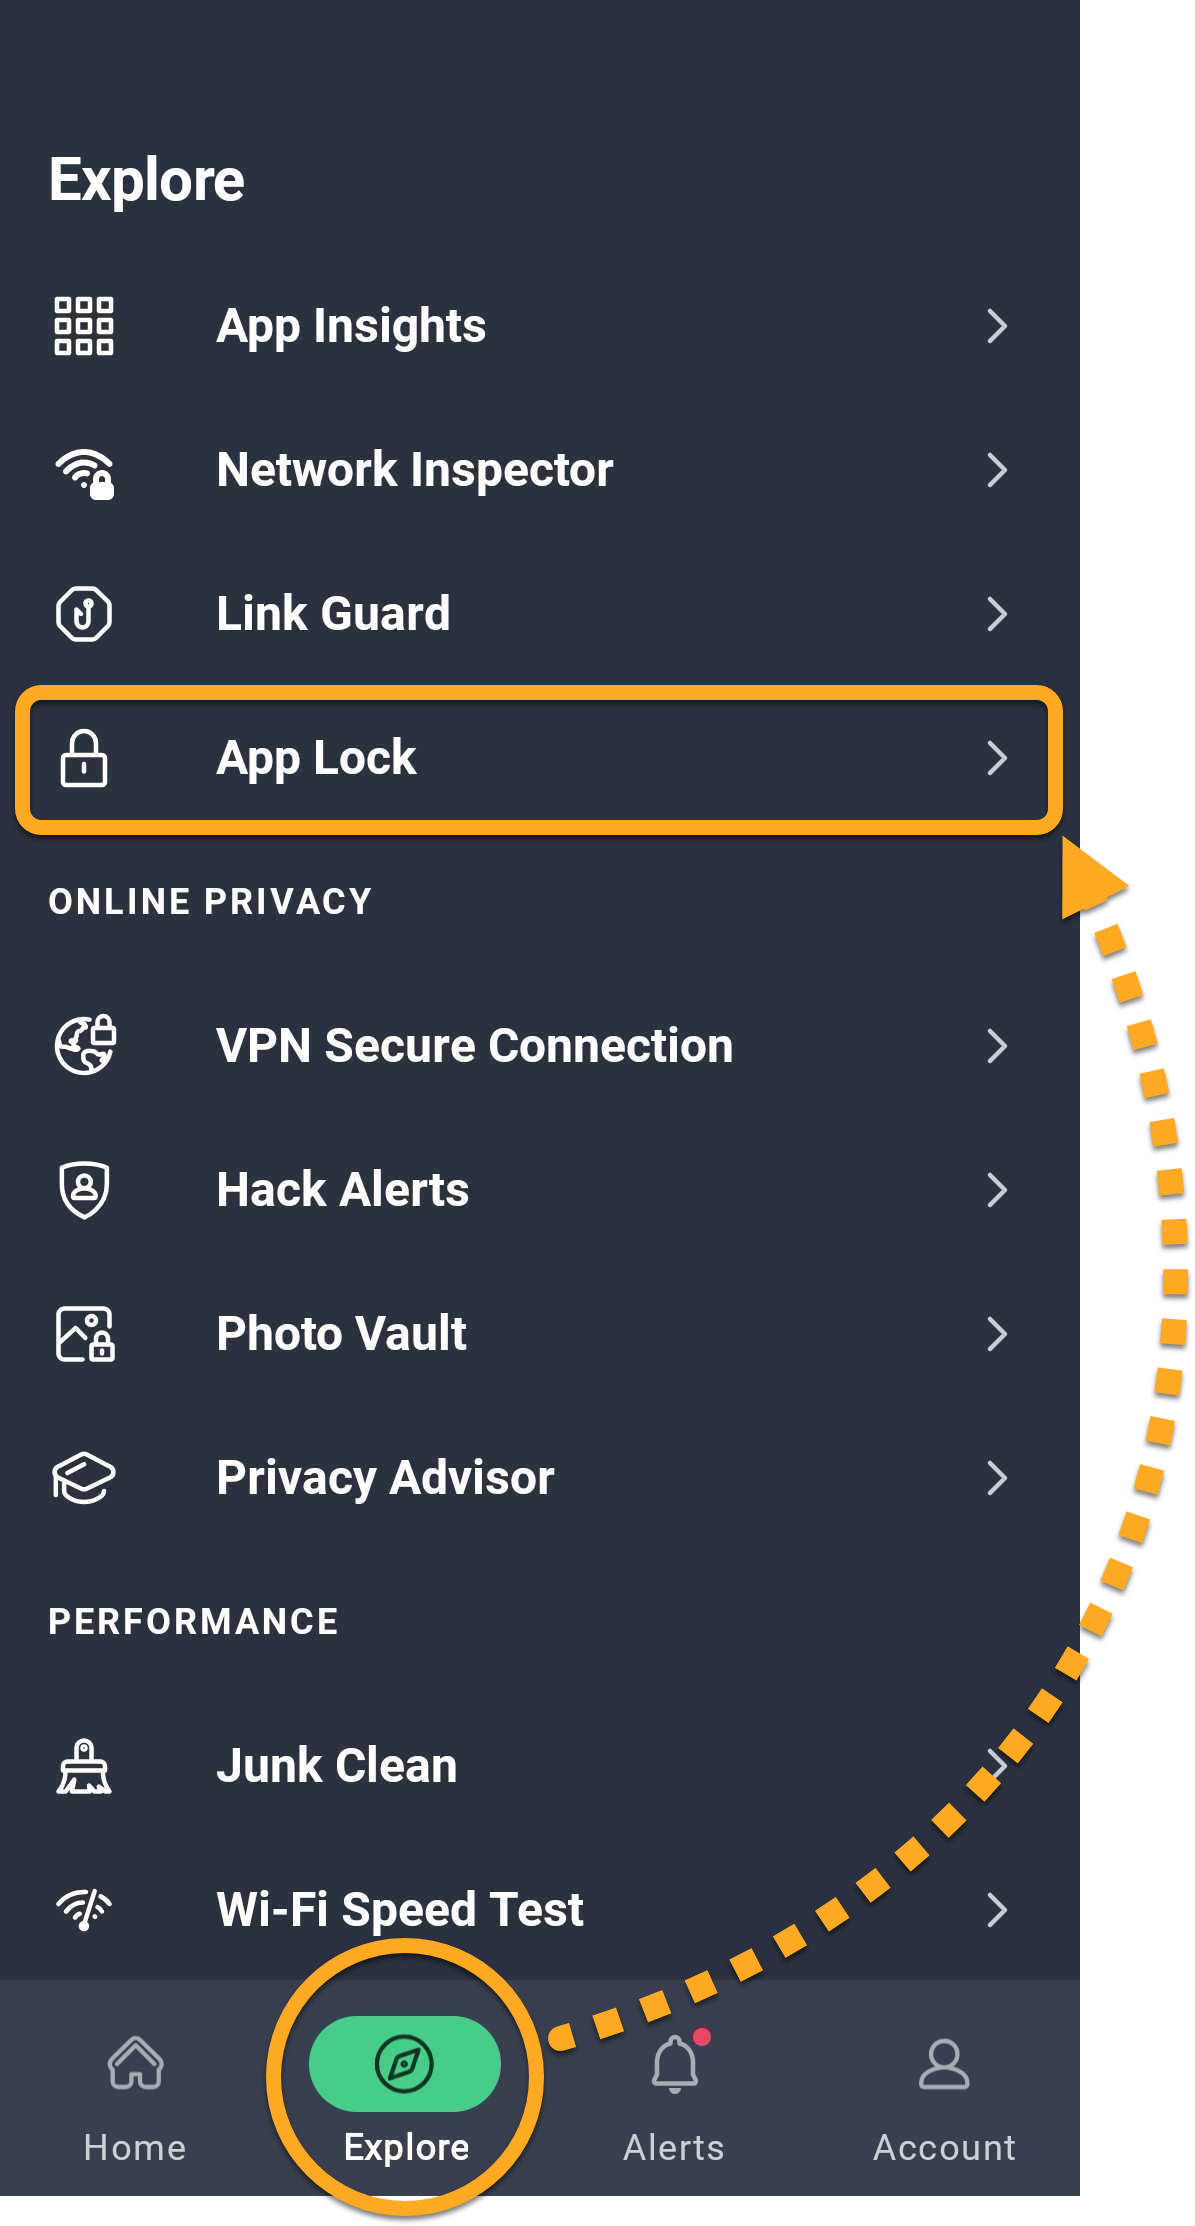
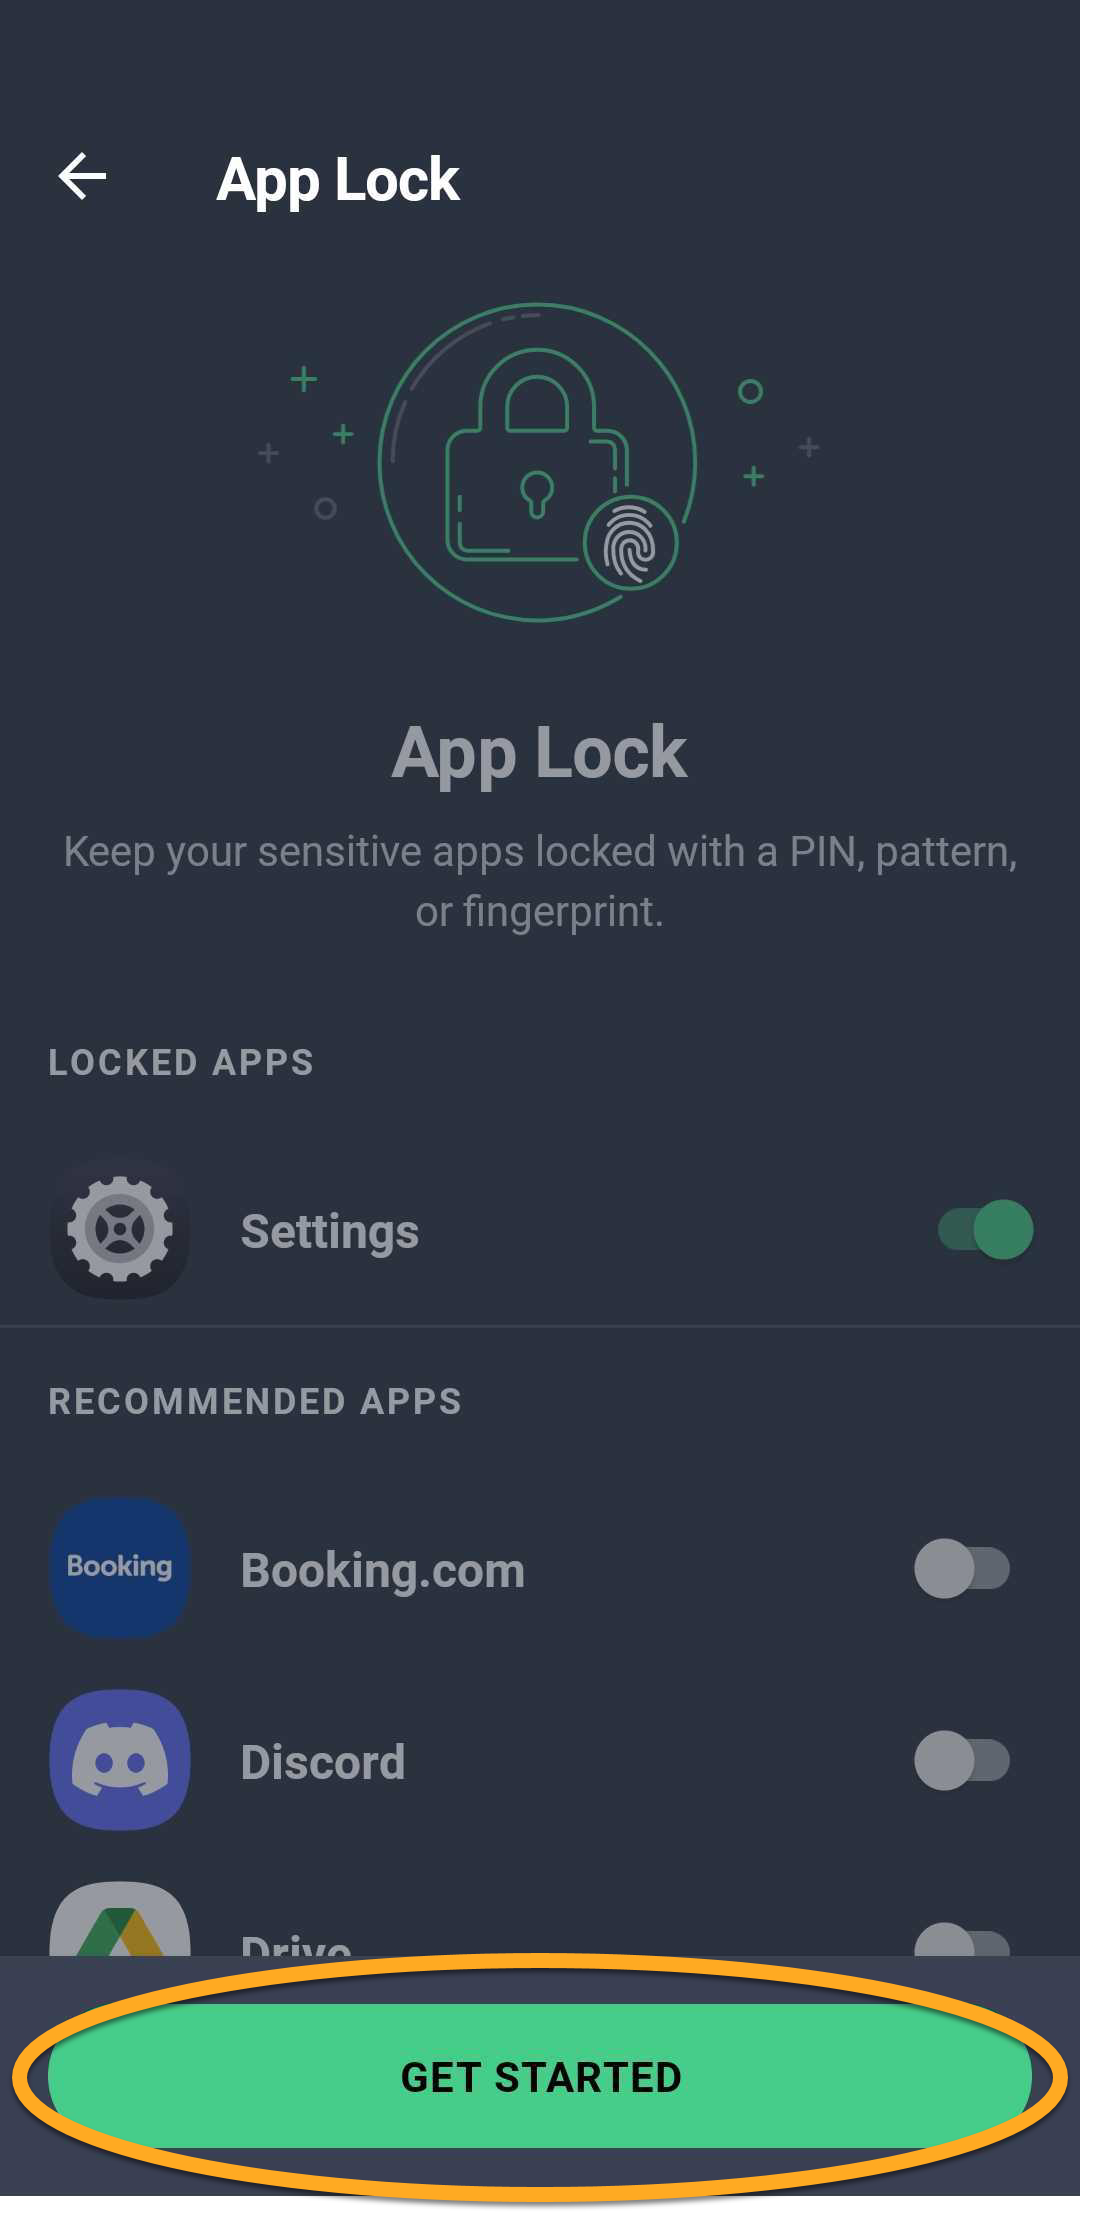
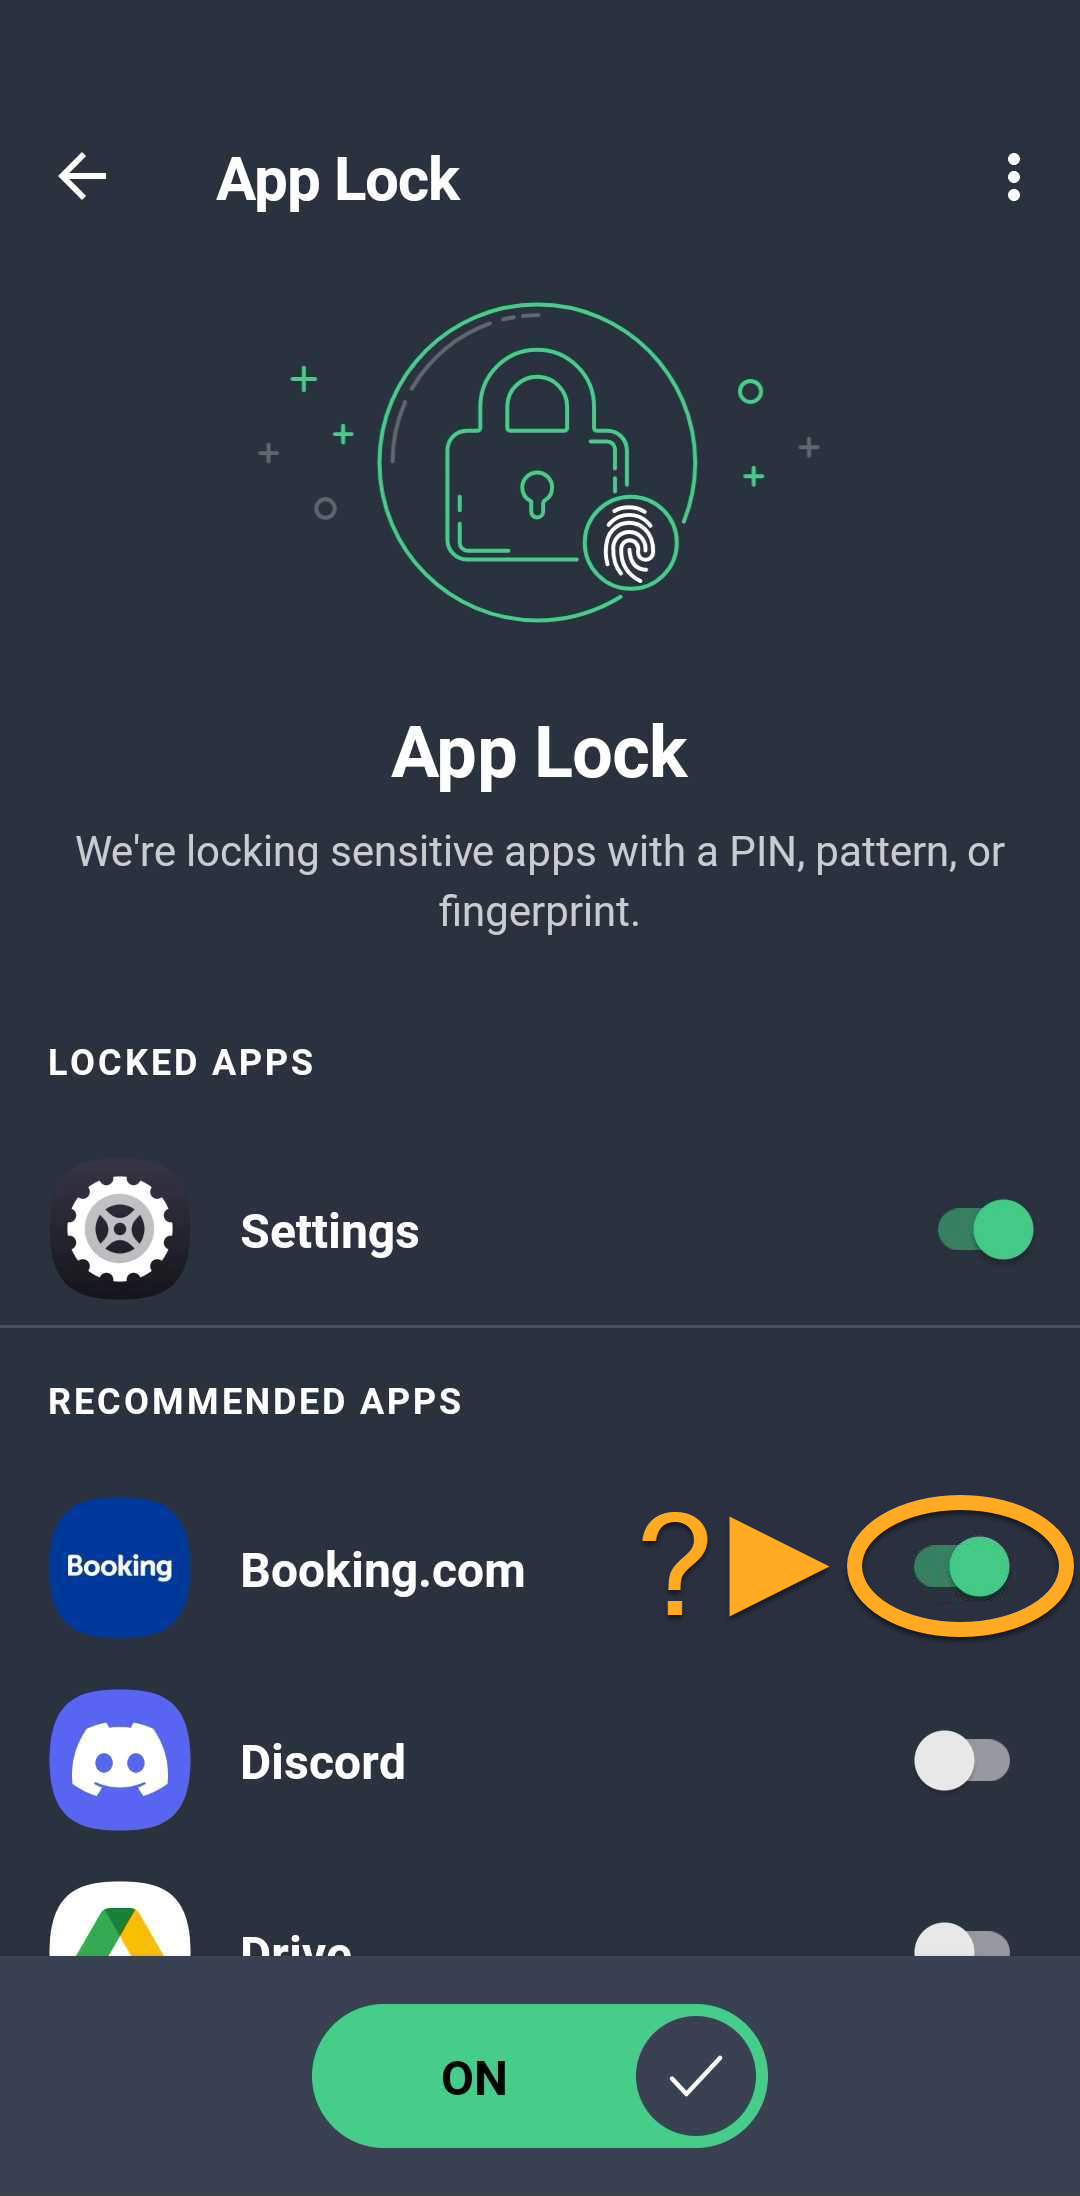
App Lock is now enabled for the selected apps. When opening a protected app, use the configured PIN, pattern, or fingerprint to unlock it.
Manage App Lock settings
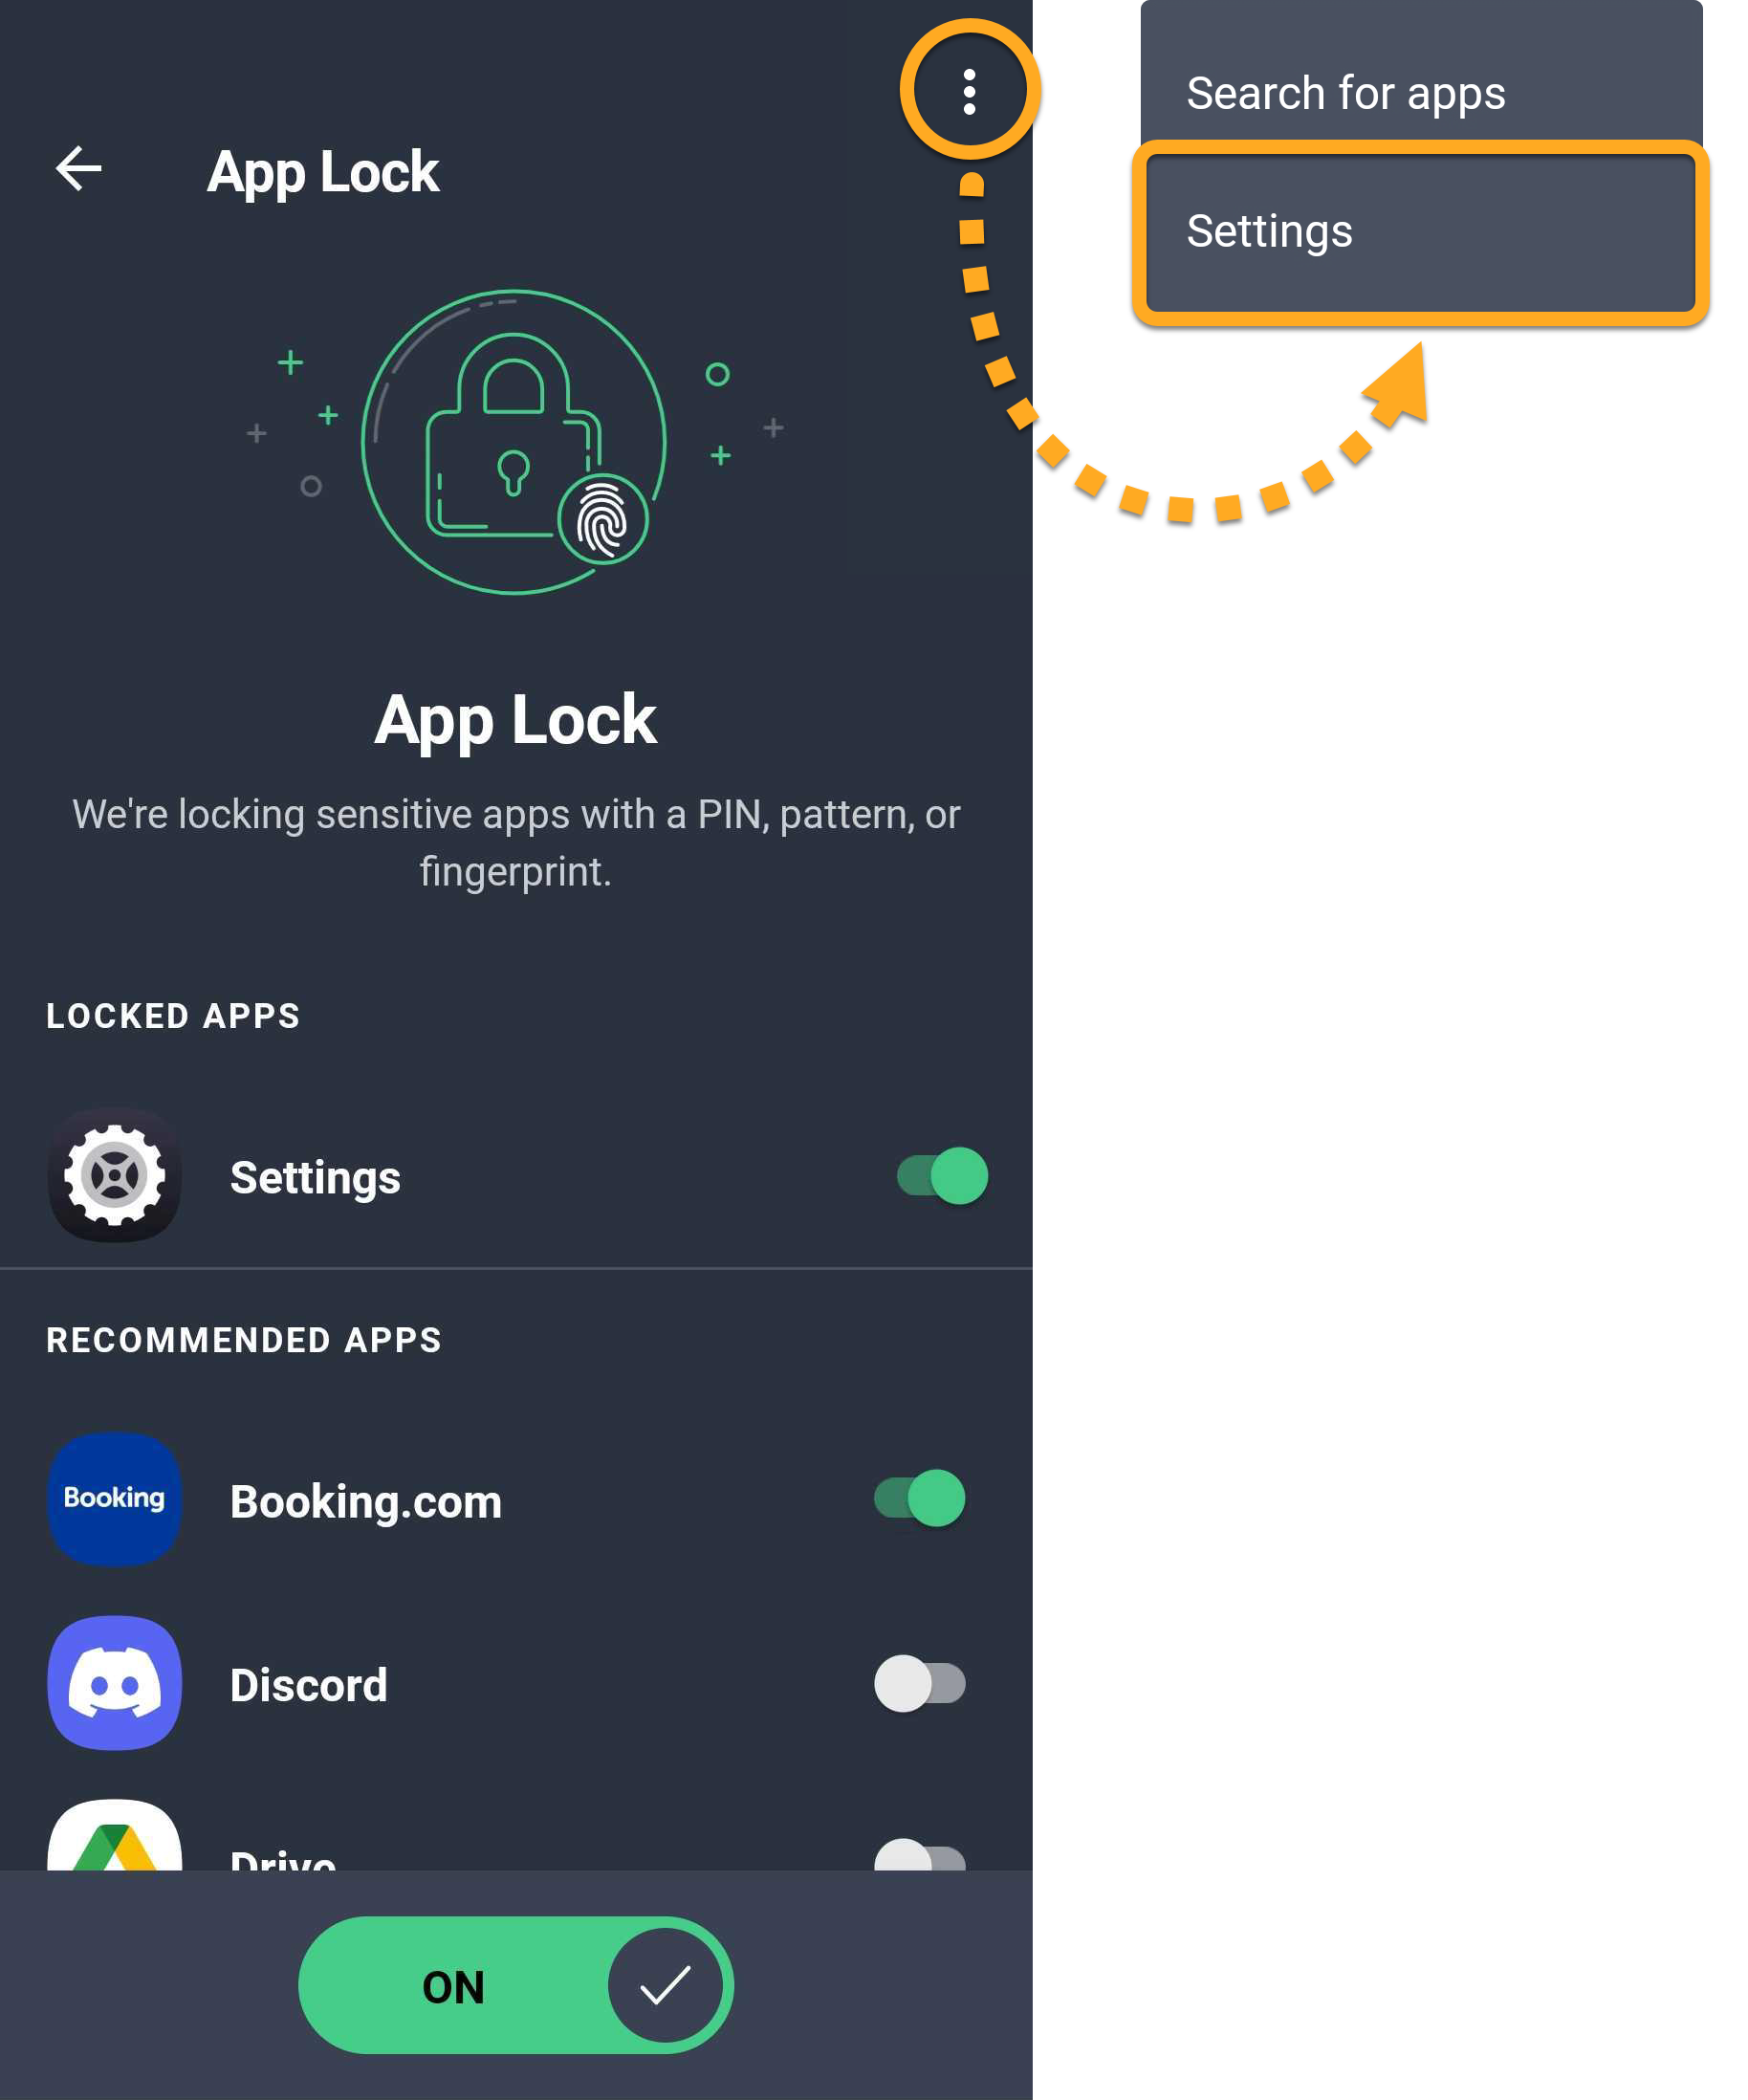
To manage App Lock settings, follow the steps below:
- Open AVG AntiVirus and tap Explore ▸ App Lock.
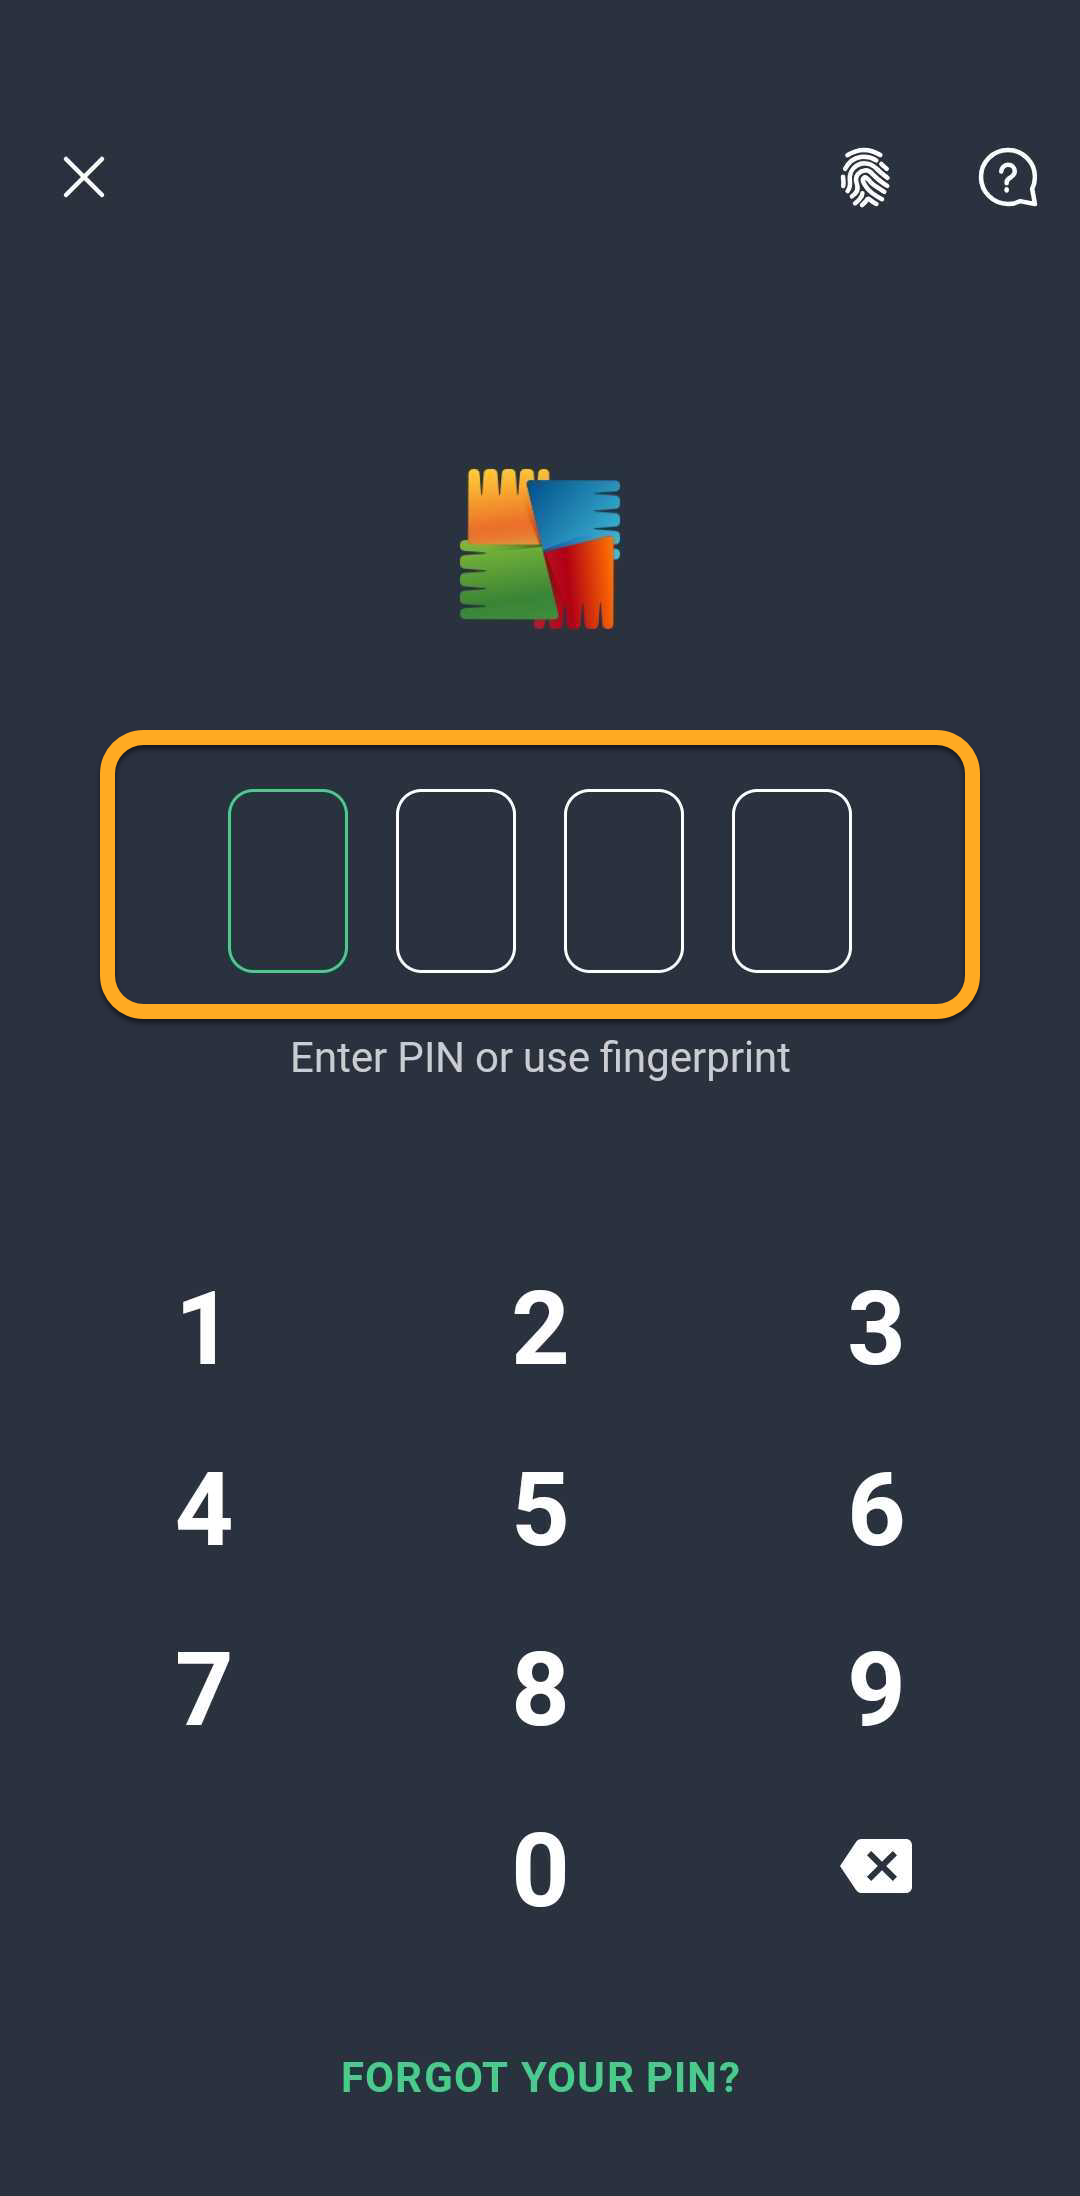
- Enter your App Lock PIN.
- Tap
⋮More options (the three dots) ▸ Settings.
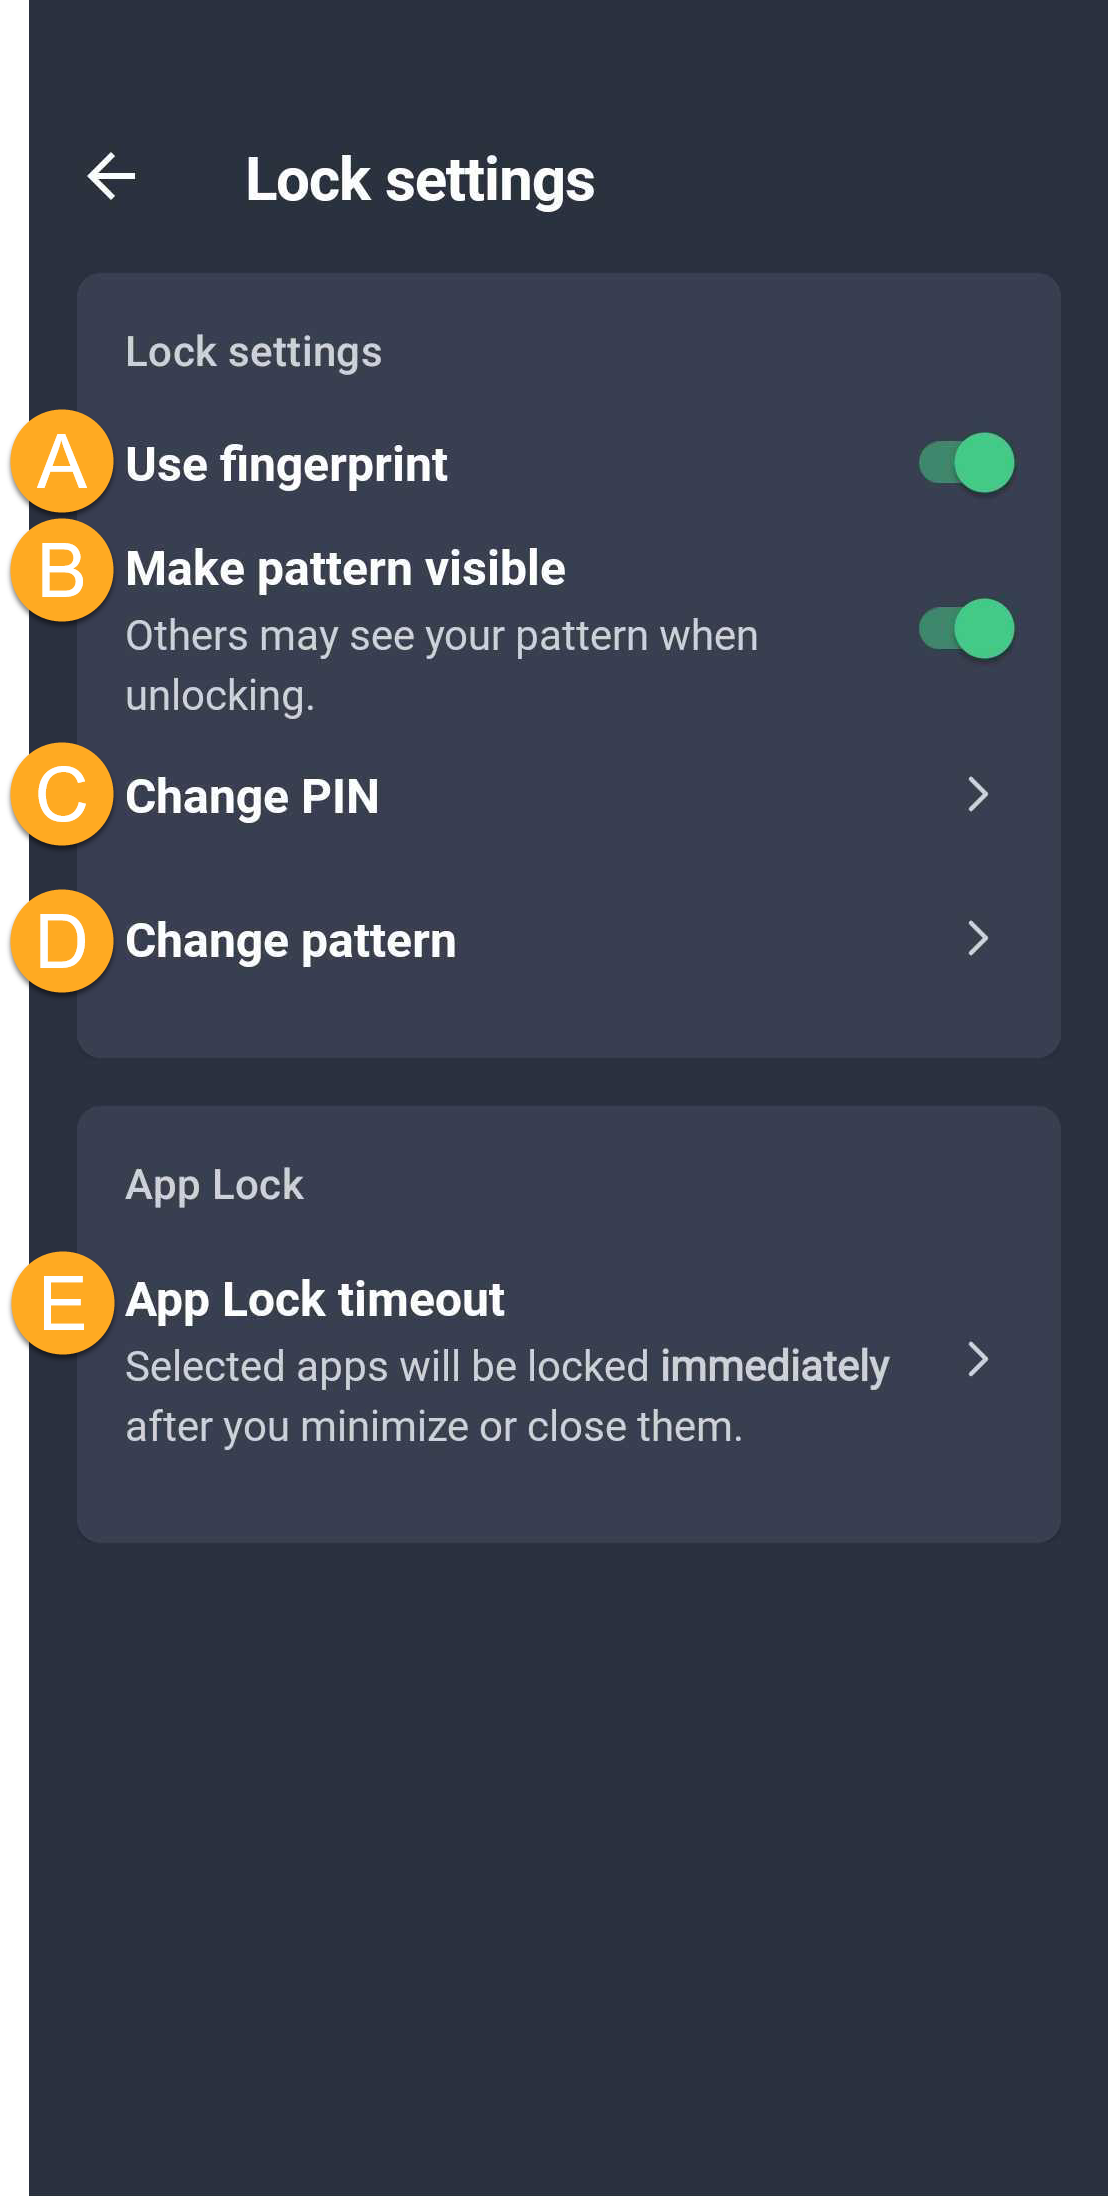
- The following options are available:
- Use fingerprint: If supported on your device, enable this option to unlock protected apps and features using your fingerprint.
- Make pattern visible: Shows your unlock pattern.
- Change PIN: Set a new App Lock PIN. To use this option, first enter the current App Lock PIN.
- Change pattern: Set a new App Lock swipe pattern. To use this option, first enter the current swipe pattern.
- App Lock timeout: Specify when your apps lock (Immediately, After 10 seconds, After 30 seconds, After 1 minute, or When screen turns off).
Disable App Lock
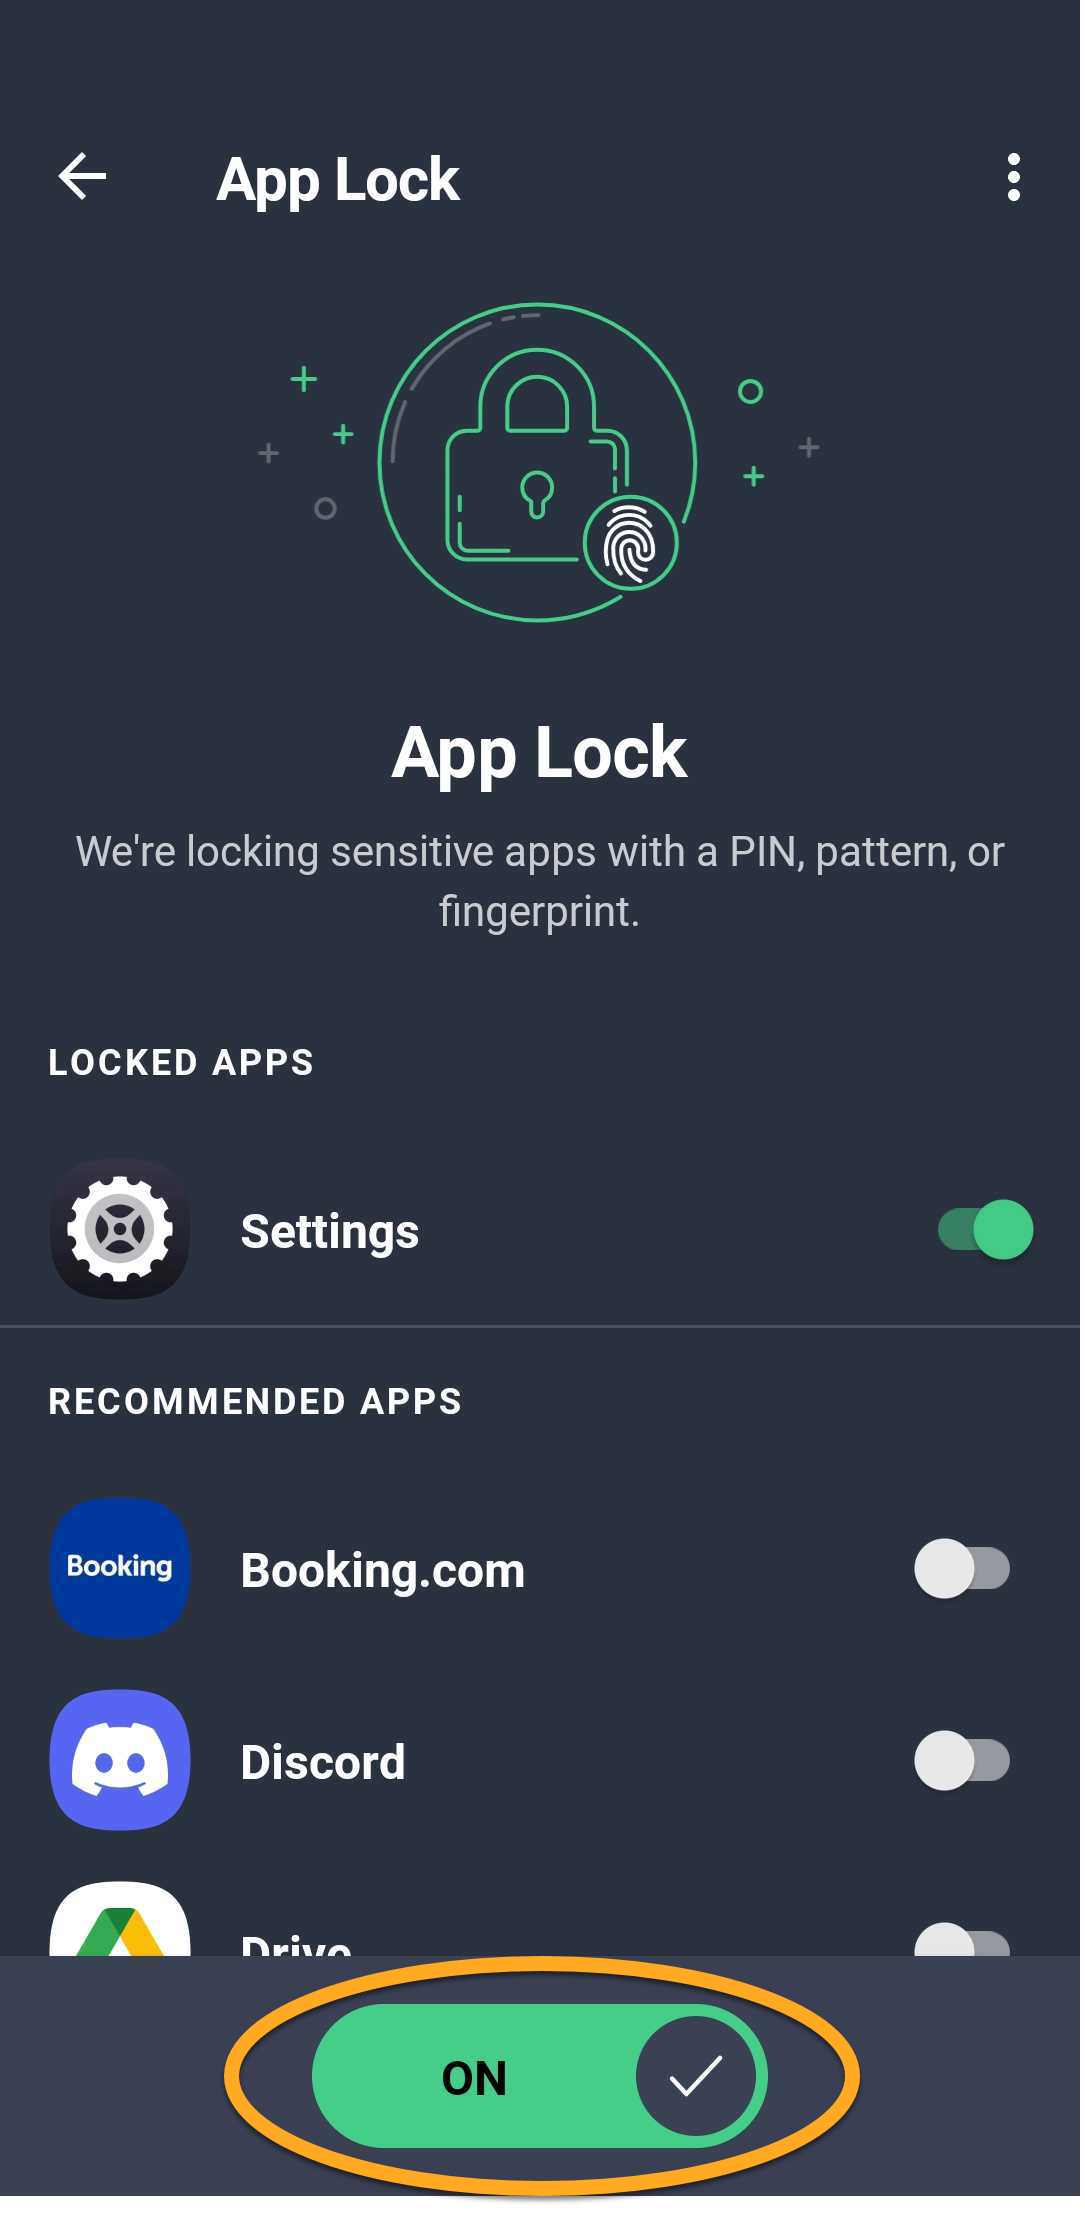
To disable App Lock:
- Open AVG AntiVirus and tap Explore ▸ App Lock.
- Enter your App Lock PIN.
- Tap the main App Lock slider so that it changes from green (ON) to gray (OFF).
Reset App Lock PIN
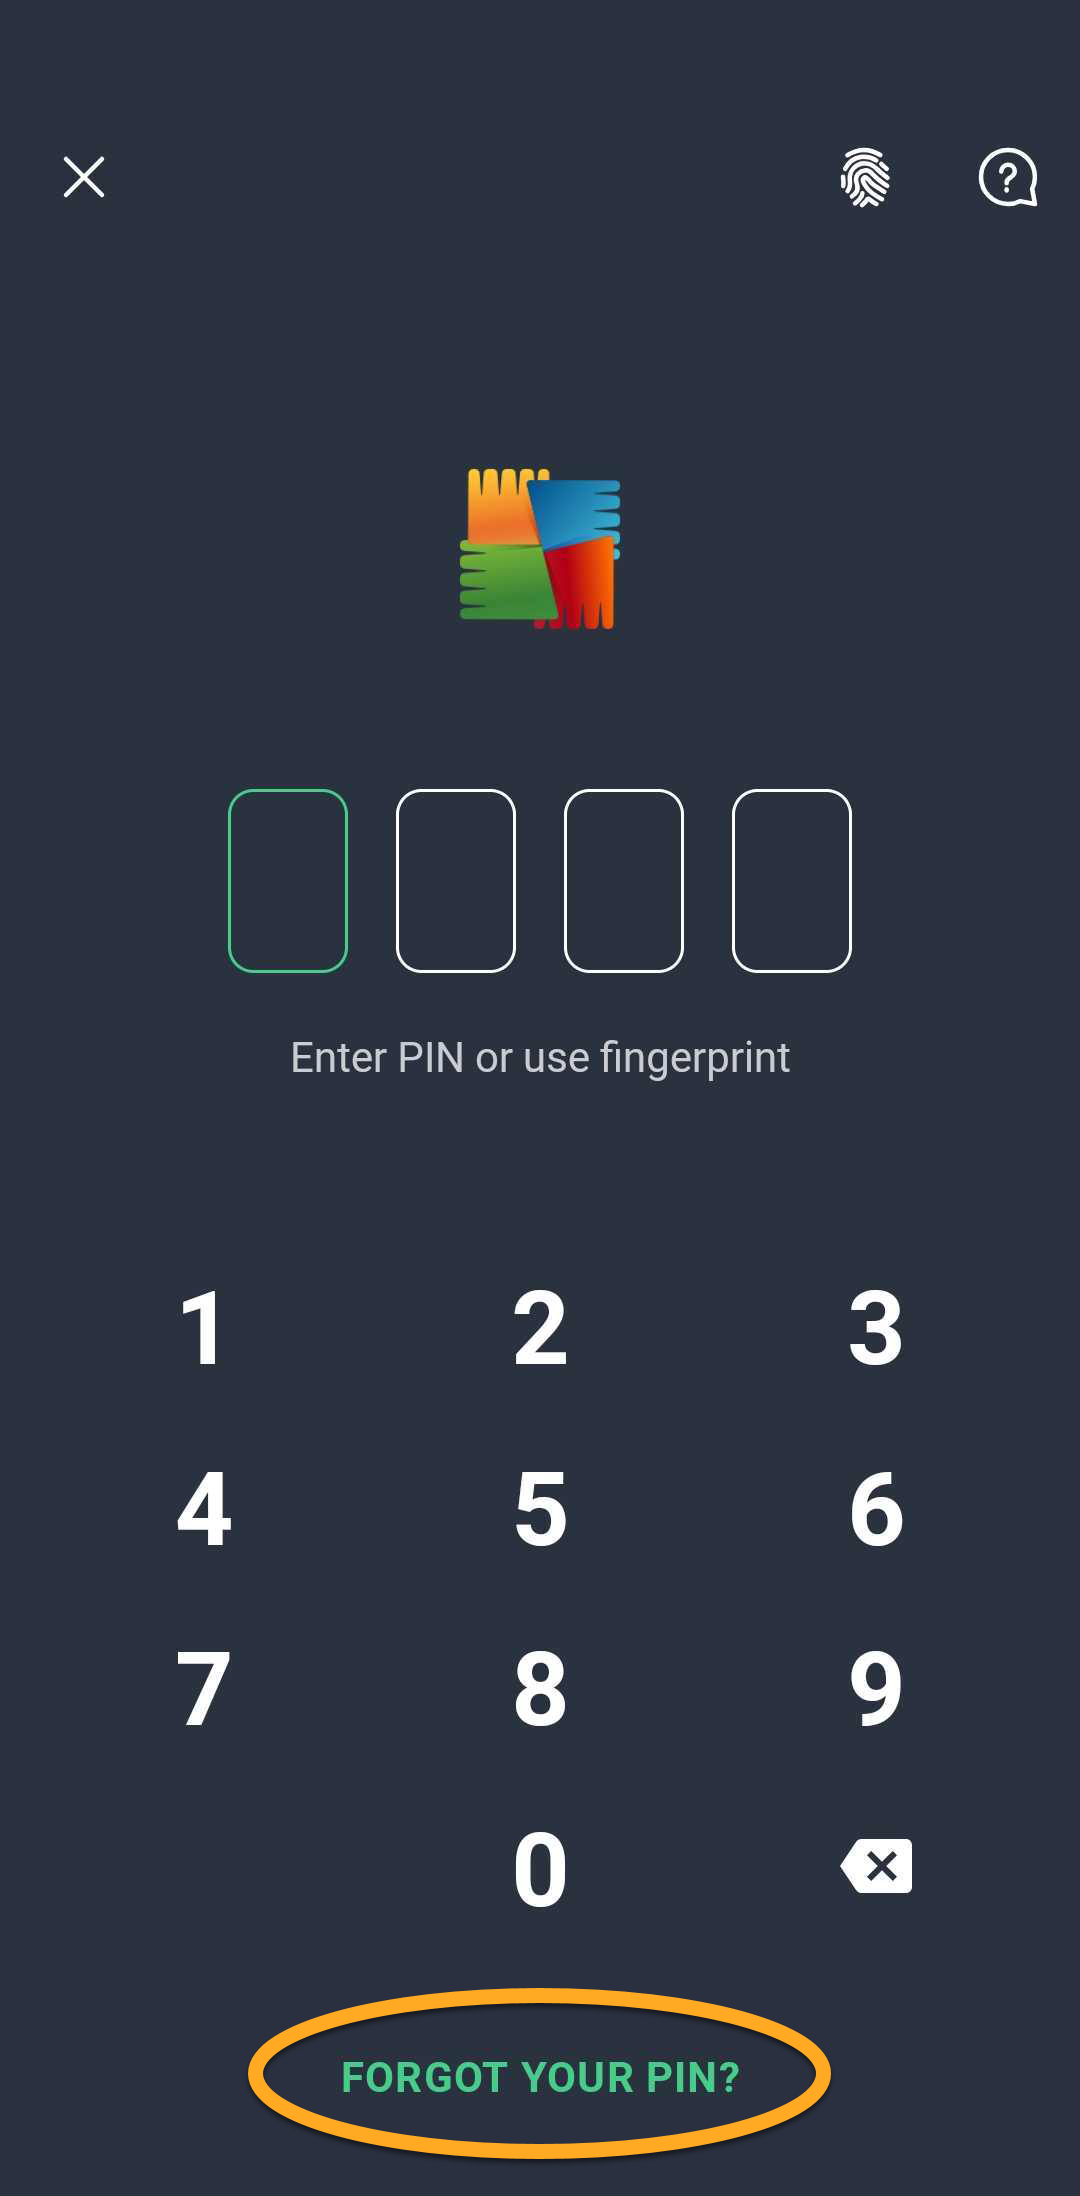
If you forget your App Lock PIN, you can reset it by following the steps below:
- Open AVG AntiVirus and tap Explore ▸ App Lock.
- When you are asked to enter your PIN, tap Forgot your PIN?.
- Follow the on-screen instructions to sign in to the email account selected during App Lock setup.
- After signing in to the selected email account, create a new four-digit PIN, then enter it again to confirm.
Check for hacks and leaks
The Hack Alerts feature monitors online accounts associated with an email address and notifies you if the email address is involved in a data breach.
To enable Hack Alerts:
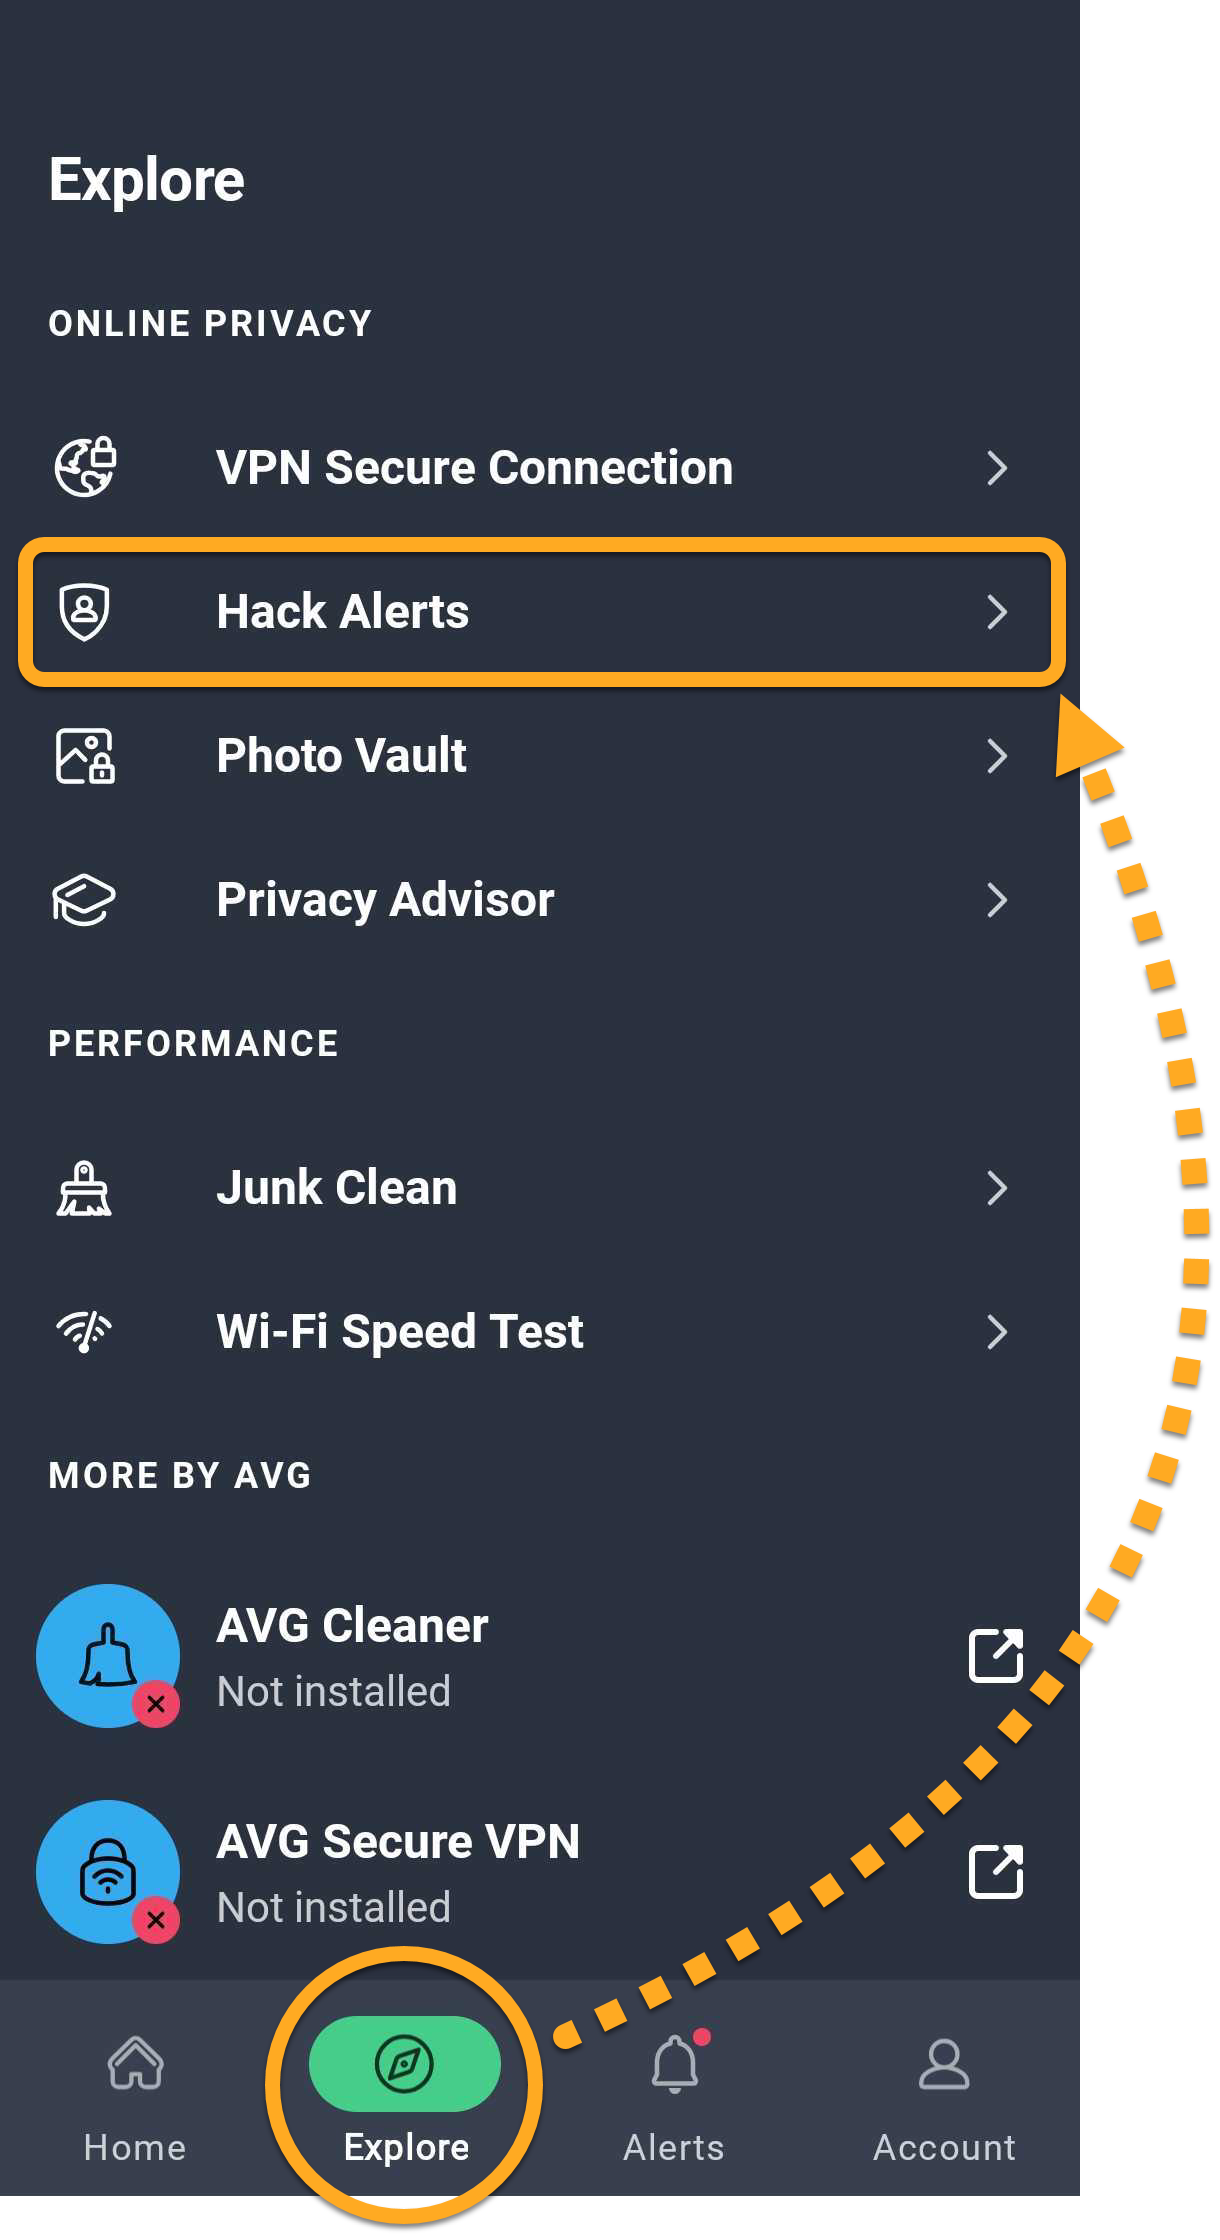
- Tap Explore ▸ Hack Alerts.
- Tap Add email, enter the email address you want to monitor, then tap Add.
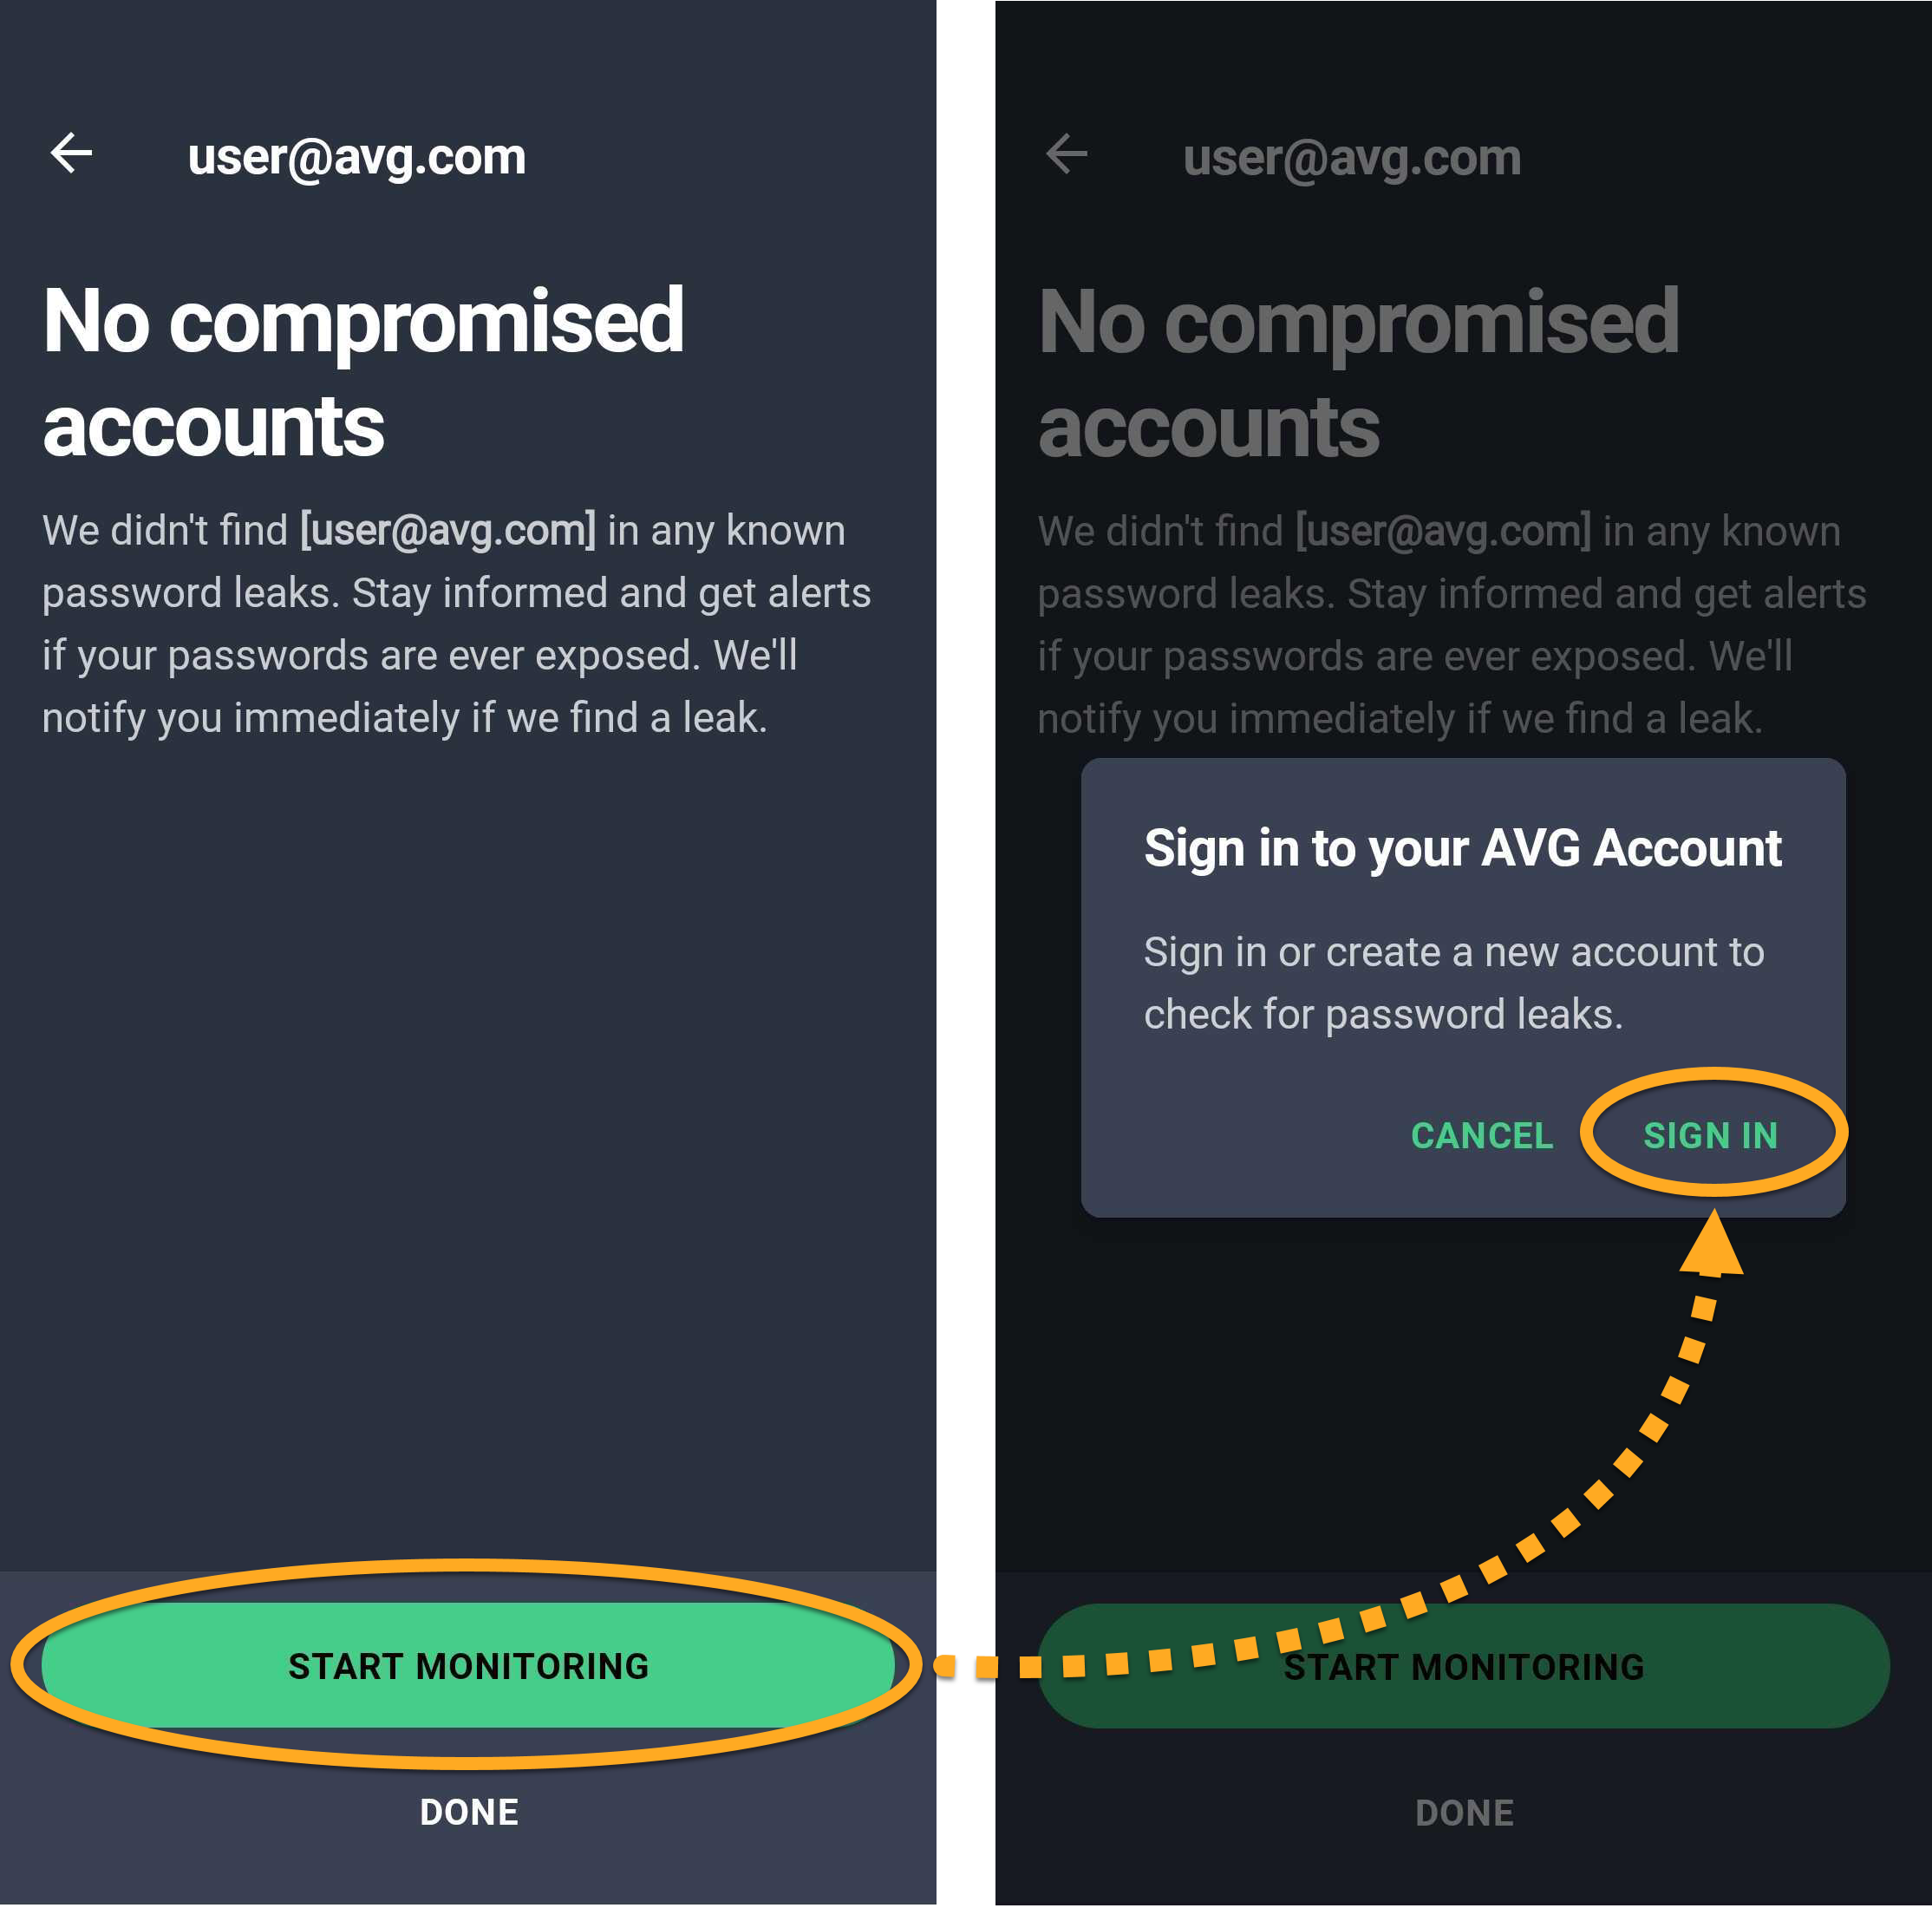
- After the scan is complete, tap Start monitoring. If prompted, sign in to your AVG Account.
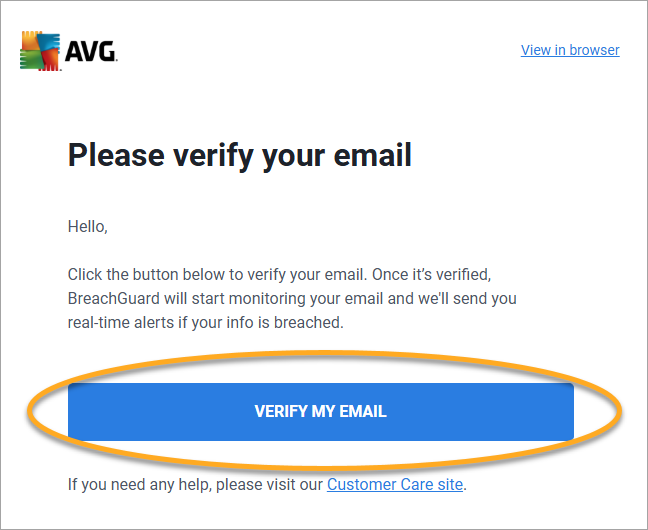
- Open the email from notification@emails.avg.com with the subject line Please verify your email, then tap Verify my email.
- In the AVG AntiVirus app, select your email address and tap Already verified.

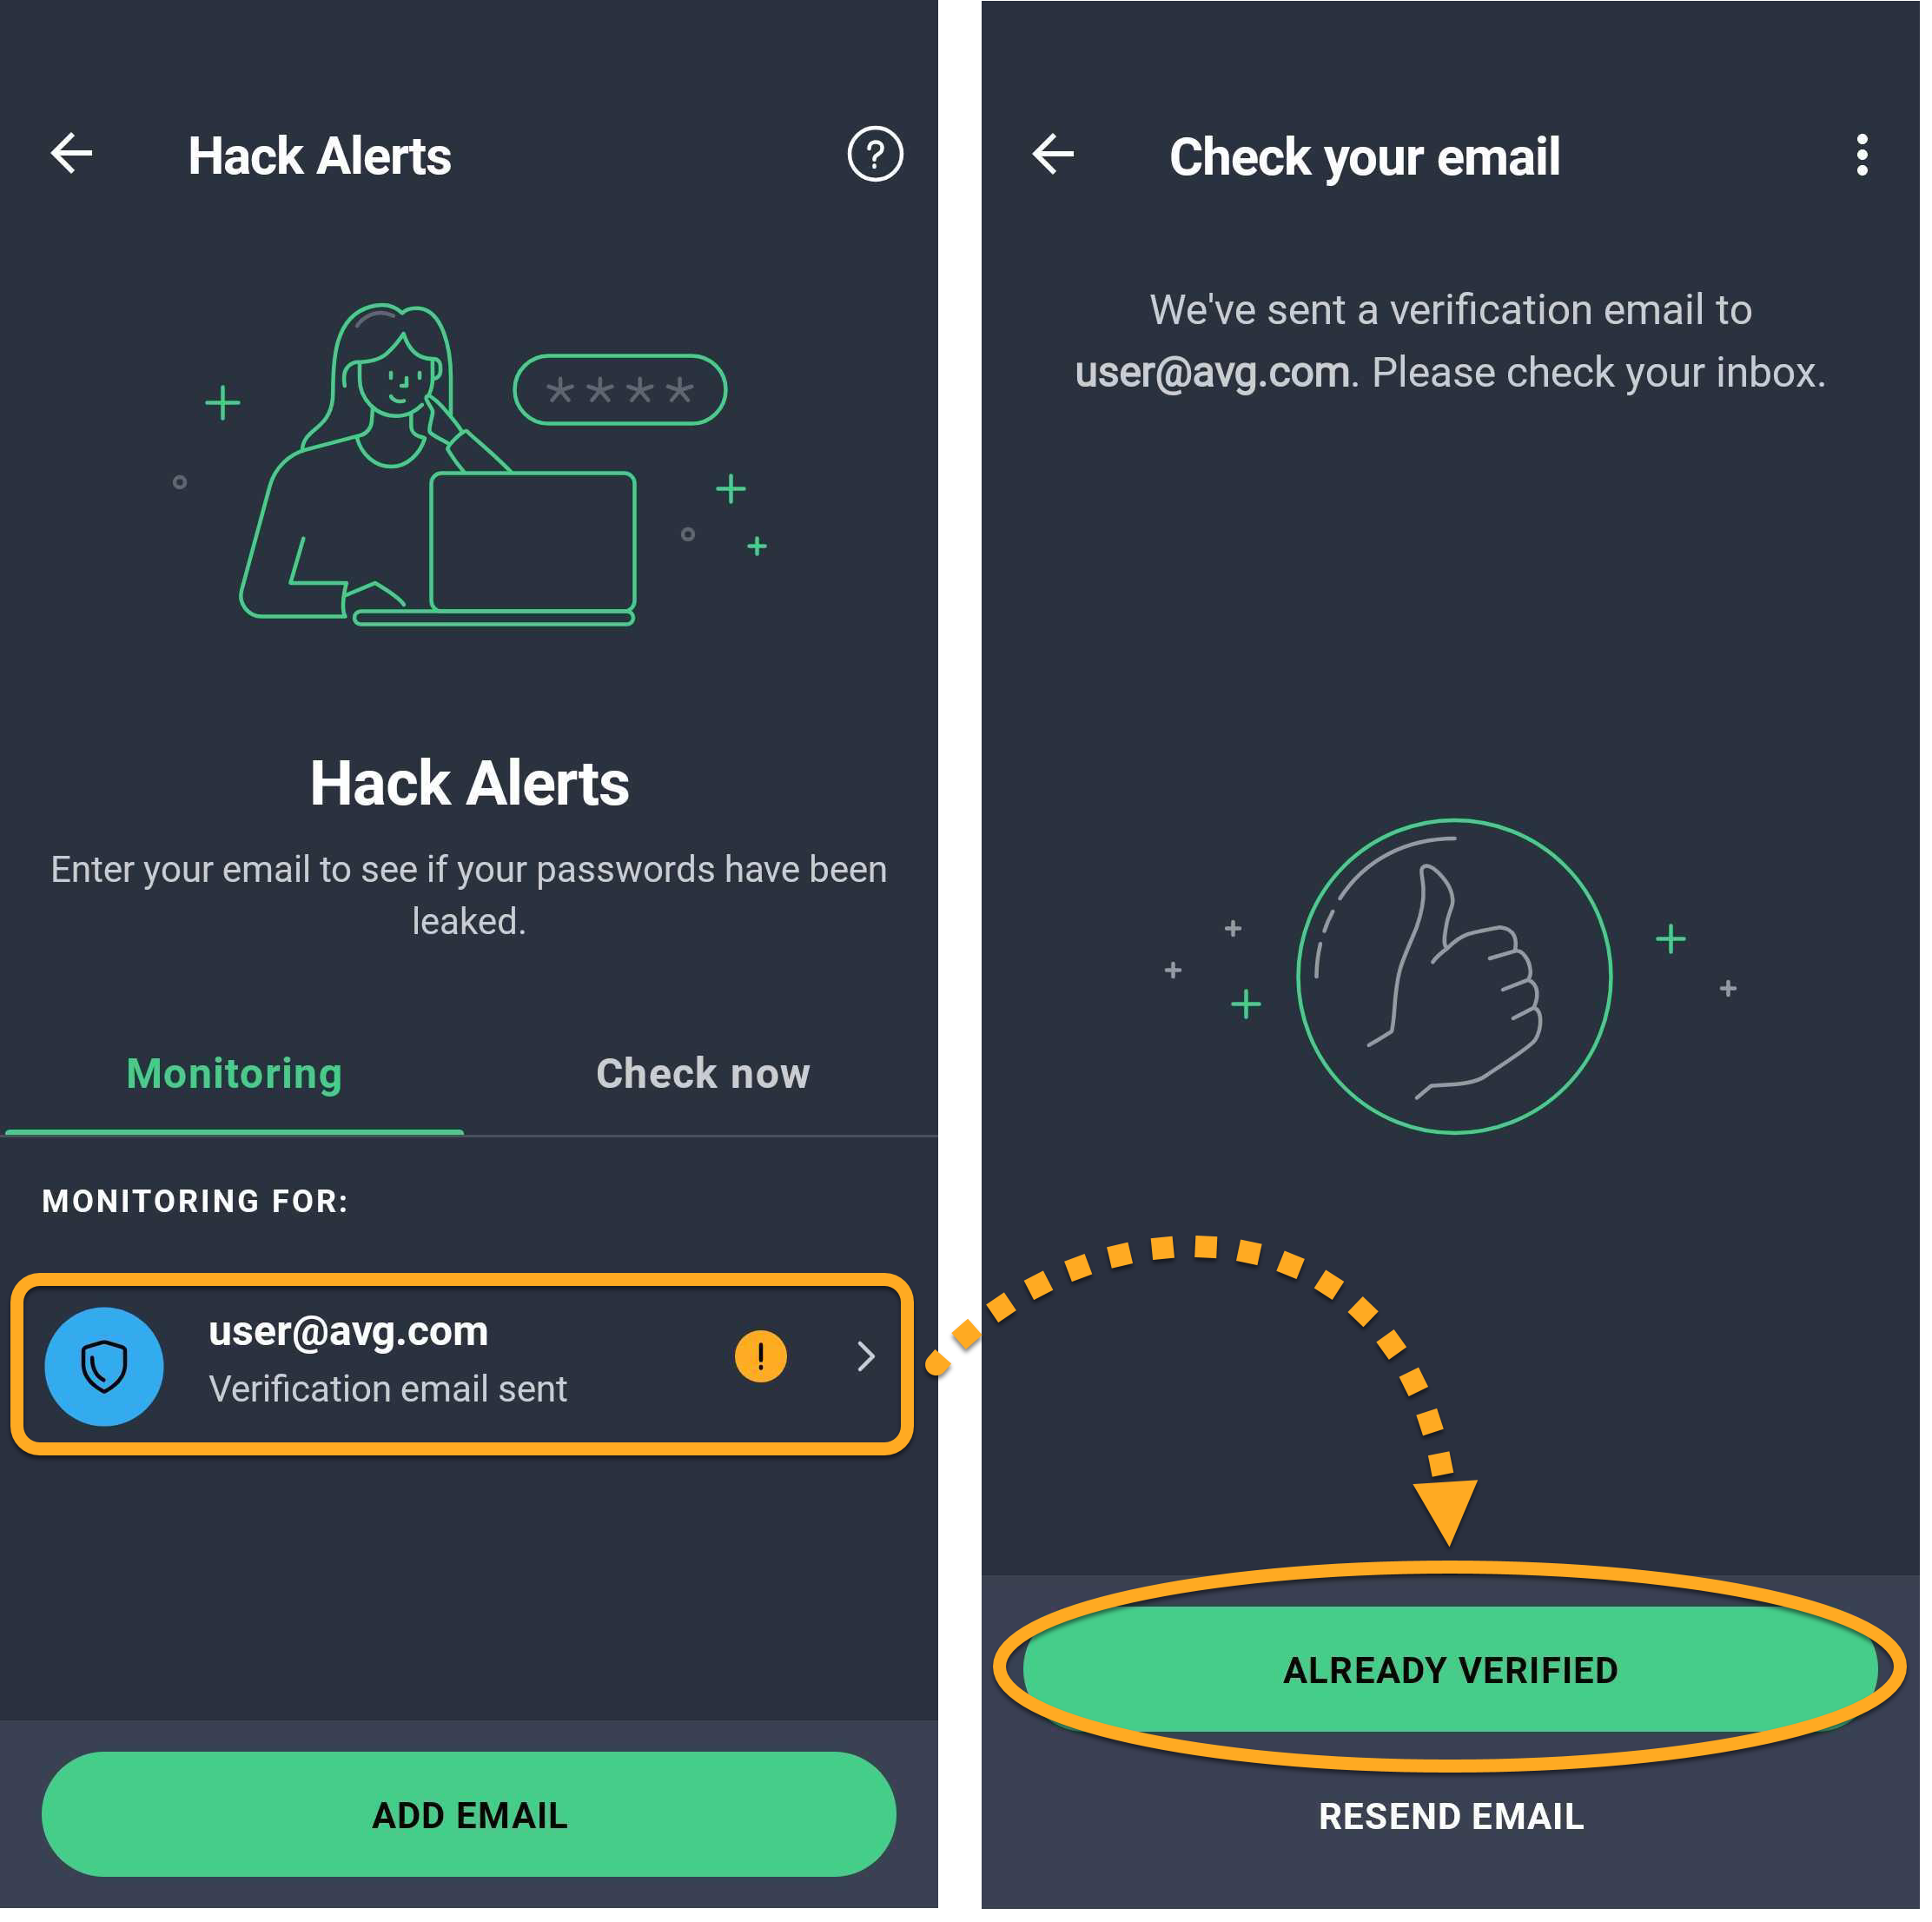
Hack Alerts is now active and continuously monitors the selected email address for new data breaches. Free users can monitor one email address. Paid users can monitor up to five email addresses.
 (the trash icon) ▸ Yes, remove.
Manually check an email address
To manually check an email address for leaks:
- Tap Explore ▸ Hack Alerts.
- Tap Check now.
- Enter the email you want to check and tap Check data breaches.
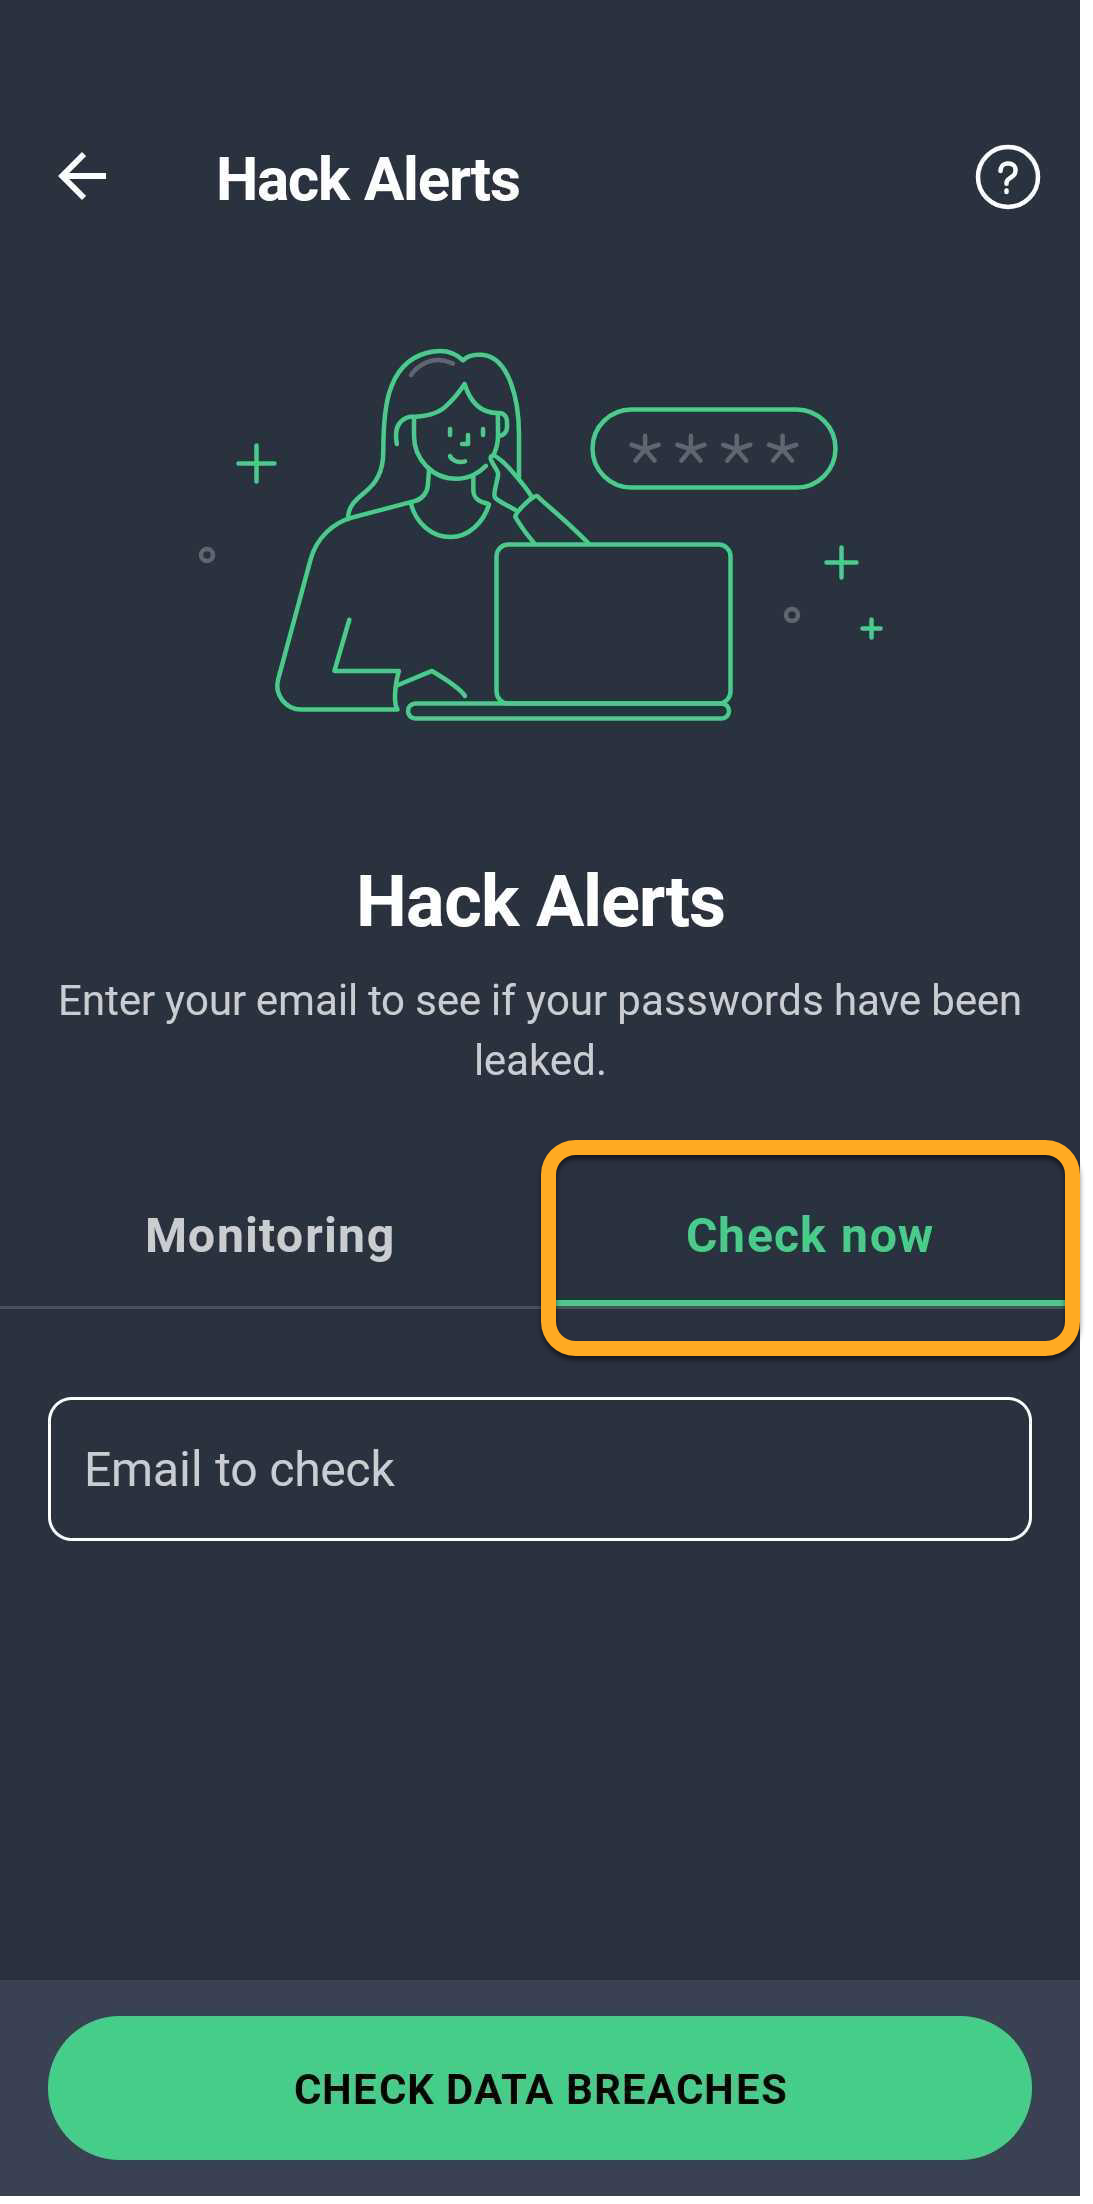
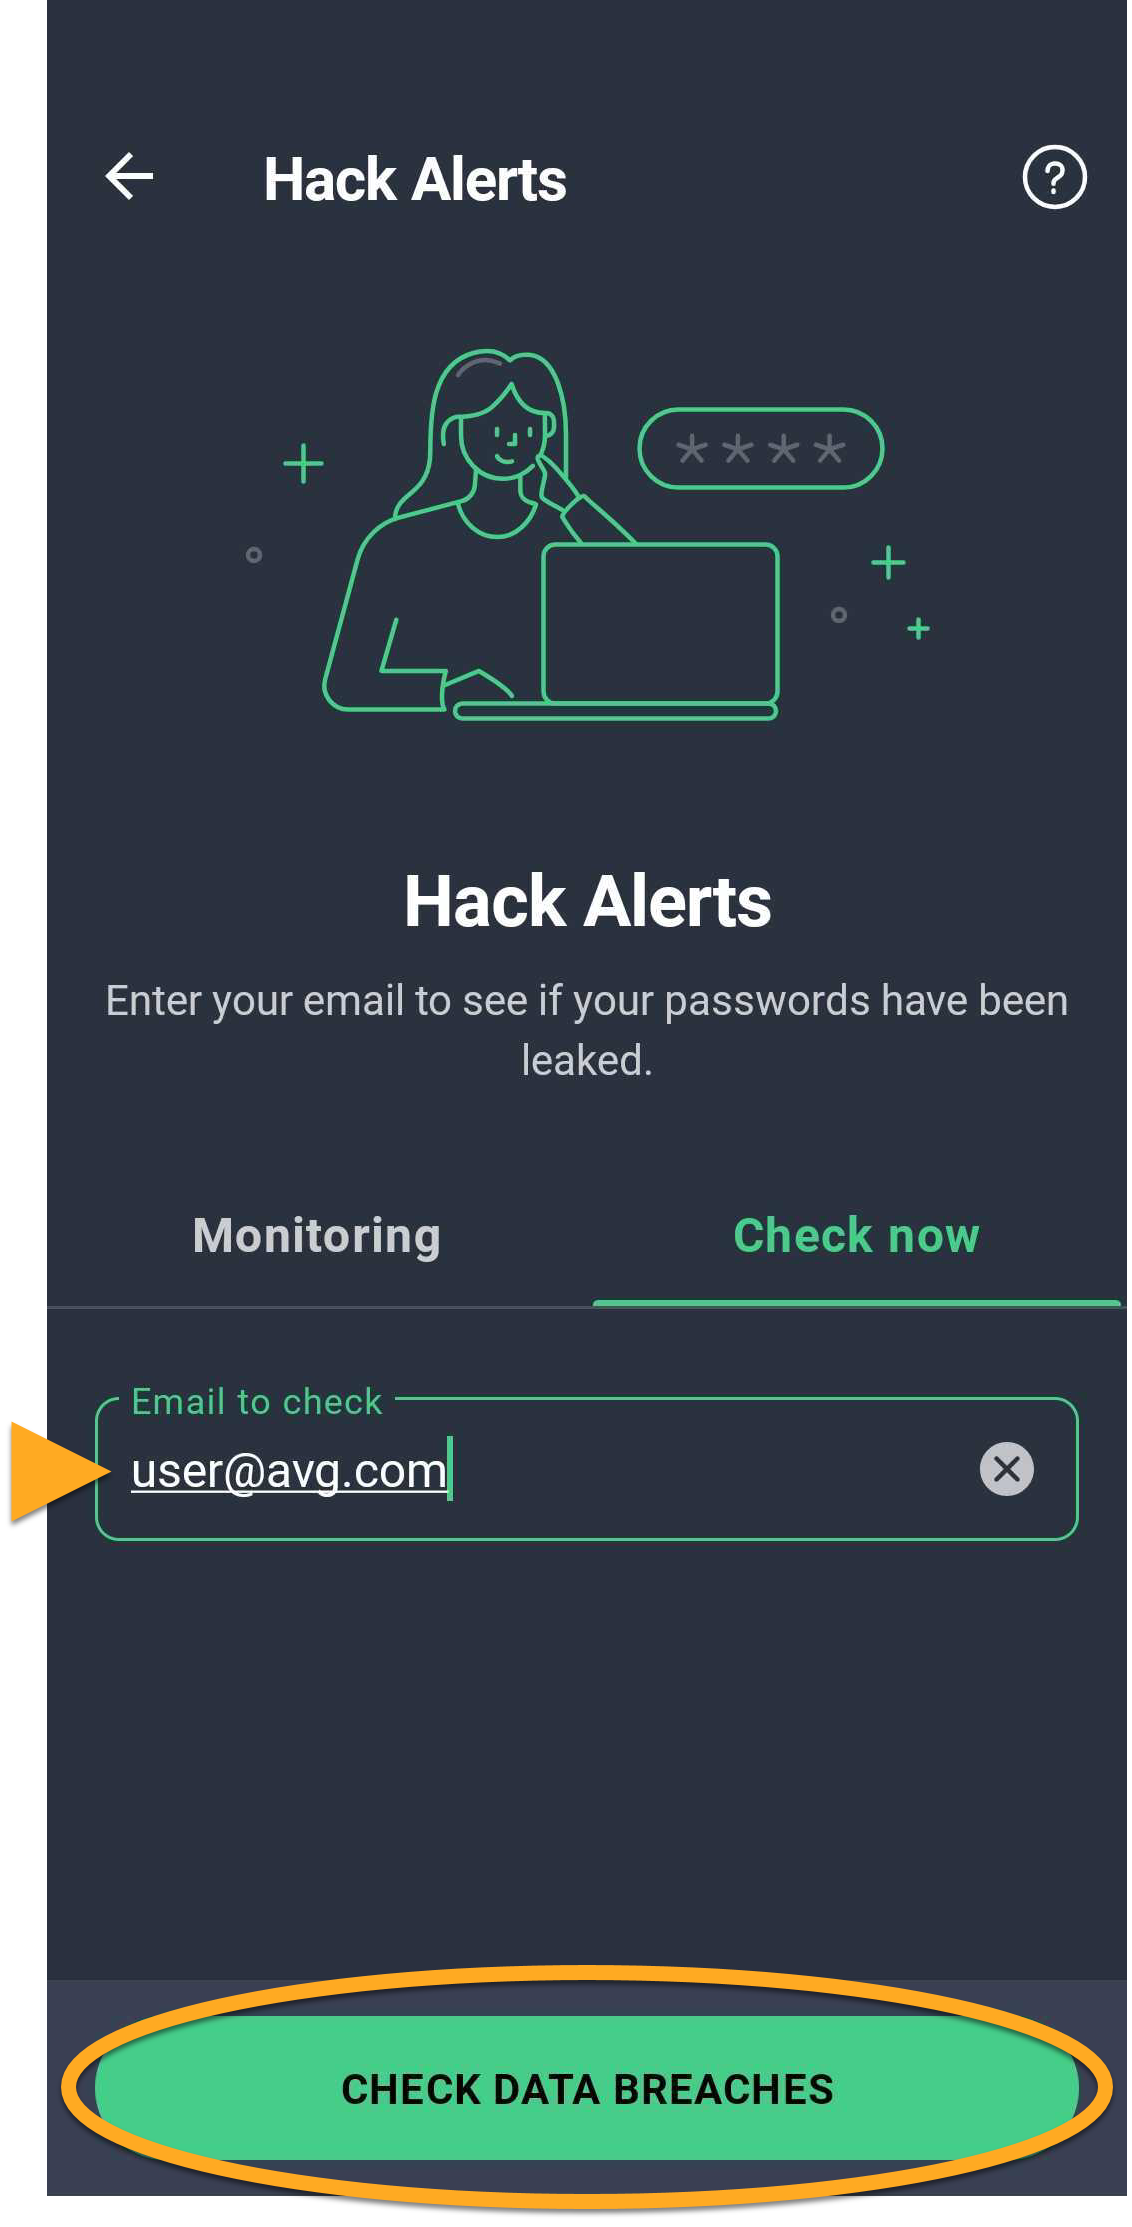
The scan results show any affected online accounts or the message No compromised accounts.
Securing compromised accounts
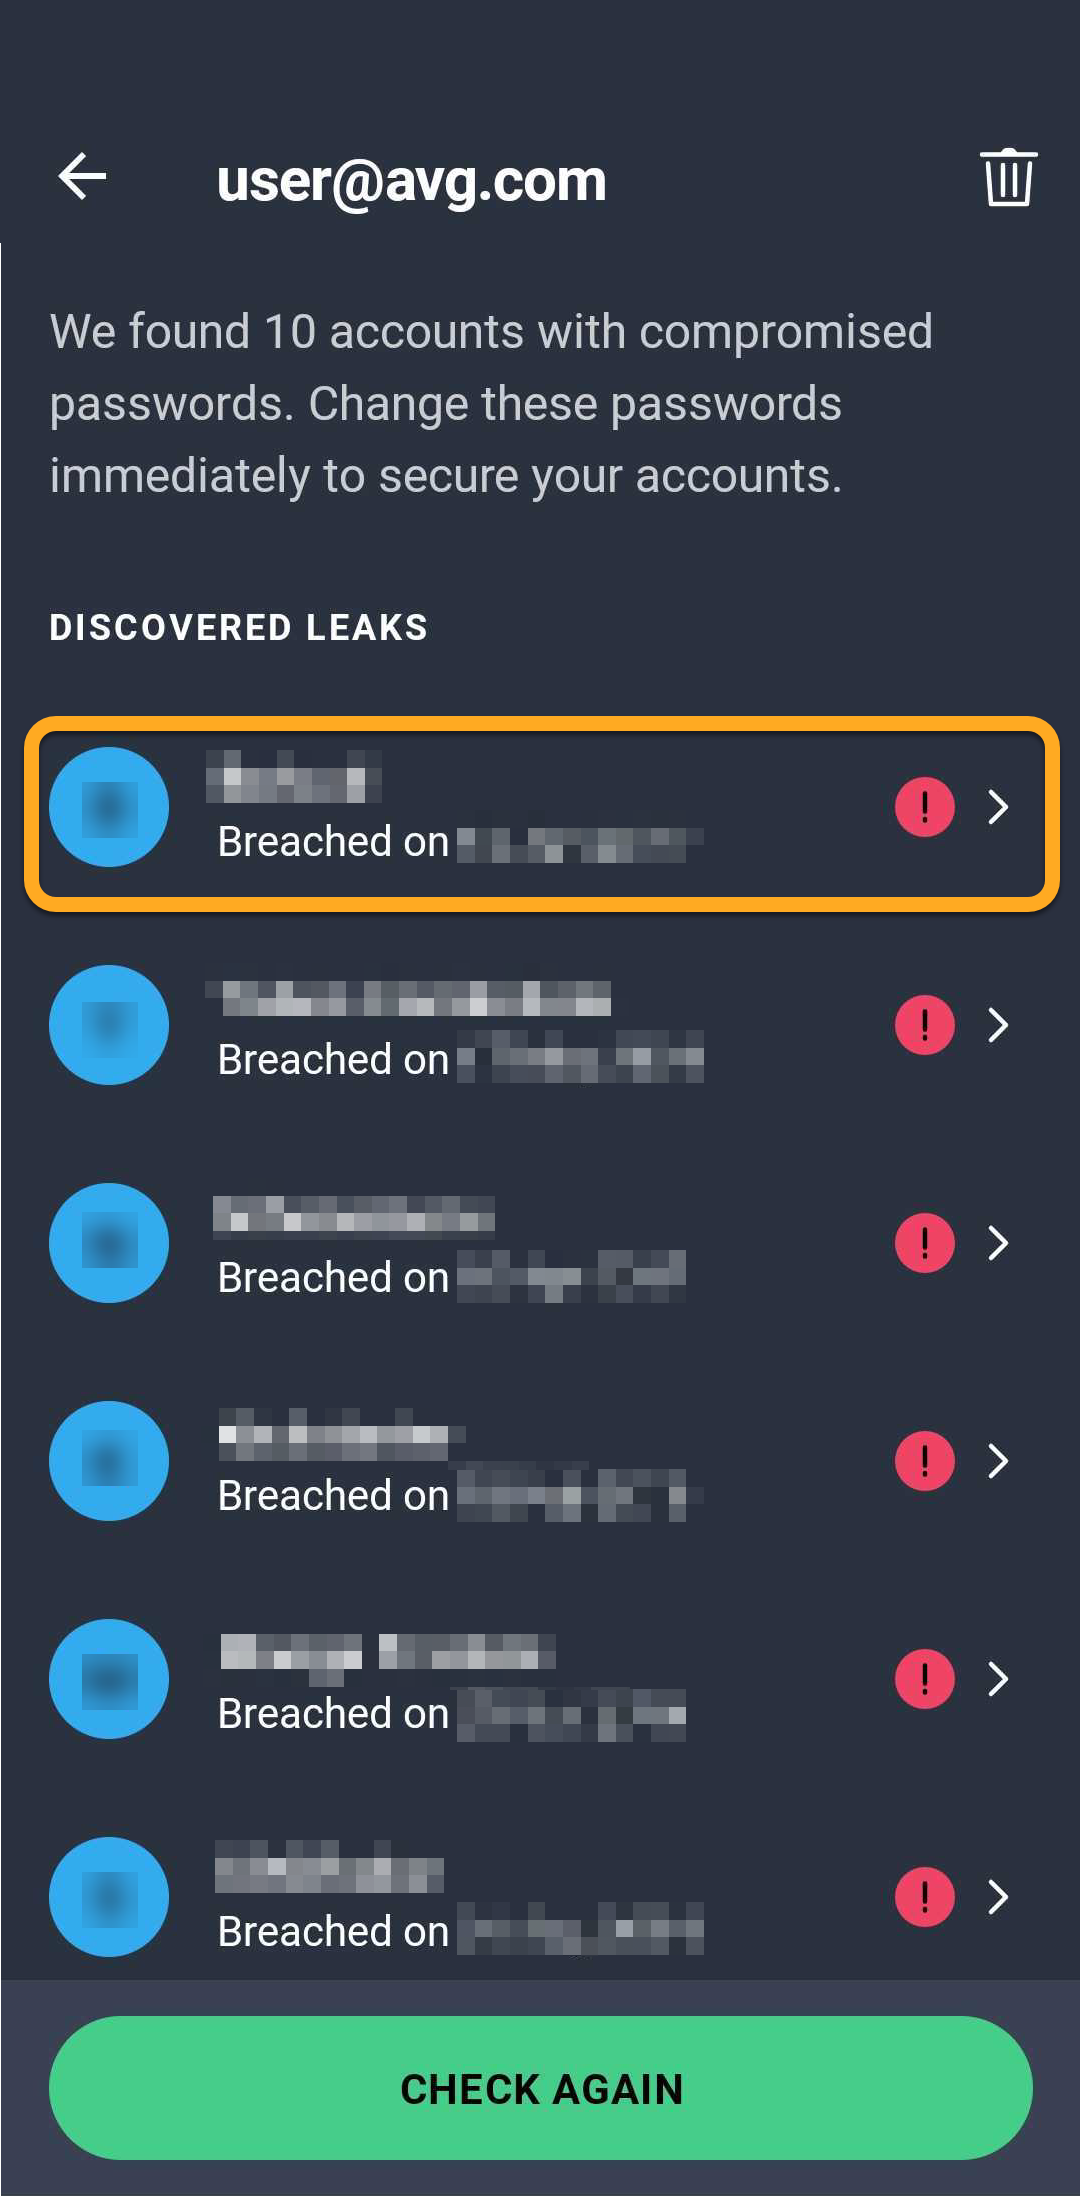
If Hack Alerts finds any breaches related to your email address, the affected accounts appear under Compromised accounts. Change the passwords for all affected accounts as soon as possible:
- Tap an account in the Unresolved list.
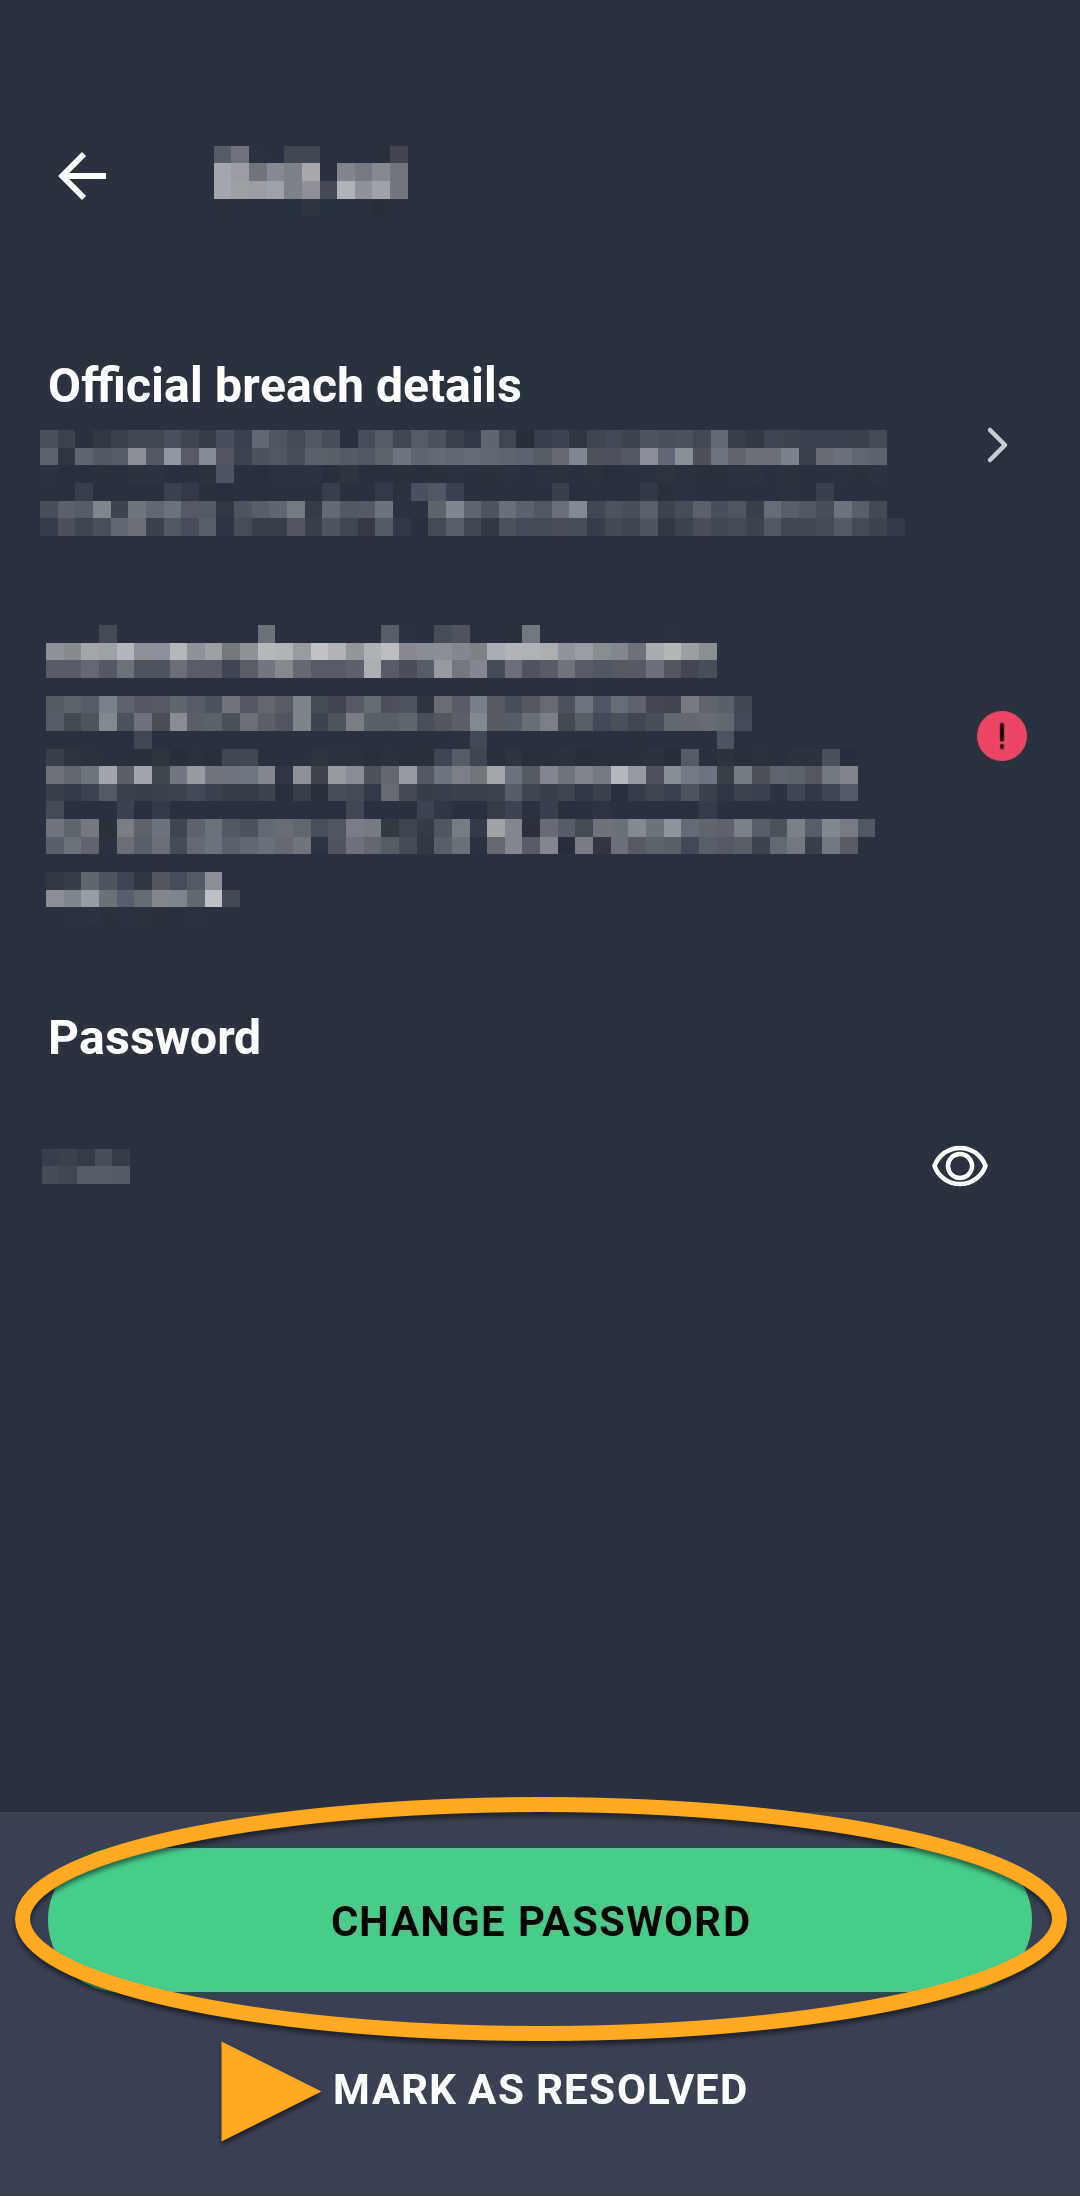
- Tap Change password and follow the on-screen instructions to update the password. When finished, tap Mark as resolved.
 (the trash icon) ▸ Yes, remove.
Configure Photo Vault
Photo Vault allows you to protect photos stored on your device with a PIN, pattern, or fingerprint. Photos that are moved to Photo Vault are encrypted and hidden.
To protect photos using Photo Vault:
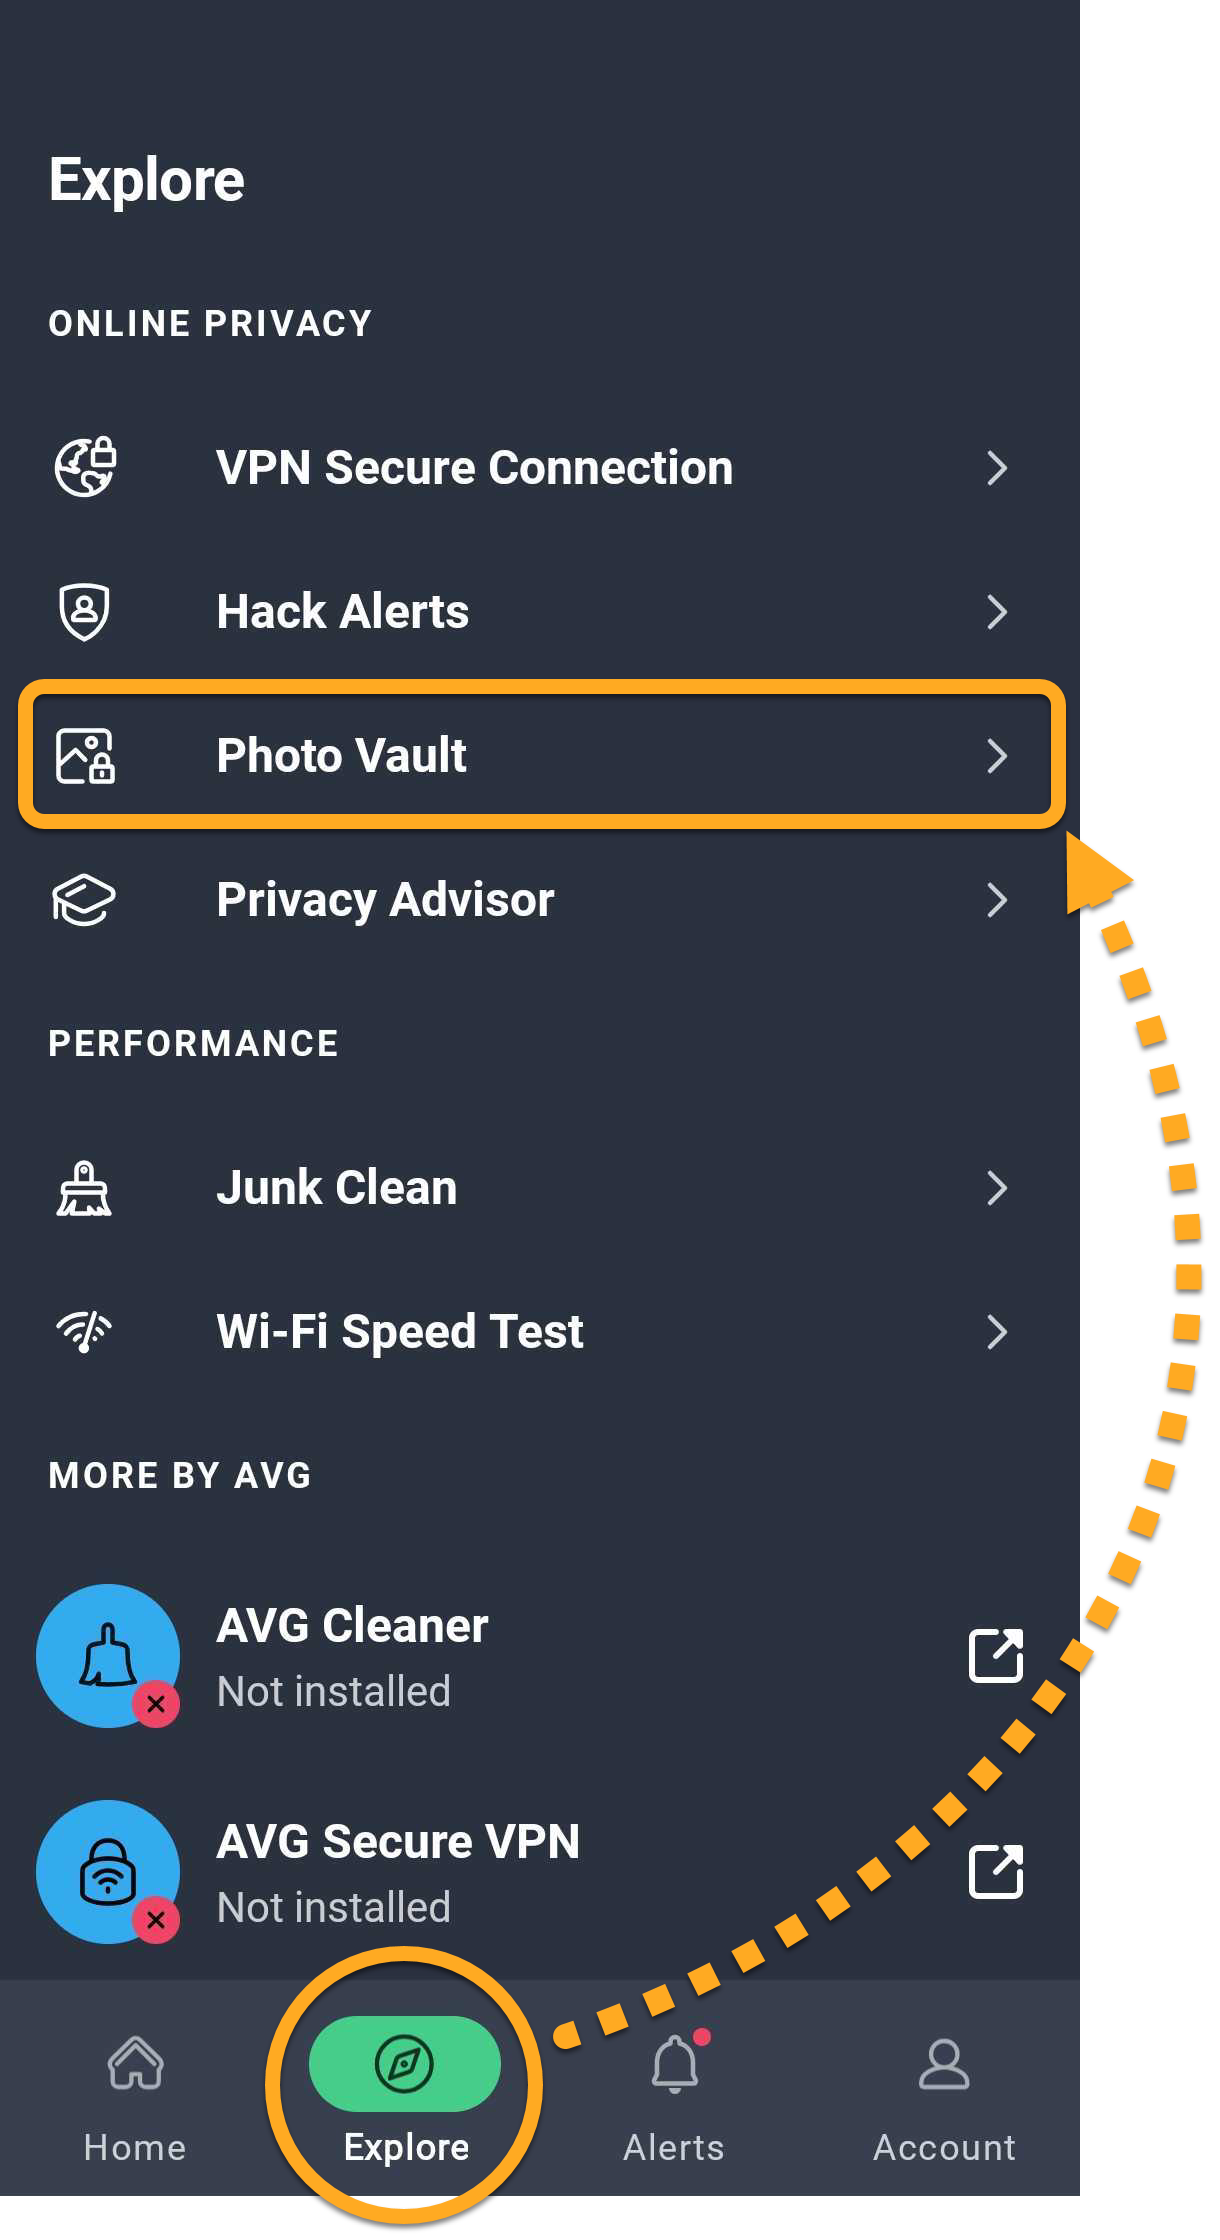
- Tap Explore ▸ Photo Vault.
- Tap Continue.
- Tap Set up PIN to create the PIN that will be used to unlock protected photos.
- Select the email account that will be used to reset the Photo Vault PIN if it is forgotten, then tap OK.
- Create a four-digit PIN, then enter it again to confirm.
- Tap Grant permissions to open Settings, then ensure the slider next to Allow permission is ON to grant All file access.
- Tap Enable Photo Vault. Optionally, tap Set up pattern or Set up fingerprint to use a pattern or fingerprint to unlock protected photos.
- Once Photo Vault is enabled, tap Add photo, then select one of the following options:
- Take new photo: Take a new photo and directly add it to Photo Vault.
- Import from gallery: Select photos from your existing gallery. Tap the photo(s) you want to hide, then tap Hide now.
The selected photos are now stored in Photo Vault and hidden from the device gallery.
Export or delete photos from Photo Vault
To export or delete photos, tap and hold the photo(s), then select one of the following icons at the top of the screen:
- Export icon: Restores a photo to its original location and makes it visible outside Photo Vault.
- Trash icon: Removes a photo from the Vault and from the original location. This action cannot be undone.
Reset your Photo Vault PIN
If you forget your Photo Vault PIN:
- Tap Explore ▸ Photo Vault.
- When you are asked to enter your PIN, tap Forgot your PIN?.
- Follow the on-screen instructions to sign in to the email account selected during Photo Vault setup.
- After signing in to the selected email account, create a new four-digit PIN, then enter it again to confirm.
Clean junk from your device
Junk Cleaner detects dispensable items that are occupying your device's storage, including leftover APKs, residual files, and visible cache. To remove these items to free up storage space:
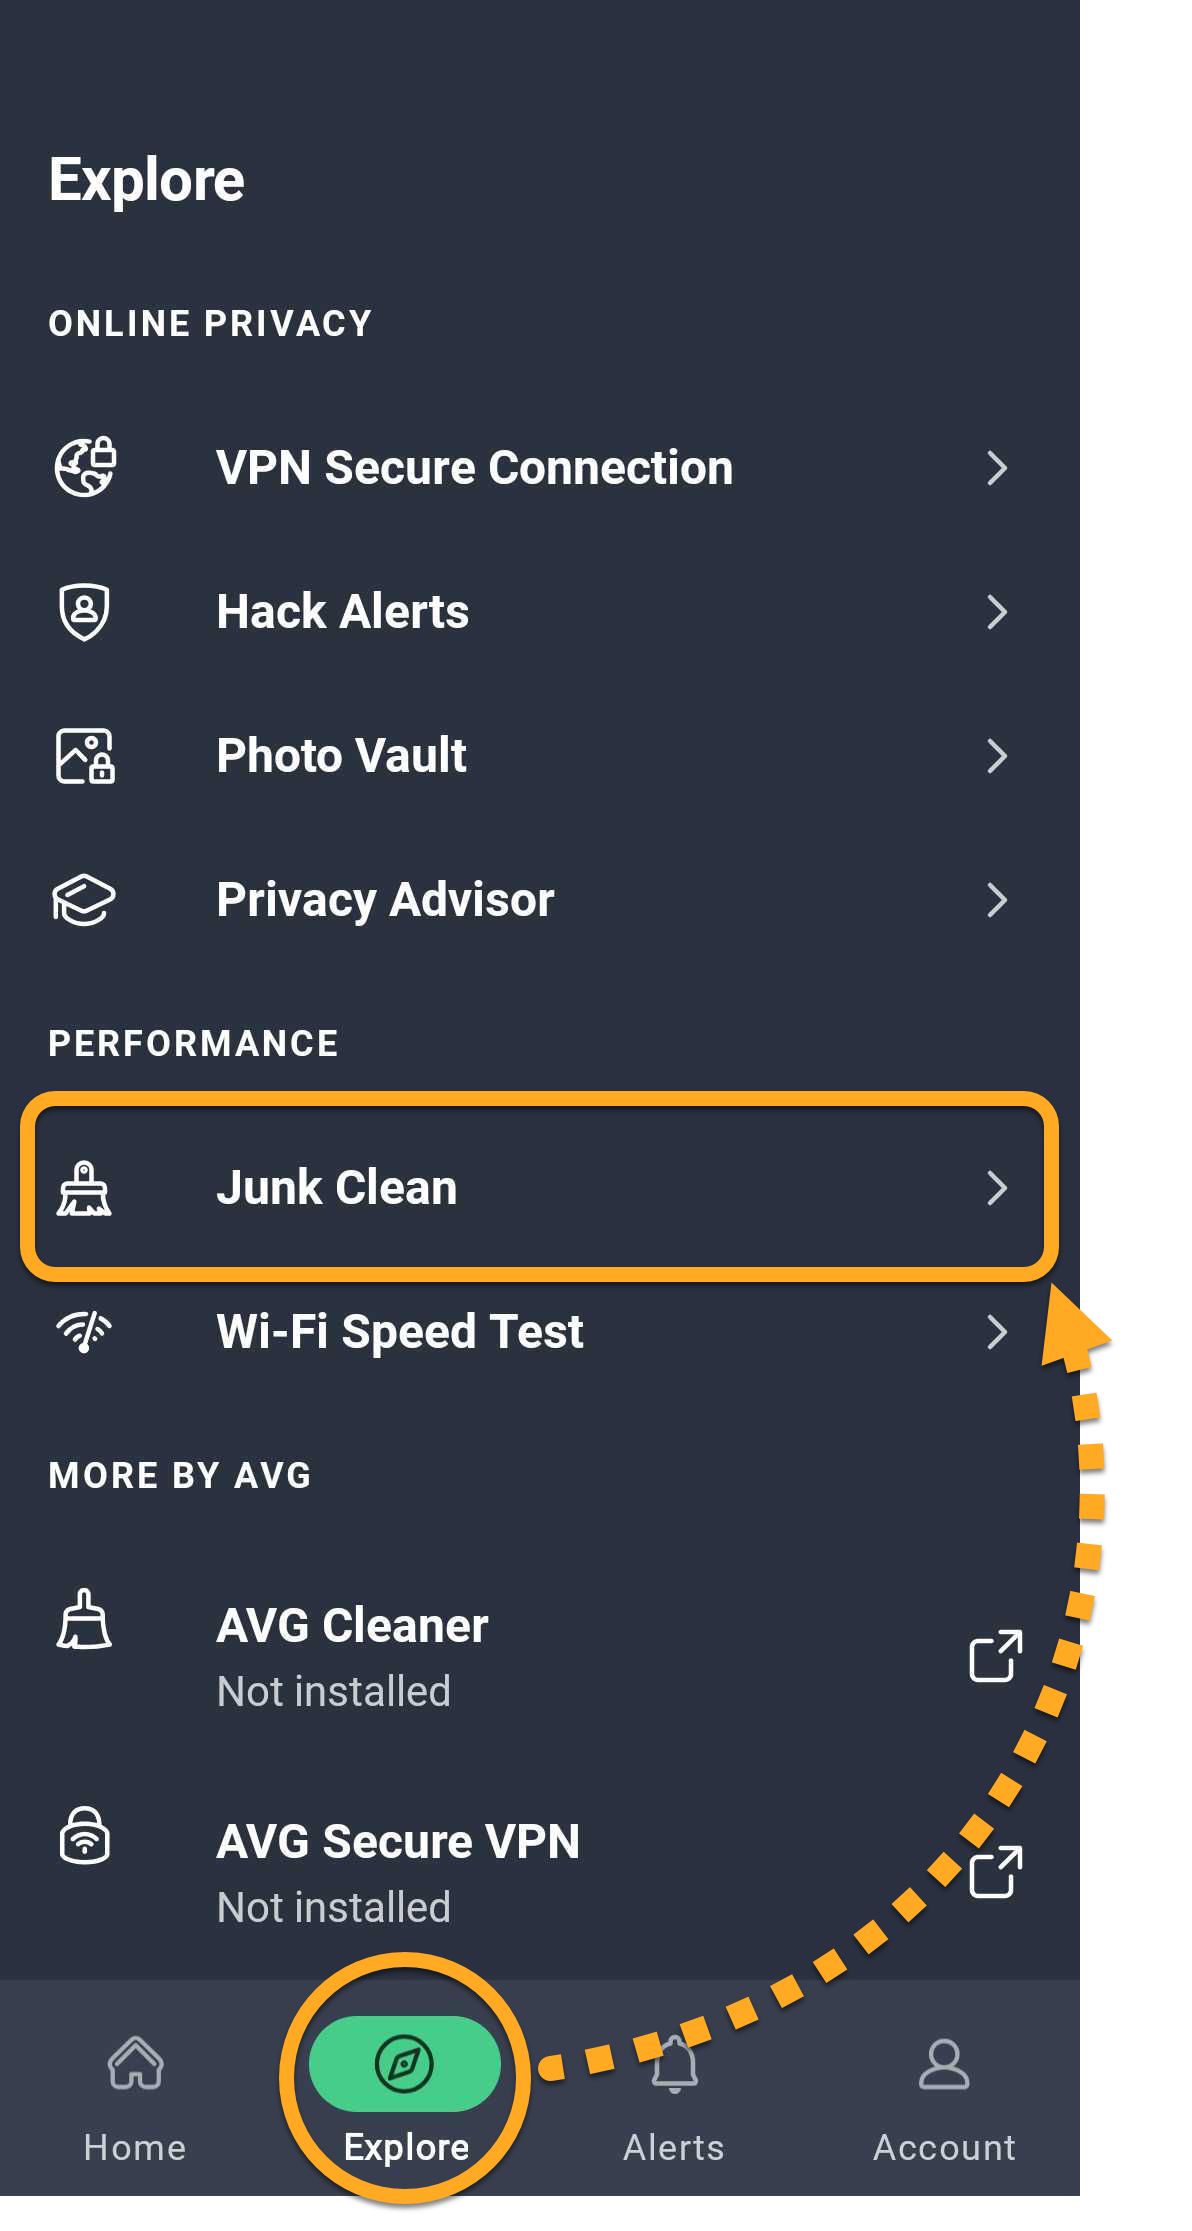
- Tap Explore ▸ Junk Clean.
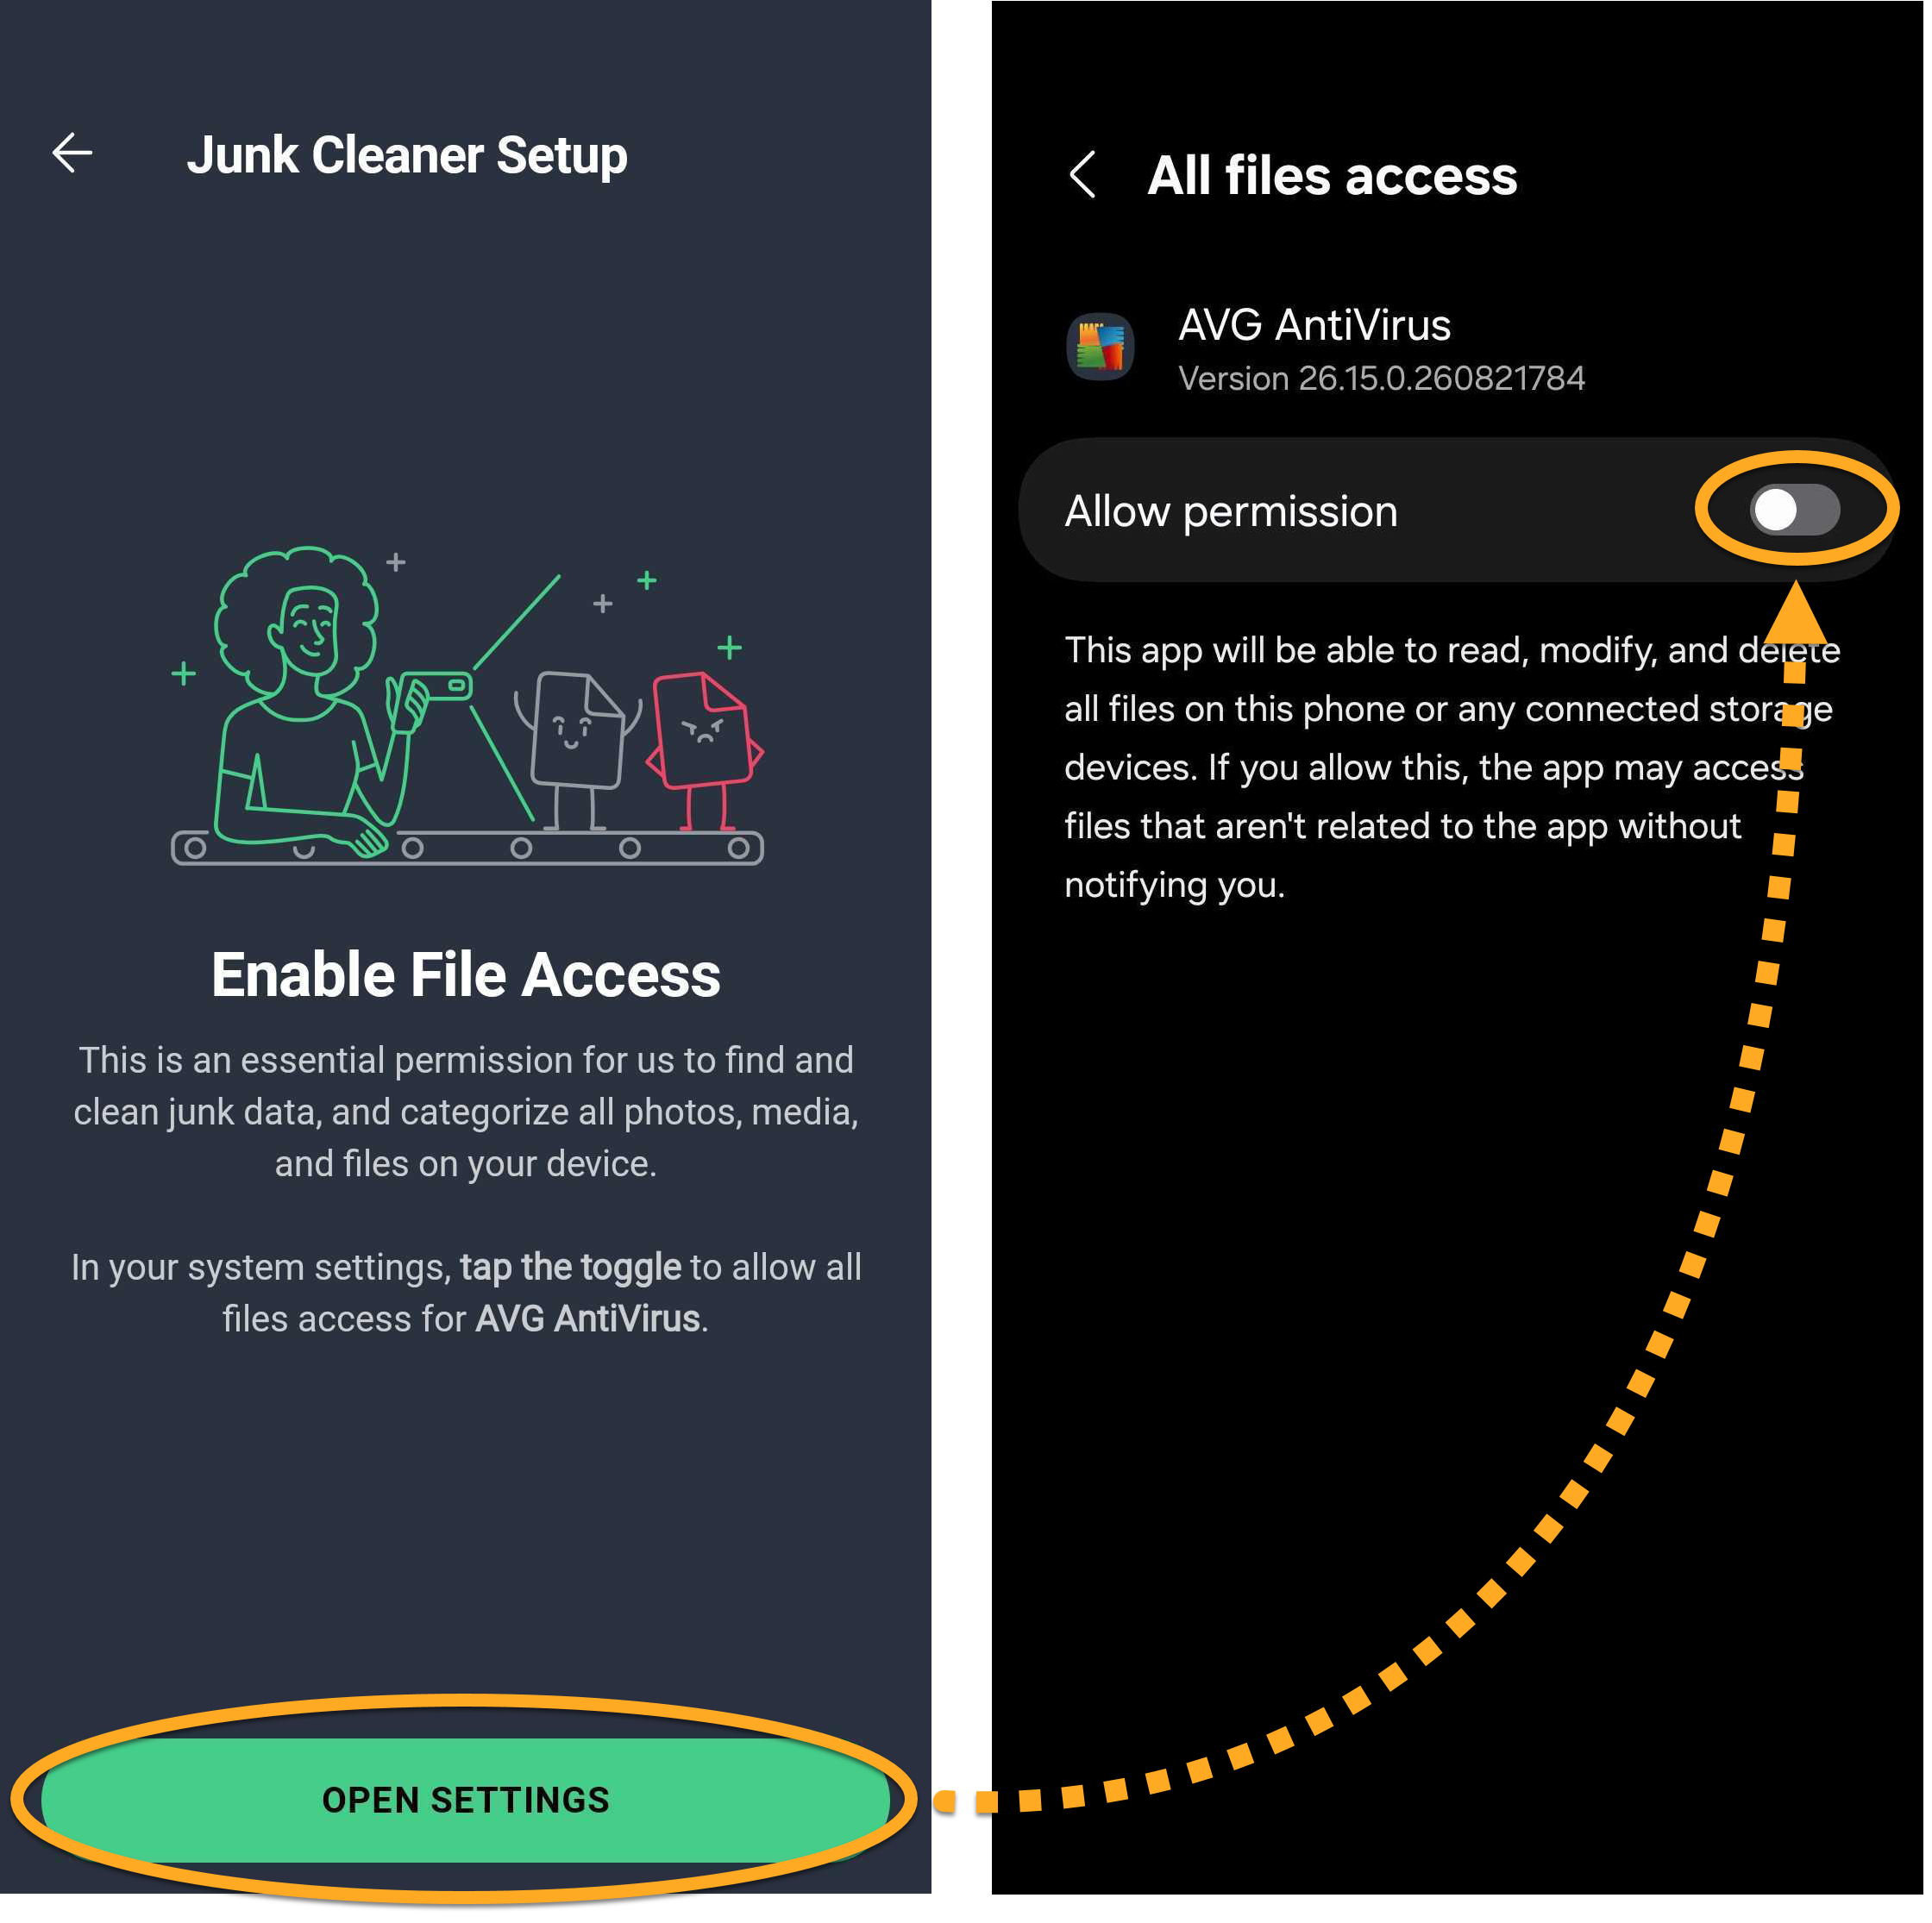
- Tap Open Settings, then ensure the slider next to Allow permission is ON to grant All file access.
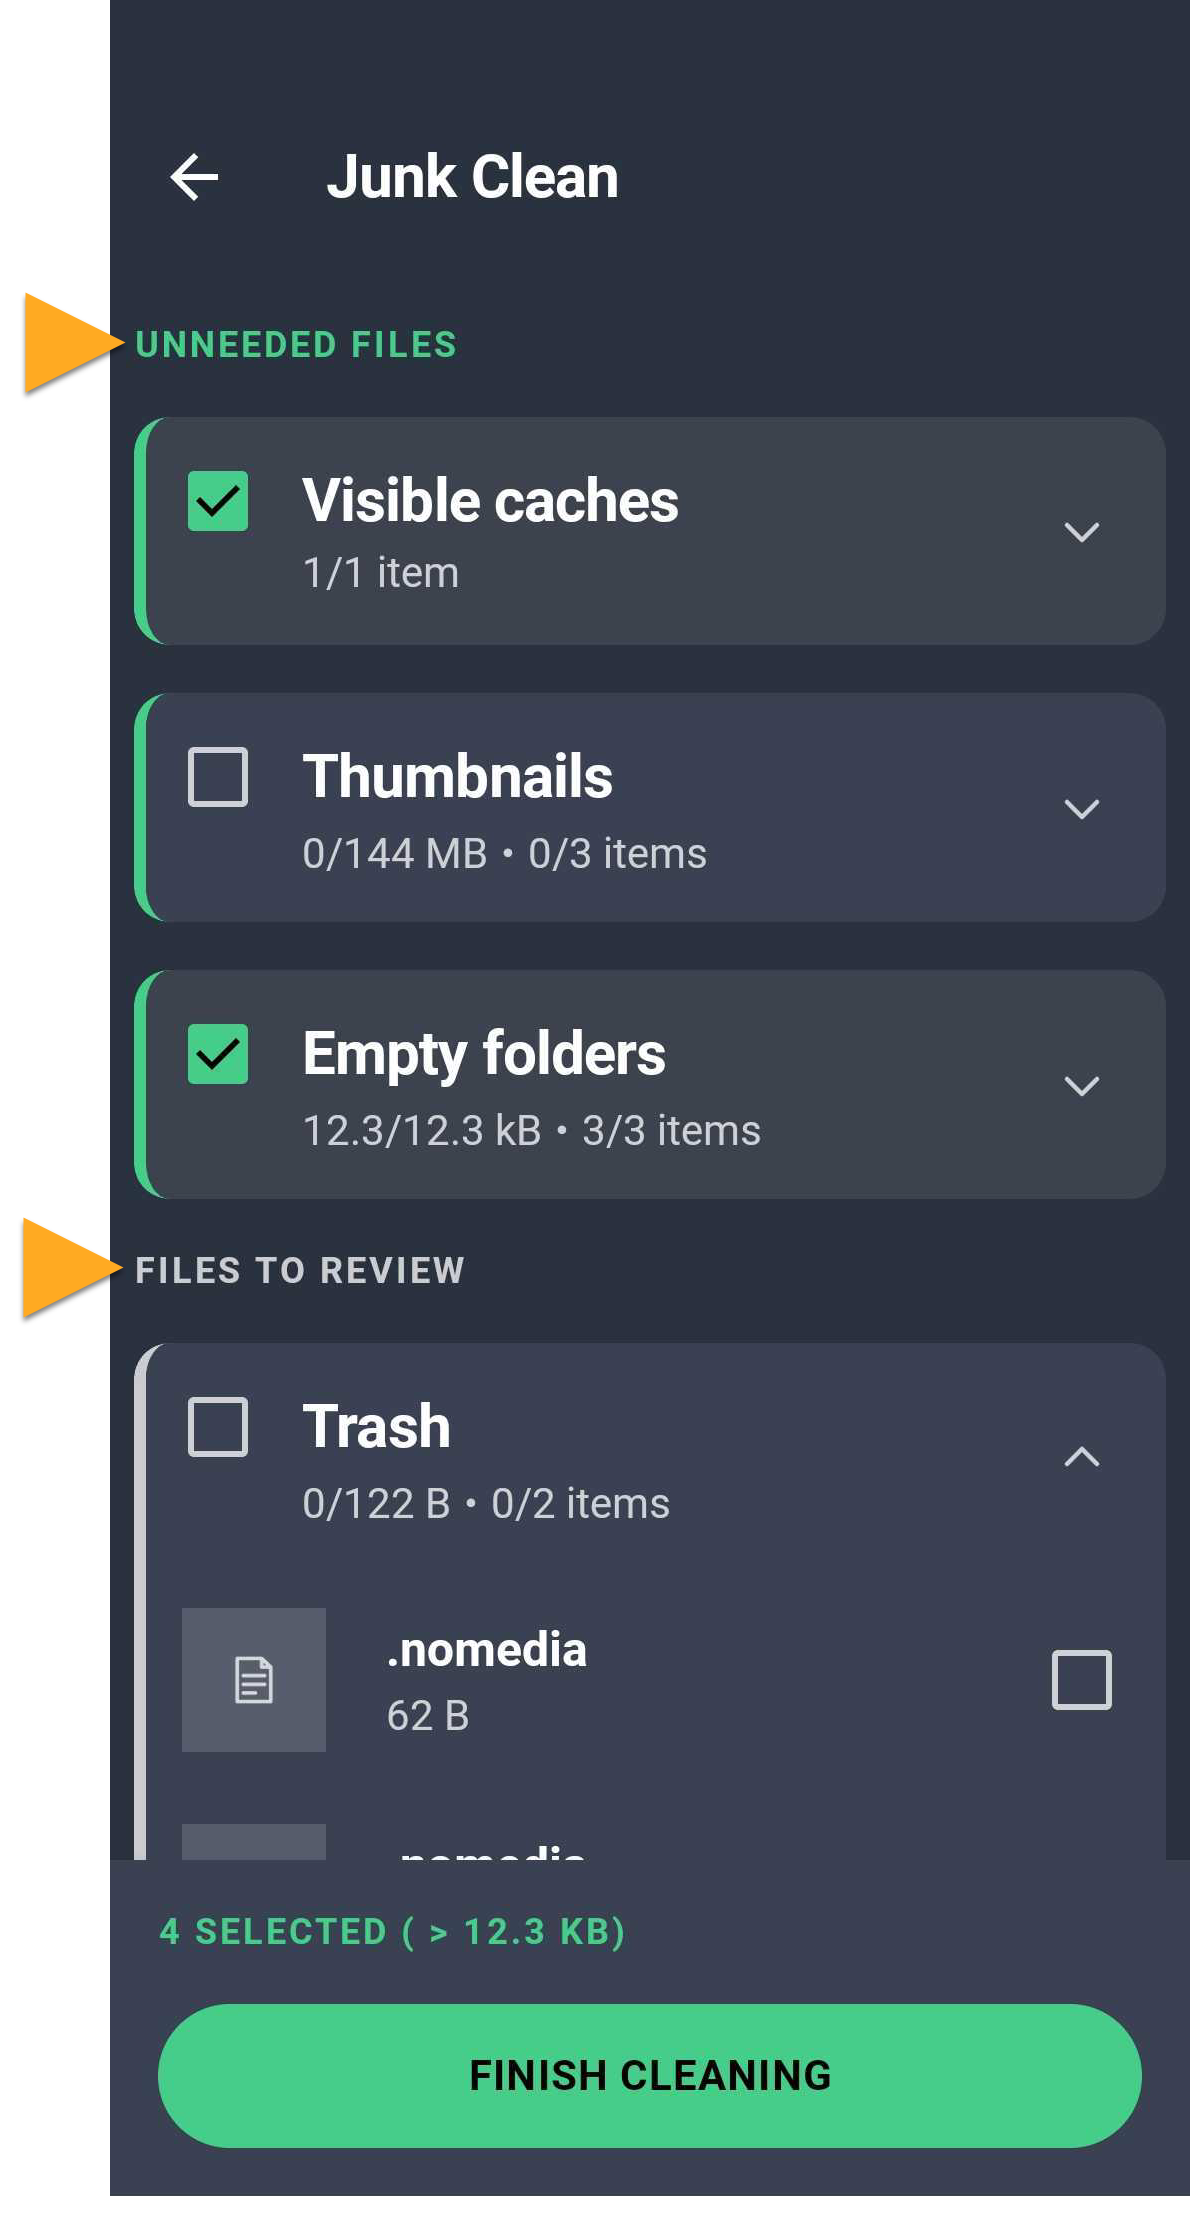
- After the scan is complete, select the item types you want to clean. Item types are divided into two sections (you may see one or both sections, depending on which data types are stored on your device):
- Unneeded files: Data that has been carefully selected to ensure that it is truly dispensable.
- Files to review: Data that may not be valuable to you. We recommend reviewing items included in this group and only ticking items that are dispensable. All items are unselected by default and will not be deleted unless you manually select them.
- Tap Finish cleaning to delete the selected items.
 Explore ▸ Junk Clean.
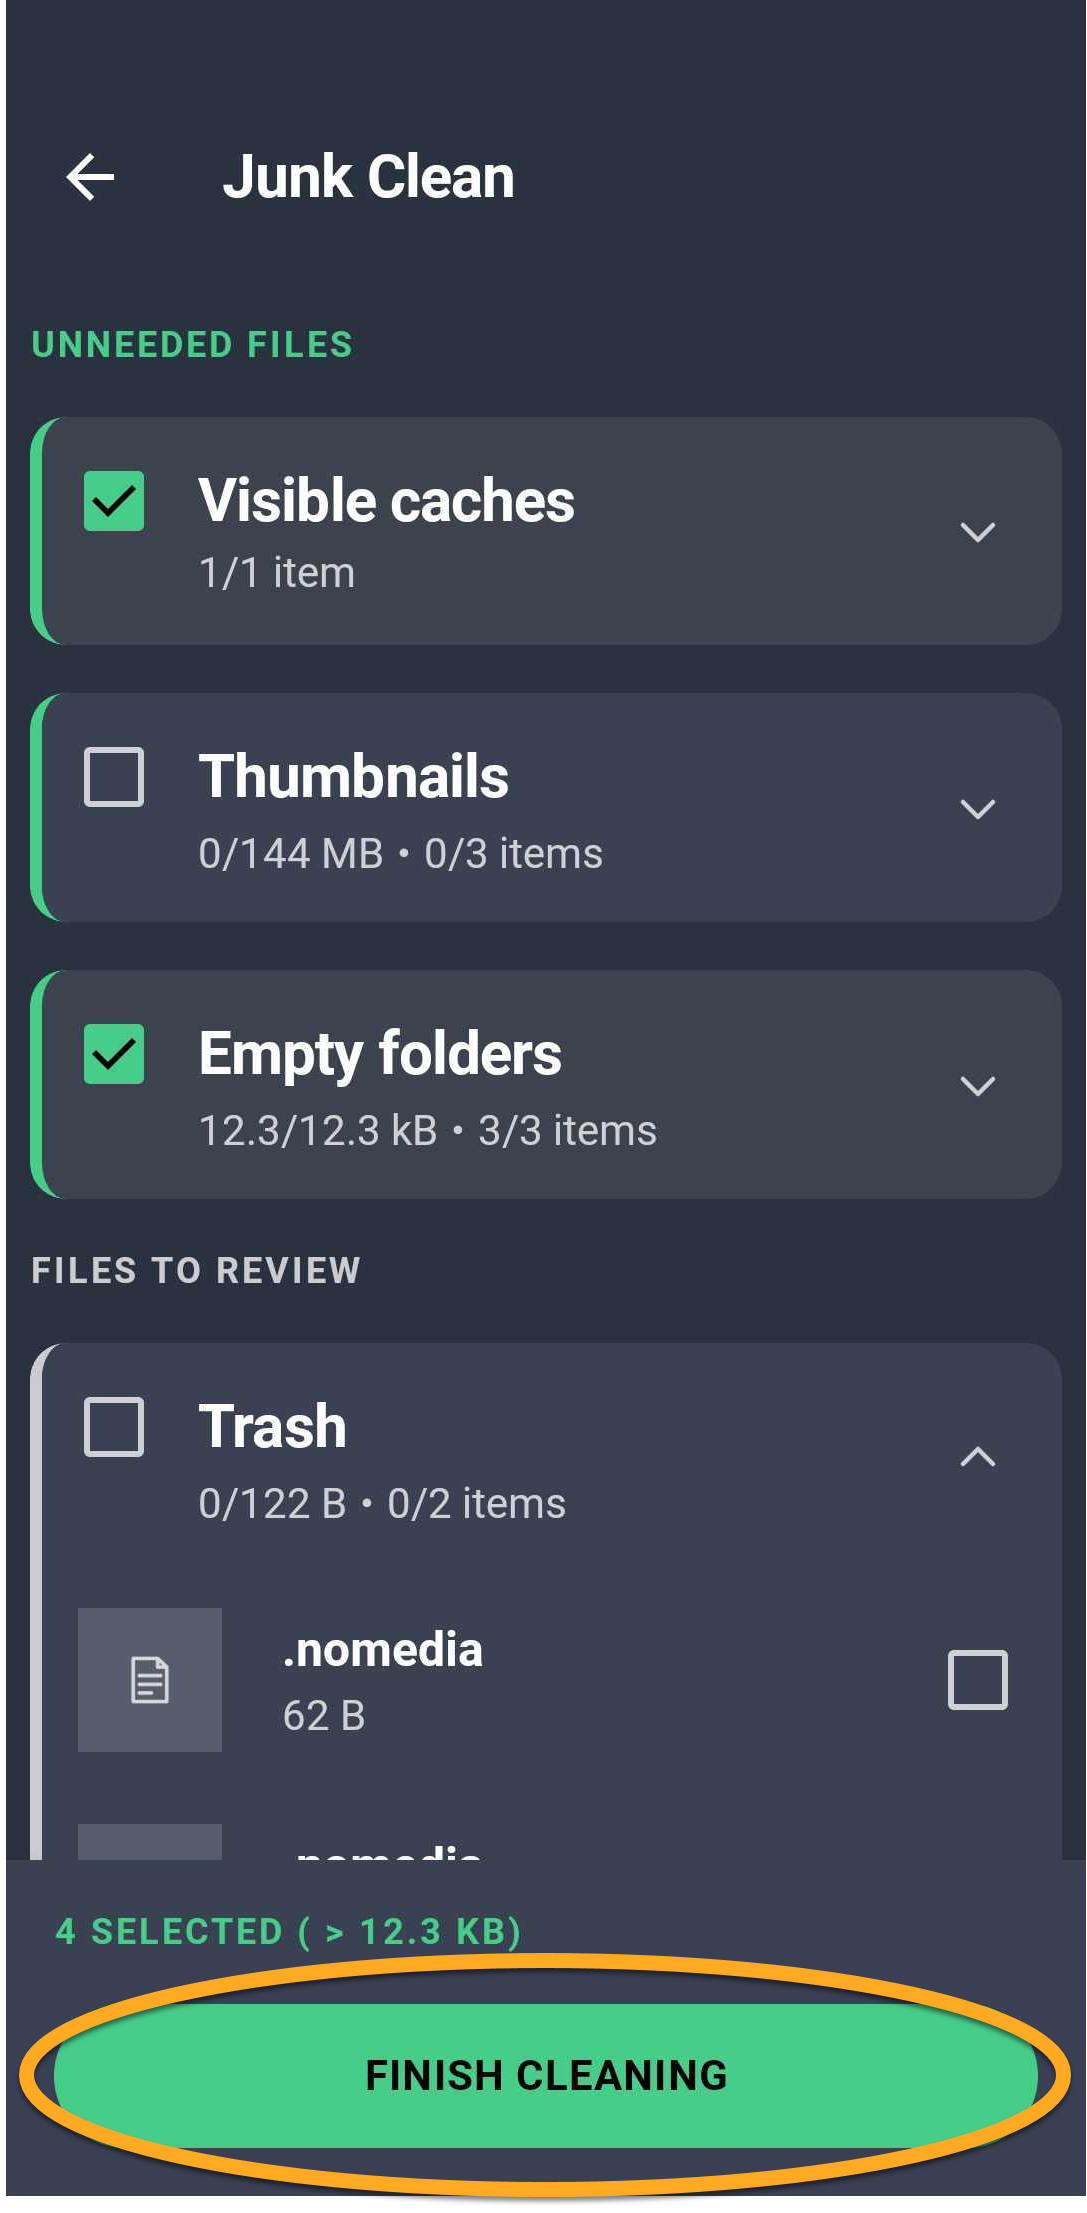
The selected items are removed from your device.
Further recommendations
For more information about the features available in AVG AntiVirus for Android, refer to the following article:
- AVG AntiVirus
- Android