To open the AVG Geek settings area:
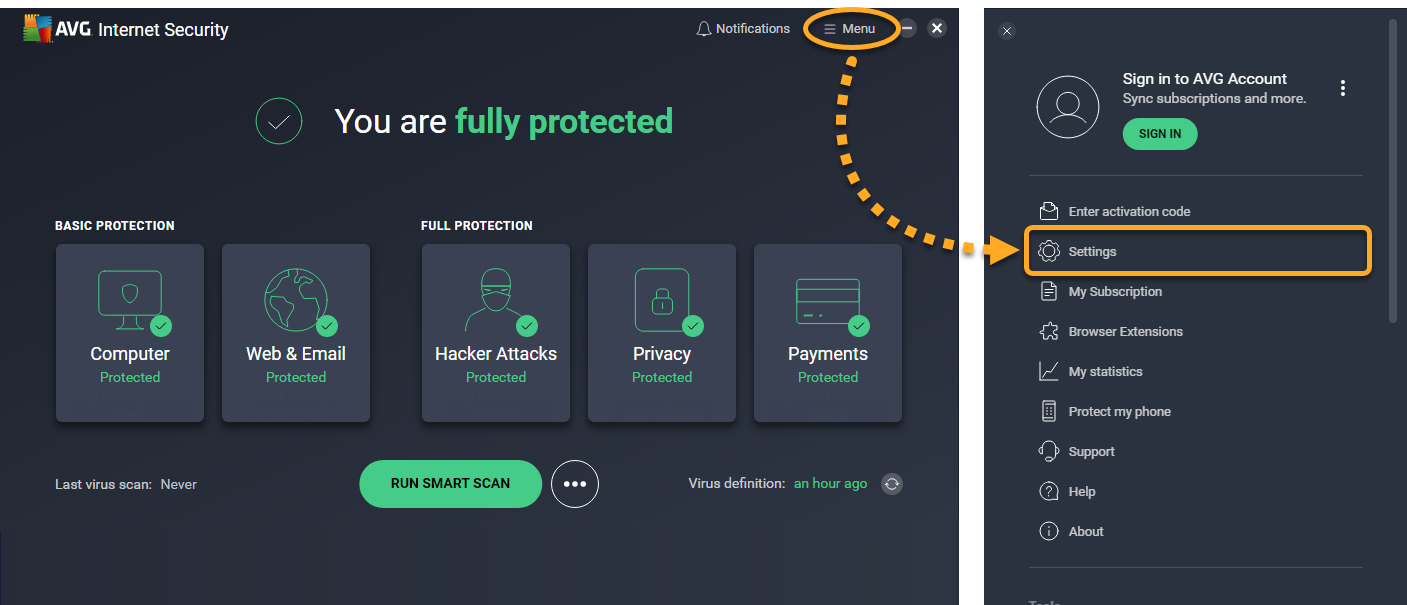
- Open AVG AntiVirus and go to
☰Menu ▸ Settings.
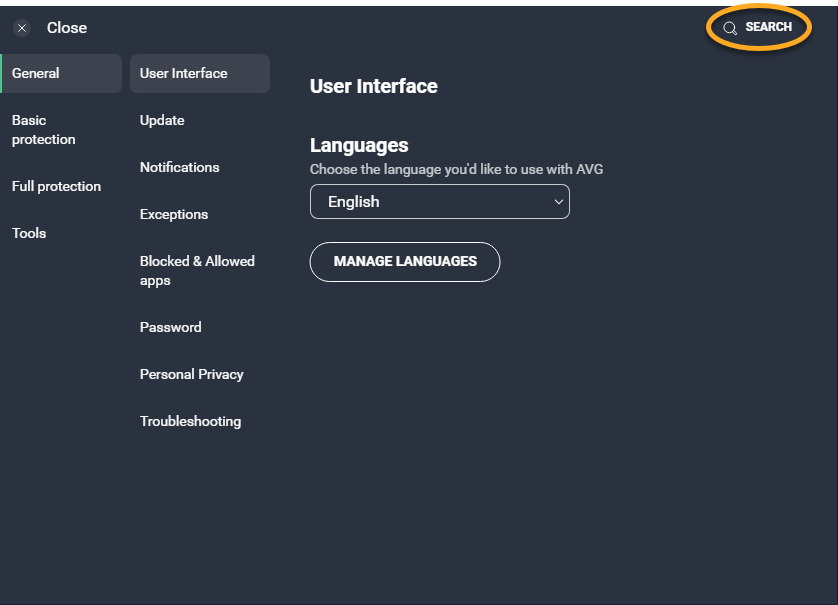
- Click Search in the top-right corner.
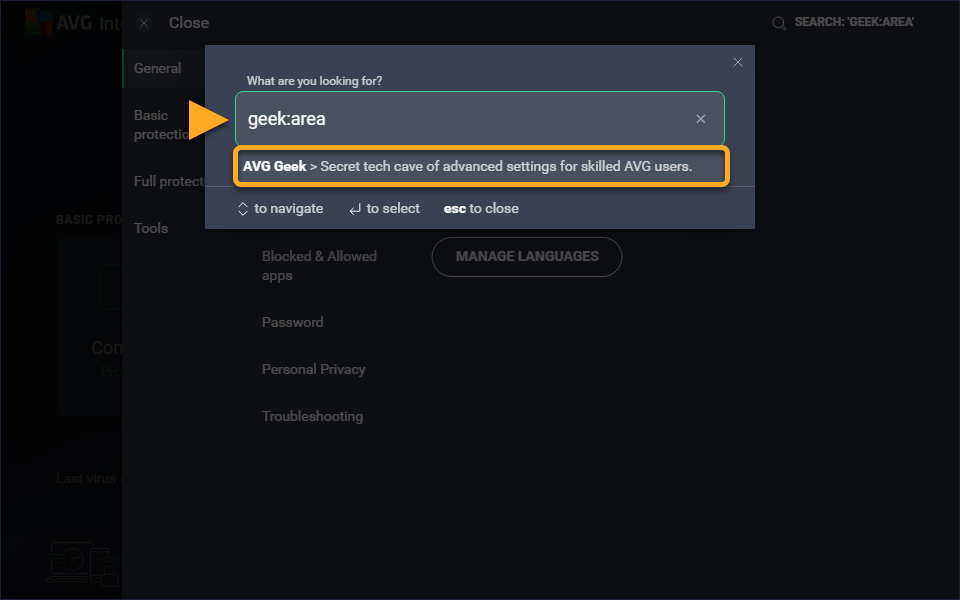
- Type
geek:areainto the search field, and select AVG Geek from the search results. - AVG Geek settings are organized by component. Click Search in the top-right corner, type a component name, and select the relevant search result. Alternatively, scroll down to the relevant section.
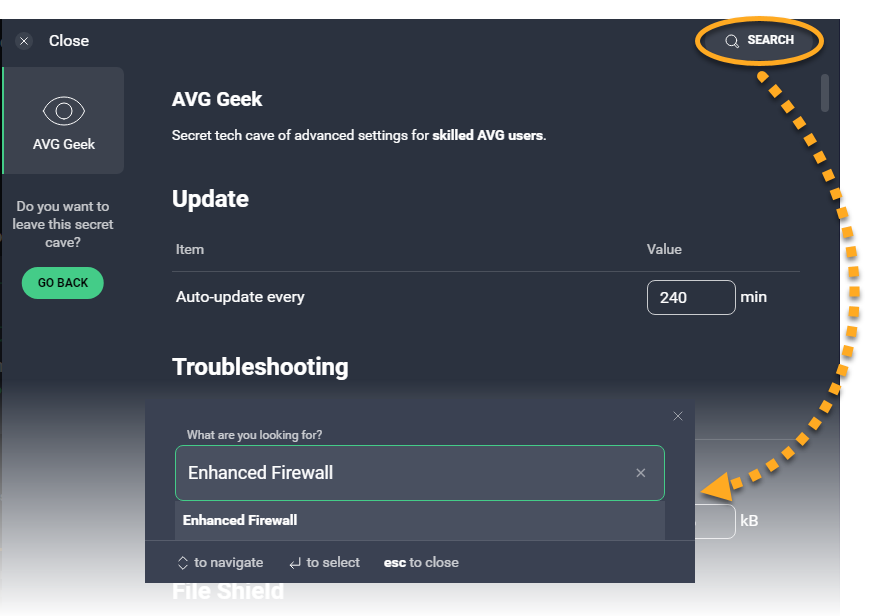
Refer to the sections below for detailed information about each of the AVG Geek settings options.
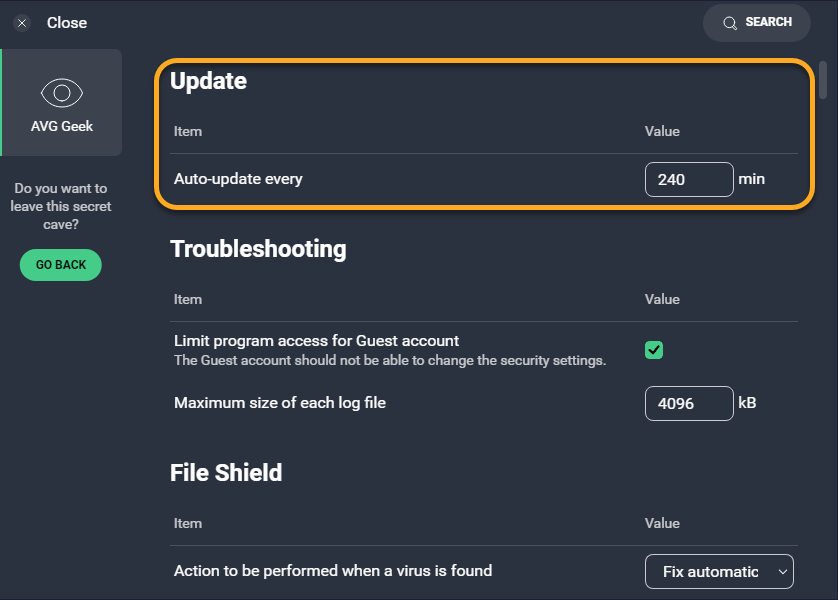
Update
Specify how frequently AVG AntiVirus downloads Virus definitions and application updates (default value 240 minutes).
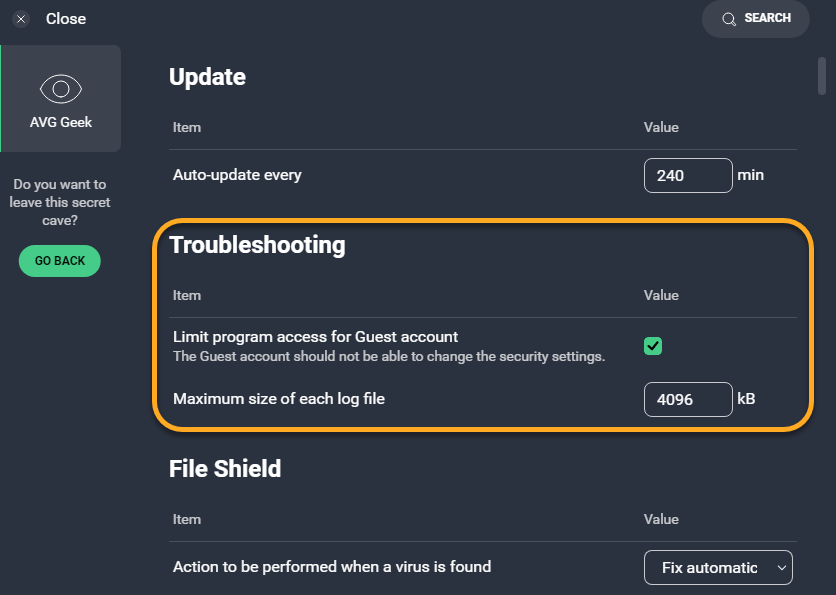
Troubleshooting
- Limit program access for Guest account: Restrict guest users (secondary accounts logged into your PC) from accessing or modifying your AVG AntiVirus settings. We recommend keeping this option enabled to ensure only authorized users have this permission.
- Maximum size of each log file: Change the maximum size of any log files you create (4096 KB by default).
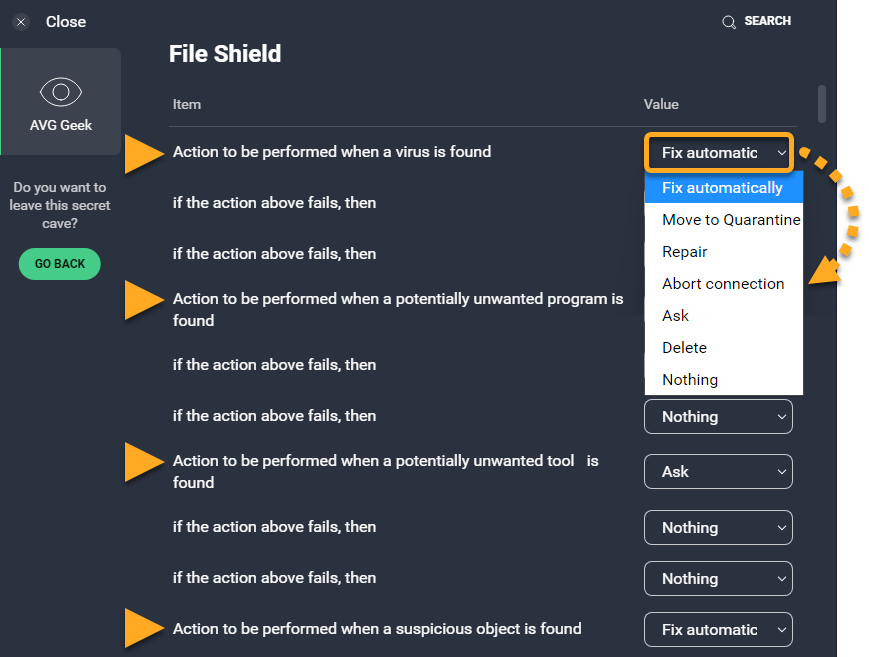
File Shield
File Shield actively scans all programs and files on your hard drive as they are opened, run, modified, and saved. AVG Geek allows you to specify which action(s) File Shield performs when it detects a threat (virus, potentially unwanted program, potentially unwanted tool, or suspicious object). For each individual threat type, select an action from the drop-down menu:
- Fix automatically (selected by default): Run a sequence of actions (repair file; if not possible, then move to Quarantine; if not possible, then delete).
- Move to Quarantine: Send the threat to Quarantine, where it cannot harm your system.
- Repair: Remove only malicious code attached to an otherwise safe file; this is not possible for files that are entirely malware.
- Abort connection: Terminates your connection with the applicable program or file as soon as a potential threat is detected.
- Ask: AVG asks what you want to do with each detected threat.
- Delete: Permanently remove the file from your computer.
- Nothing: No action is taken during the scan; the threat is listed in your scan results and you can decide what to do later.
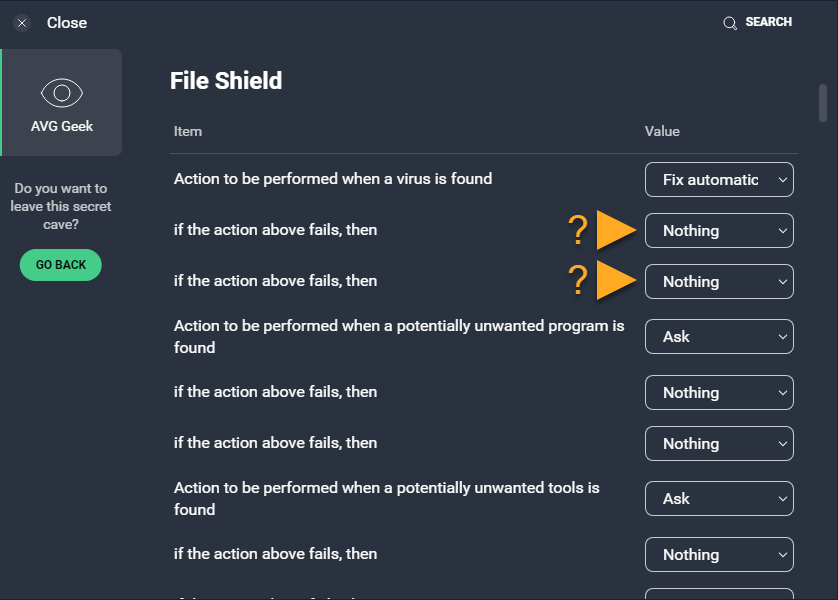
The following options allow you to further configure File Shield behavior:
- If the action above fails, then: For each threat type, optionally use the relevant drop-down menu to specify the action(s) that AVG should apply if your first chosen action fails.
- Show a notification window when action is taken (enabled by default): You receive a notification from AVG each time File Shield detects a threat.
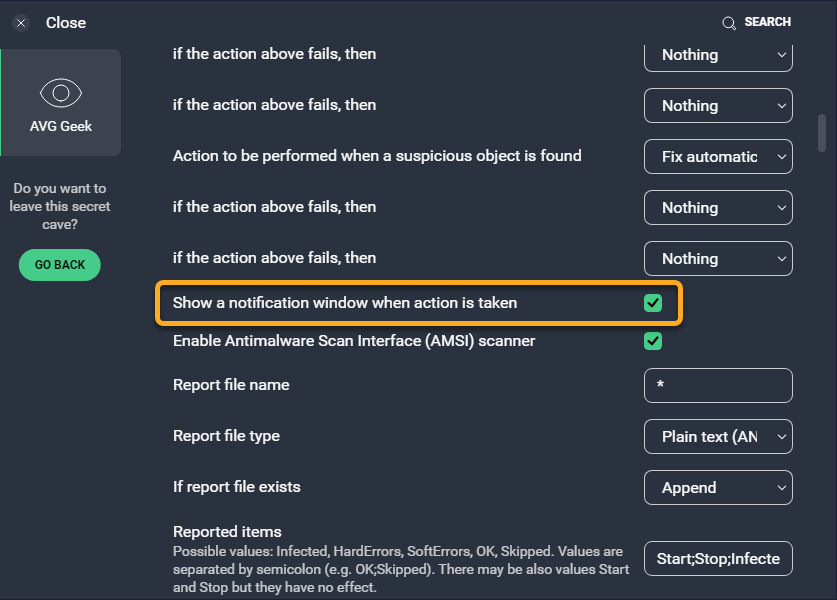
You can additionally configure report file settings individually for File Shield.
Behavior Shield
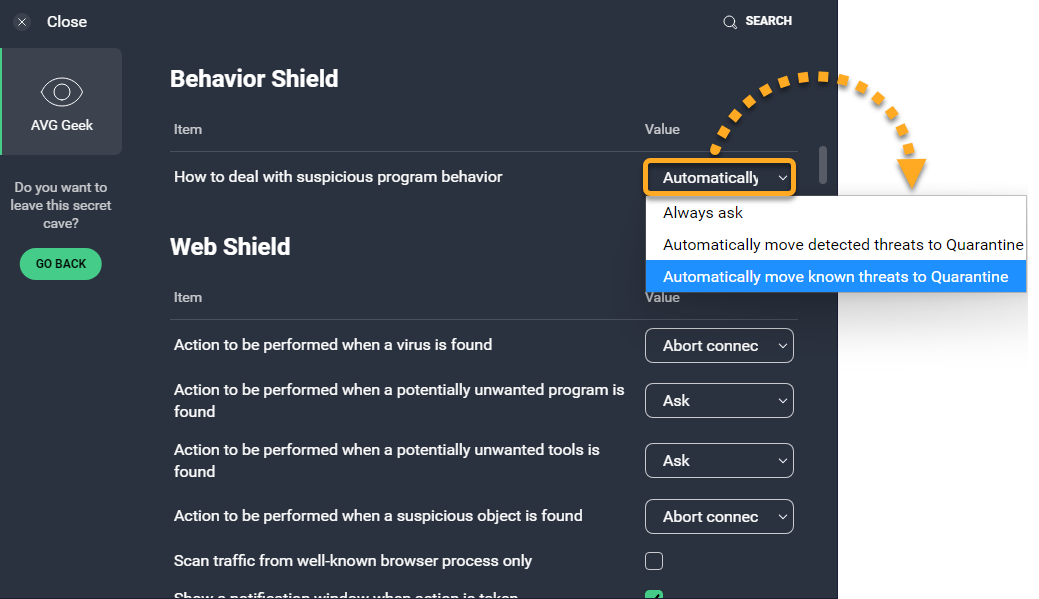
Behavior Shield monitors programs installed on your PC for suspicious behavior that may indicate the presence of malicious code. Configure how Behavior Shield deals with suspicious application behavior by selecting one of the following options from the drop-down menu:
- Always ask: AVG asks what you want to do with each detected threat.
- Automatically move detected threats to Quarantine: Threats that behave similarly to known threats listed on the AVG virus definitions database are moved to Quarantine, where they cannot harm your system.
- Automatically move known threats to Quarantine (selected by default): Threats that are listed on the AVG virus definitions database are moved to Quarantine, where they cannot harm your system.
Web Shield
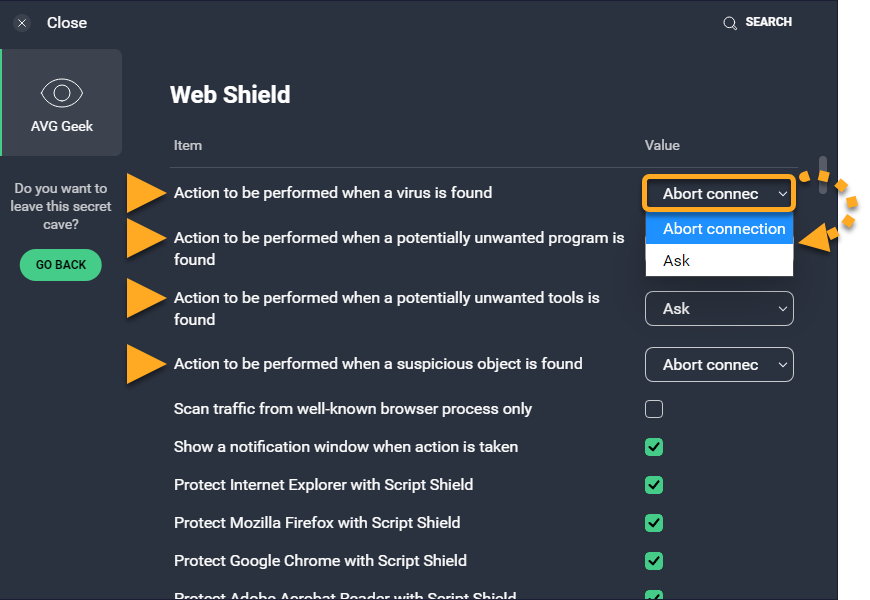
Web Shield actively scans data that is transferred when you browse the internet to prevent malware from being downloaded and run on your PC. AVG Geek allows you to specify which action Web Shield performs when it detects a threat (virus, potentially unwanted program, potentially unwanted tool, or suspicious object). For each individual threat type, select an action from the drop-down menu:
- Abort connection (selected by default): Terminates your connection with the applicable website as soon as a potential threat is detected.
- Ask: Gives you the option to terminate the connection with the applicable website or remain connected when a potential threat is detected. Remaining connected may be risky.
The following options allow you to further configure Web Shield behavior:
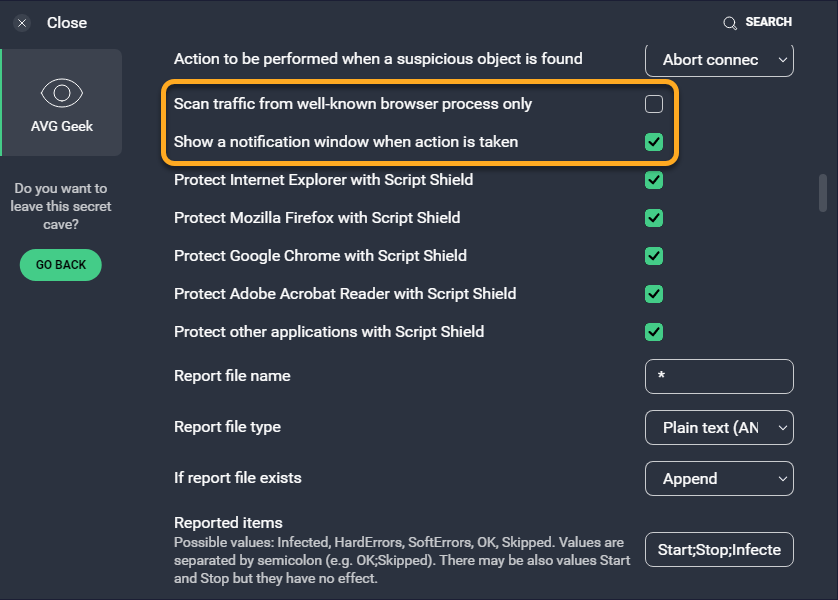
- Scan traffic from well-known browser processes only: With this option enabled, Web Shield only monitors HTTP traffic for the most common browsers.
- Show a notification window when action is taken (enabled by default): You receive a notification from AVG each time Web Shield detects a threat.
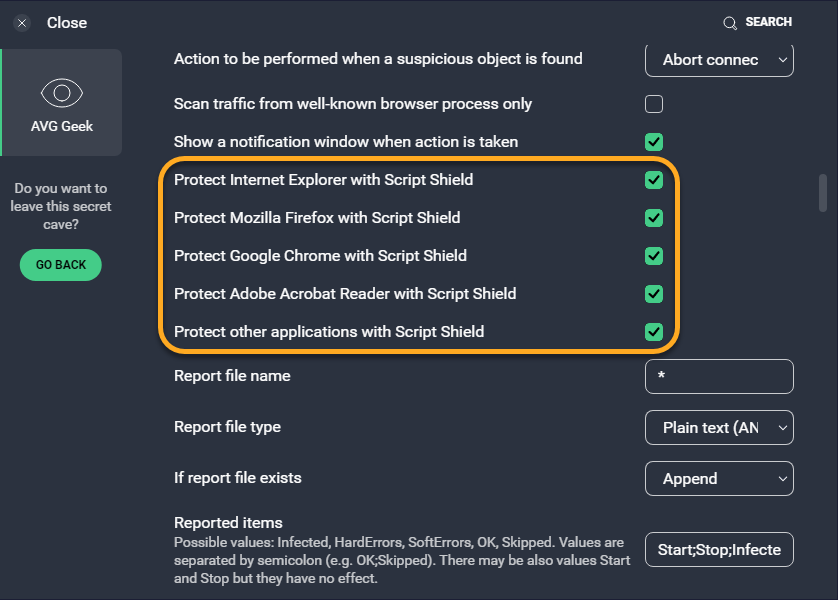
Script Shield protection
Script Shield prevents browsers and other applications from running potentially malicious scripts. This includes remote threats from the web and outside sources, local threats downloaded to your hard drive or in the browser cache, and scripts that come from encrypted connections.
Tick or untick the relevant boxes to specify which browsers and applications are protected by Script Shield. Commonly used browsers, Adobe Acrobat Reader, and all other applications on your PC are protected by default.
You can additionally configure report file settings individually for Web Shield.
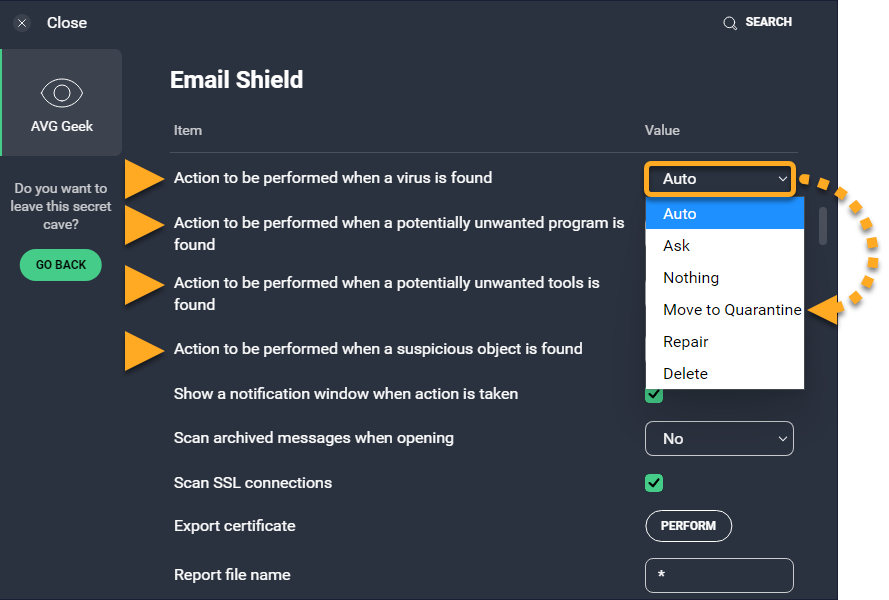
Email Shield
Email Shield scans for threats in your incoming and outgoing email messages. AVG Geek allows you to specify which action AVG performs when Email Shield detects a threat (virus, potentially unwanted program, potentially unwanted program, or suspicious object). For each threat type, select an action from the drop-down menu:
- Auto (selected by default): Run a sequence of actions (repair file; if not possible, then move to Quarantine; if not possible, then delete).
- Ask: AVG asks what you want to do with each detected threat.
- Nothing: No action is taken during the scan; the threat is listed in your scan results and you can decide what to do later.
- Move to Quarantine: Send the threat to Quarantine, where it cannot harm your system.
- Repair: Remove only malicious code attached to an otherwise safe file; this is not possible for files that are entirely malware.
- Delete: Permanently remove the file from your computer.
The following options allow you to further configure Email Shield behavior:
- Show a notification window when action is taken (enabled by default): You receive a notification from AVG each time Email Shield detects a threat.
- Scan archived messages when opening: Scans archived messages every time they are opened.
- Scan SSL connections (enabled by default): Enables scanning of emails sent or received using SSL/TLS encrypted connection. If disabled, only emails sent or received via unsecured connections are scanned.

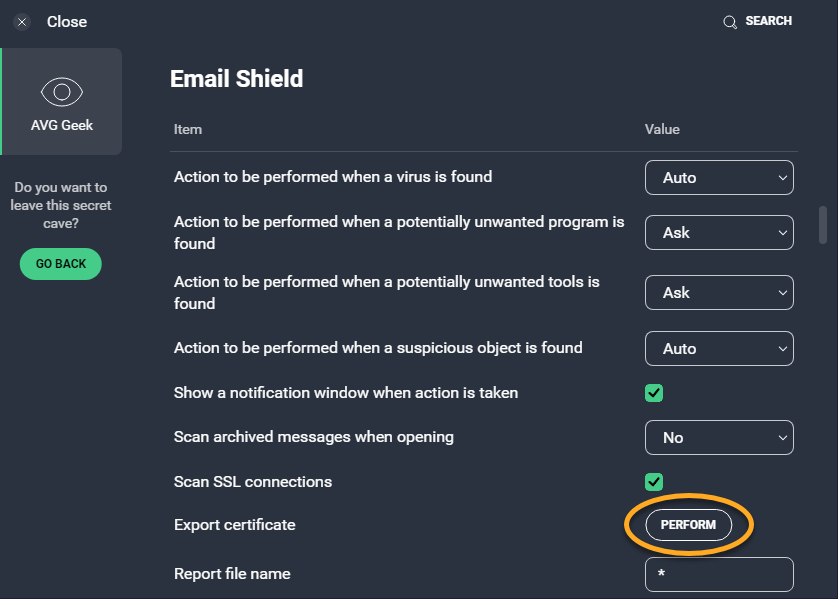
Export a Email Shield certificate
Click Perform to export an Email Shield certificate from AVG AntiVirus. This is useful for troubleshooting error messages about invalid server certificates from third party email clients, such as Mozilla Thunderbird.
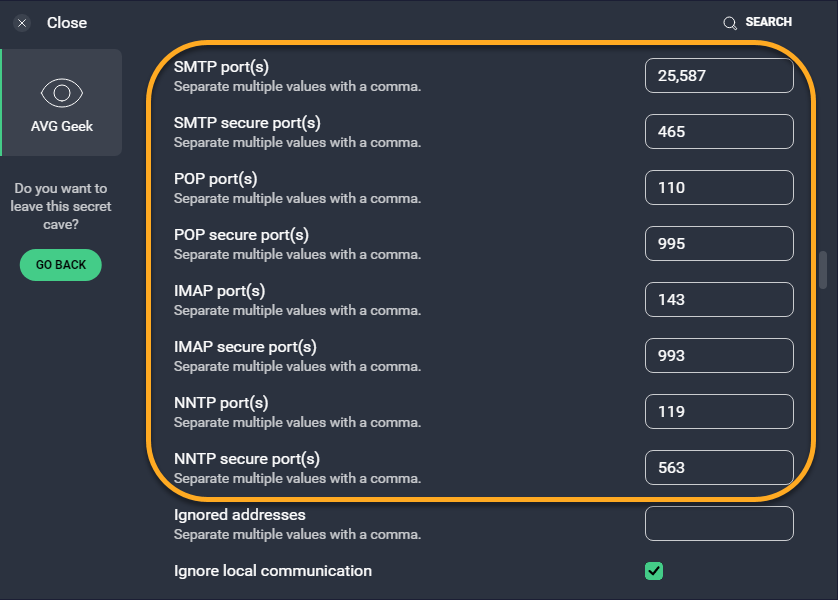
Port settings
If AVG fails to intercept a malicious email or you notice that you are not receiving certain emails, you may need to correct the defined port numbers. AVG Geek allows you to edit the port numbers according to your email service provider or mail server configuration.
You can additionally configure report file settings individually for Email Shield.
Scans
You can configure the following settings for each type of Virus Scan:
- Automatic actions to be performed during the scan
- Processing of infected archives
- Performance settings
- Scan logs
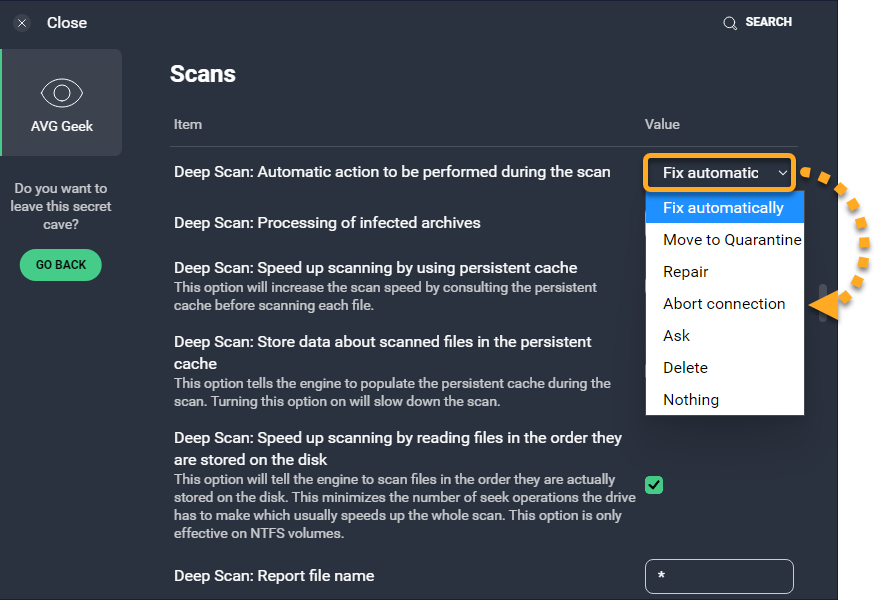
Automatic actions to be performed during the scan
For each listed scan type, specify which action is applied when the scan detects a threat. Select one of the following actions from the drop-down menu:
- Fix automatically (selected by default): Run a sequence of actions (repair file; if not possible, then move to Quarantine; if not possible, then delete).
- Move to Quarantine: Send the threat to Quarantine, where it cannot harm your system.
- Repair: Remove only malicious code attached to an otherwise safe file - this is not possible for files which are entirely malware.
- Abort connection: If AVG detects that you are connected to a URL, game, or device that contains malware, the connection is stopped automatically.
- Ask: AVG asks what you want to do with a detected threat before any action is taken.
- Delete: Permanently remove the file from your computer.
- Nothing: No action is taken during the scan; the threat is listed in your scan results and you can decide what to do later.
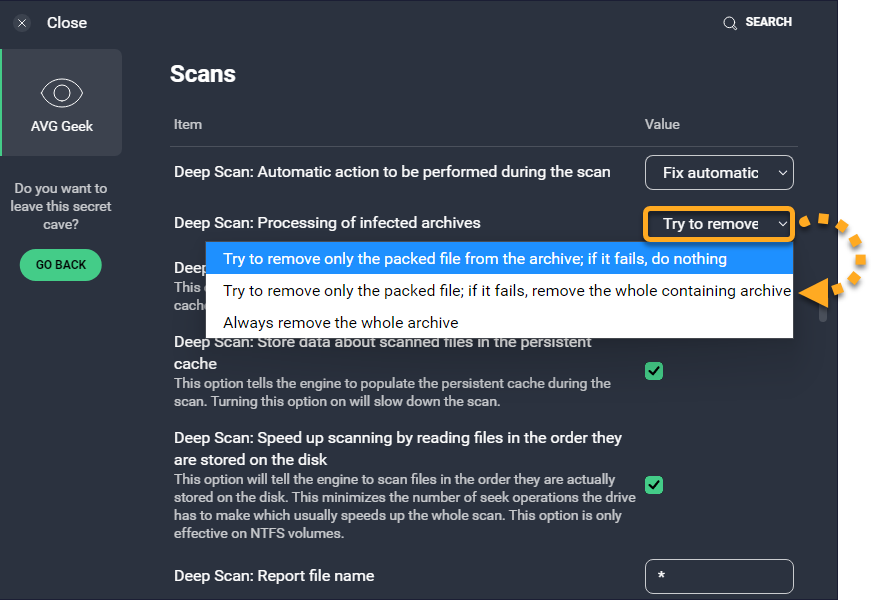
Processing of infected archives
For each listed scan type, specify which action is applied when the scan detects an infected archive. Select one of the following actions from the drop-down menu:
- Try to remove only the packed file from the archive; if it fails, do nothing (selected by default)
- Try to remove only the packed file from the archive; if it fails, remove the whole containing archive
- Always remove the whole archive
Performance settings
For each listed scan type, configure the following performance settings which impact scan speed:
- Speed up scanning by using persistent cache: Enables the scan to refer to information retained from previously scanned files. Trusted files that have already been verified as safe are not scanned again, which enables scans to process faster.
- Store data about scanned files in the persistent cache: Stores data about scanned files in your system's permanent memory, so that future scans can refer to this data and run faster. The information stored in persistent cache is not lost after a system restart or virus definitions update.
- Speed up scanning by reading files in the order they are stored on the disk: Reduces the amount of time the scan takes to locate stored data by scanning files in the order that their physical data is stored on the disk (faster) rather than the order that the files are organized in the file system (slower). This option is only effective for NTFS (New Technology File System) formatted drives.
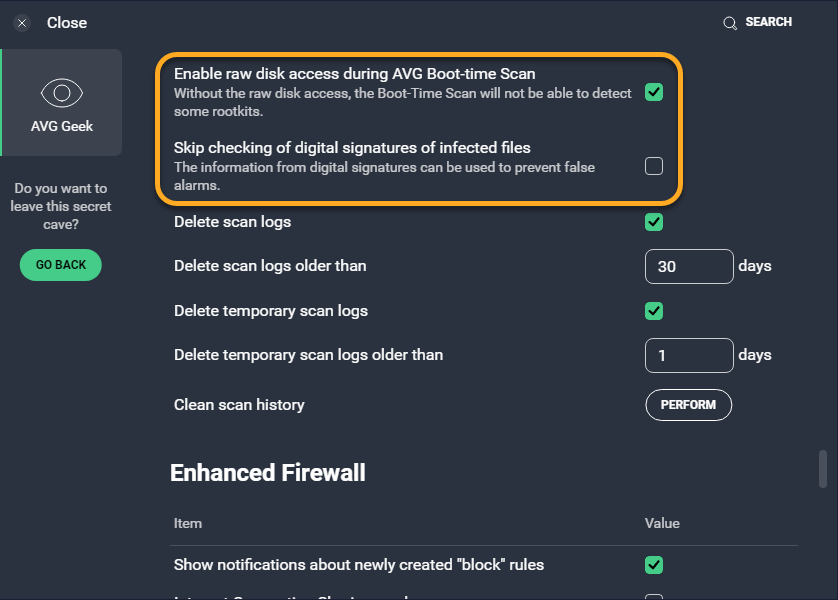
The following additional options can be useful for troubleshooting purposes if scans in AVG take a long time to complete:
- Enable raw disk access during an AVG Boot-time scan (enabled by default): This option applies only to Boot-Time Scans and enables AVG to access and scan the entire disk, including dropped files and file fragments that may contain malicious code. Disabling this option may slightly speed up Boot-Time scans but weaken your antivirus protection.
- Skip checking of digital signatures of infected files: This option applies to all scans in AVG and enables scans to report any files as suspicious, even if they are from trusted publishers, which can speed up the scanning process. However, this option is disabled by default to avoid false positive detections.
Scan logs
AVG scan logs contain details of events detected during a scan. By default, AVG creates scan logs each time you run a scan. AVG scan logs are stored in the following location:
C:\ProgramData\AVG\Antivirus\report
Scan log settings apply to all scans in AVG AntiVirus. The following options are available:
- Delete scan logs (enabled by default): Allows AVG to delete scan logs after a specified time period.
- Delete scan logs older than: Specify after how long AVG deletes scan logs.
- Delete temporary scan logs (enabled by default): Allows AVG to delete temporary scan logs after a specified time period.
- Delete temporary scan logs older than: Specify after how long AVG deletes temporary scan logs.
- Clear scan history: Click Perform to immediately delete all currently stored scan logs.

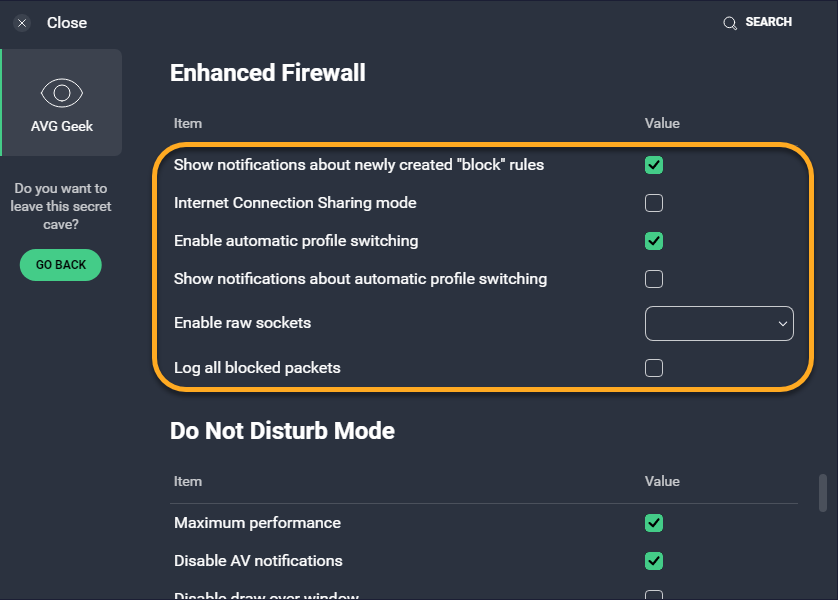
Enhanced Firewall
Enhanced Firewall monitors all network traffic between your PC and the outside world to protect you from unauthorized communication and intrusions. You can configure the following aspects of Enhanced Firewall behavior:
- Show notifications about newly created "block" rules (enabled by default): Sends an alert message each time a new rule related to prohibiting communication is created by the auto-decide feature.
- Internet Connection Sharing mode: Allows a trusted user to connect to the internet through your PC, or to troubleshoot problems with devices, such as a printer that is connected to the internet via your PC. Ticking this option opens certain ports which are usually closed, decreasing the level of security.
- Enable automatic profile switching (enabled by default): Authorizes AVG to automatically change the Enhanced Firewall profile when you connect to a known network with a different profile to the previously connected network.
- Show notifications about automatic profile switching: Alerts you each time your Enhanced Firewall profile changes (for example, when you change from a Private network to a Public network or vice versa). Enabling this option may result in potentially annoying alerts.
- Enable raw sockets (enabled by default): Enables communication with applications that use raw sockets instead of specific communication protocols. Disabling this option slightly increases the security of your PC but creates significant connectivity issues with any applications that use raw sockets.
- Log all blocked packets: enables Enhanced Firewall to log every blocked packet. If you do not tick this option, Enhanced Firewall only logs connections. Typically, you only need to log all packets when troubleshooting security breaches.
Do Not Disturb Mode
Do Not Disturb Mode is an AVG AntiVirus feature that prevents notifications from showing while you are using your apps in full screen. Configure these settings to customize system behavior while Do Not Disturb Mode is enabled, and further maximize the performance of applications running in fullscreen. All options are enabled by default with the following exception:
- Disable draw over window: Blocks the appearance of notifications from other applications while you are running an application in fullscreen.
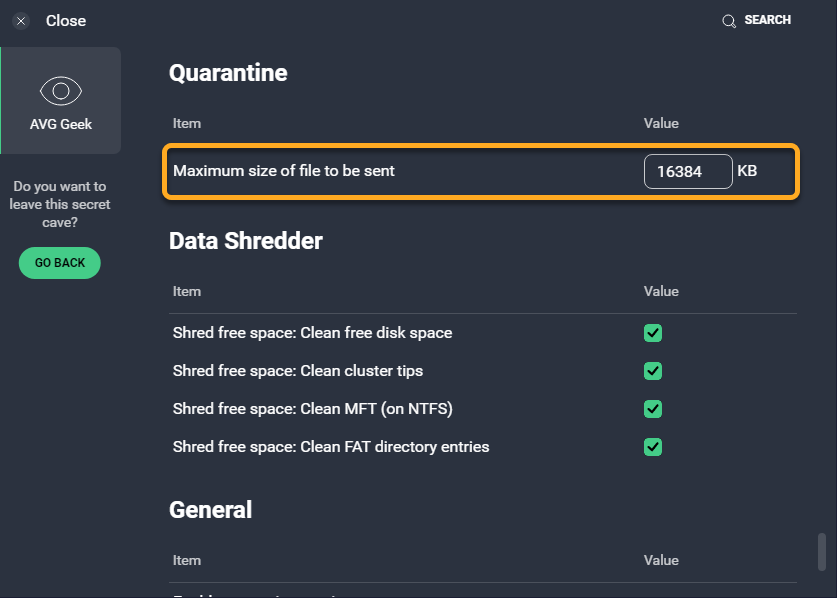
Quarantine
Quarantine is an isolated space where you can safely store potentially dangerous files or send them to the AVG Threat Labs for analysis. AVG Geek settings allow you to specify the maximum size of files that AVG sends to Quarantine. The default value is 16384 KB.
Data Shredder
Data Shredder is a paid feature in AVG Internet Security that allows you to irreversibly erase your files or whole drives, so that there is no way for anyone to restore and misuse your data.
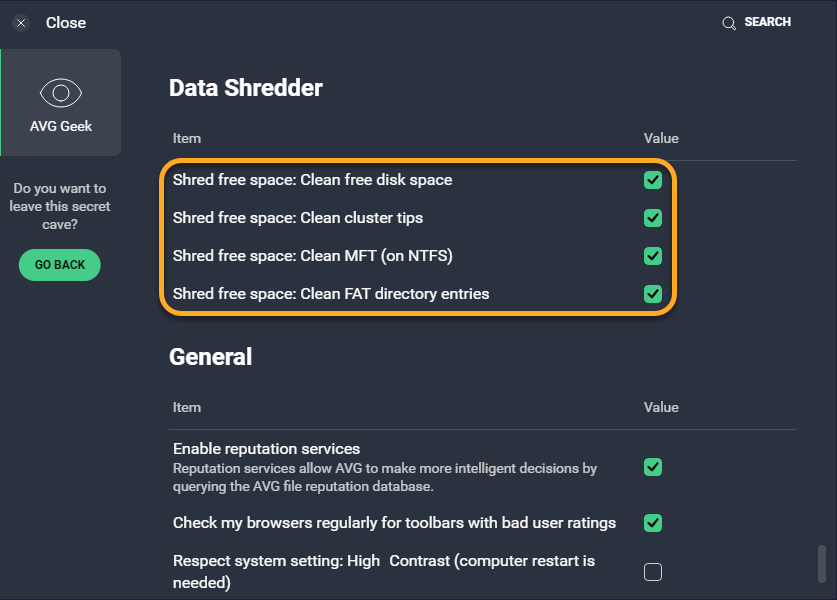
AVG Geek allows you to specify which method(s) Data Shredder uses to shred the remains of previously deleted files. All listed options are enabled by default for maximum security:
- Clean free disk space: Erases free disk space that remains after deleting the files in a regular way.
- Clean cluster tips: Erases "gaps" in space that have been overwritten but can still contain data.
- Clean MFT (on NTFS): Erases Master File Tables (MFT) entries that contain file reference information (file size, date stamps, permissions, etc.) from the data structure for NTFS disks.
- Clean FAT directory entries: Erases file reference information from the data structure for FAT disks.
Report file settings
By default, AVG AntiVirus creates report files of scan results. When troubleshooting issues with AVG Support, you may be requested to provide a report file. Report files are saved to the following location:
C:\ProgramData\AVG\Antivirus\report
You can configure report file settings individually for File Shield, Web Shield, Email Shield, and each AVG scan.
Configure your report file settings by specifying the following values for each listed scan type:
- Report file name: Enter a name for the report file.
- Report file type: Select the format of the report file (plain text (ANSI), plain text (Unicode), or XML).
- If report file exists: Select Append if you want new results to be added to the end of the previous report, or Overwrite if you want new results to replace the previous report.
- Reported items: Define which events appear in report files. Type any of the following events into the text box provided, ensuring entries are separated by semicolons:
- Infected: Files and areas of the scanned environment that the virus scan identifies as containing malware.
- HardErrors: Unexpected errors that require further investigation.
- SoftErrors: Minor errors, such as a file being unable to be scanned because it was in use.
- OK: Files and areas that the virus scan identified as being clean.
- Skipped: Files and areas that the virus scan did not check because of the scan settings.
General
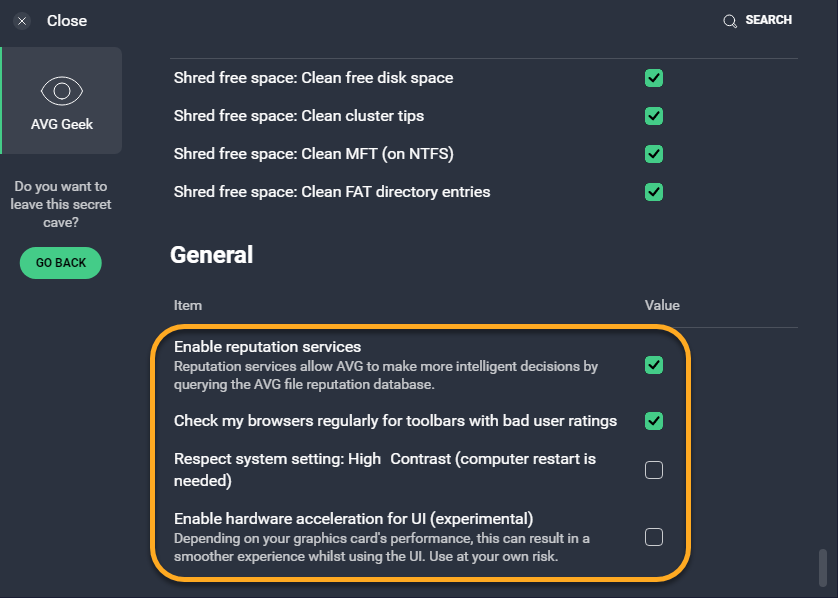
The following additional options are available via the AVG Geek Settings screen:
- Enable reputation services (enabled by default): Allows you to anonymously contribute technical information to help us to better identify malware threats.
- Check my browsers regularly for toolbars with bad user ratings (enabled by default): Checks commonly used browsers for toolbars with poor ratings and offers to remove them. To determine a toolbar's rating, AVG uses a cloud-based rating system based on known blocked and allowed lists, heuristic algorithms, AVG's Recommendation Engine, and user ratings.
- Respect system setting: High Contrast (computer restart is needed): Allows AVG AntiVirus to match your chosen color contrast Windows settings. For more information regarding color contrast settings in Windows, refer to the following Microsoft support article:
- AVG Internet Security 22.x for Windows
- AVG AntiVirus FREE 22.x for Windows
- Microsoft Windows 11 Home / Pro / Enterprise / Education
- Microsoft Windows 10 Home / Pro / Enterprise / Education - 32 / 64-bit
- Microsoft Windows 8.1 / Pro / Enterprise - 32 / 64-bit
- Microsoft Windows 8 / Pro / Enterprise - 32 / 64-bit
- Microsoft Windows 7 Home Basic / Home Premium / Professional / Enterprise / Ultimate - Service Pack 1 with Convenient Rollup Update, 32 / 64-bit