This article explains how to resolve the issue if Network Inspector in AVG Antivirus shows the following alert:
- Forwarded ports found
If you see the alert above after running a Network Inspector scan, we have found that either your router or a Windows PC on your network has open ports, which could allow attackers to remotely access your network and any connected devices. You can verify exactly which port numbers are open via the Network Inspector results screen. Click See how to fix, and check the open port numbers listed under Risks.
Description
Remote access features like Remote Desktop (port 3389) or File and Printer Sharing (port 445) on Windows PCs, when exposed to the Internet through a router's port forwarding, can allow an attacker to connect to the affected PC and install malware by either exploiting known vulnerabilities or guessing your password via a brute-force attack.
Solution
You need to disable port forwarding via your router settings. Follow the steps in the Disable Port Forwarding section below. Alternatively, refer to instructions to Disable UPnP (Universal Plug and Play) feature on the router.
This section explains how to disable port forwarding on your router.
Select your router brand for detailed instructions:
ASUS
To configure an ASUS wireless router:
| 1. |
From the Network Inspector results screen, select Go to your router settings to open the administration page of your ASUS router. |
| 2. |
Enter your router username and password. If you do not know your login credentials, contact the party who provided the router. This is normally your Internet Service Provider (ISP). |
| 3. |
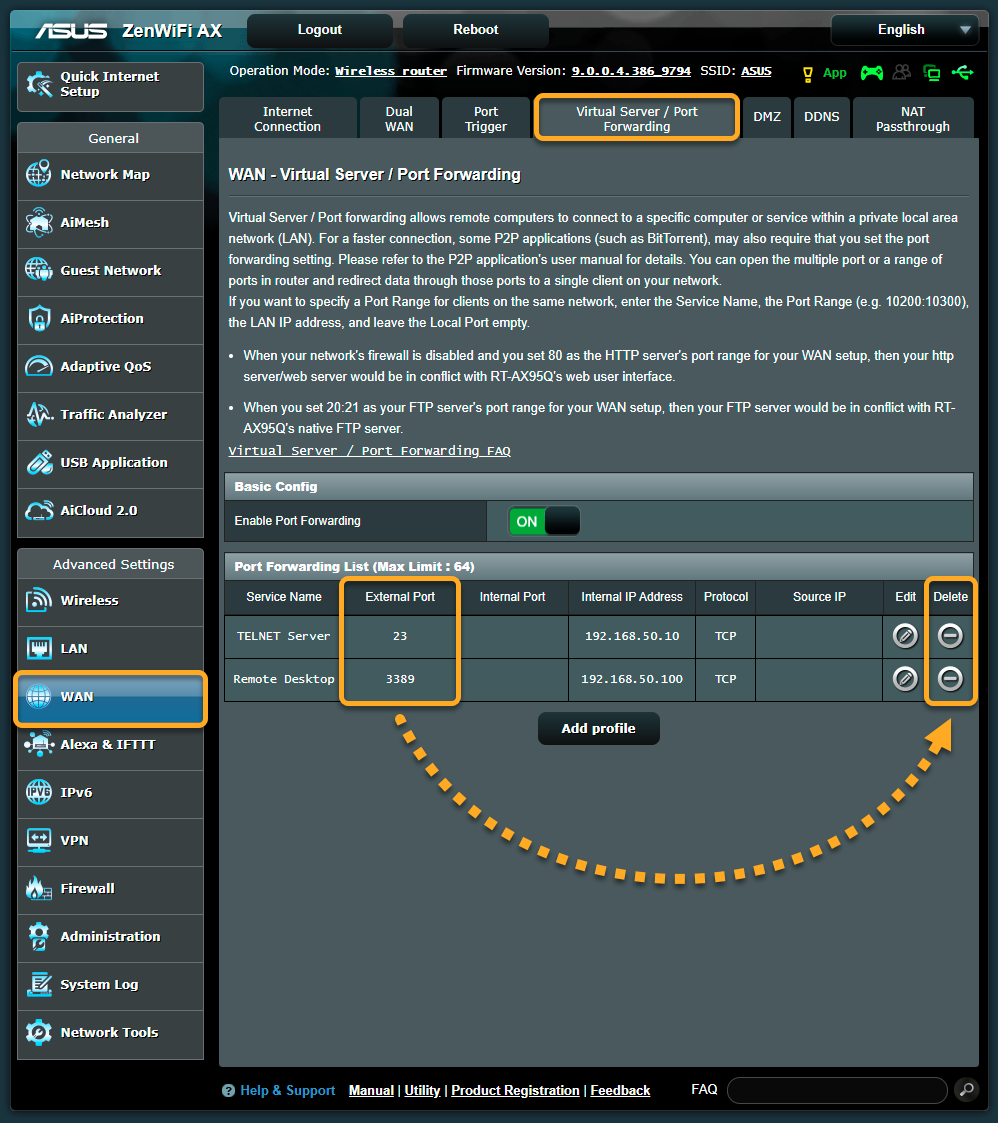
Go to Advanced Settings ▸ WAN ▸ Virtual Server / Port Forwarding. |
| 4. |
Choose your preferred option below:
|
| 5. |
Reboot your router if necessary. |
Belkin
To configure a Belkin wireless router:
| 1. |
From the Network Inspector results screen, select Go to your router settings to open the administration page of your Belkin router. |
| 2. |
Enter your router username and password. If you do not know your login credentials, contact the party who provided the router. This is normally your Internet Service Provider (ISP). |
| 3. |
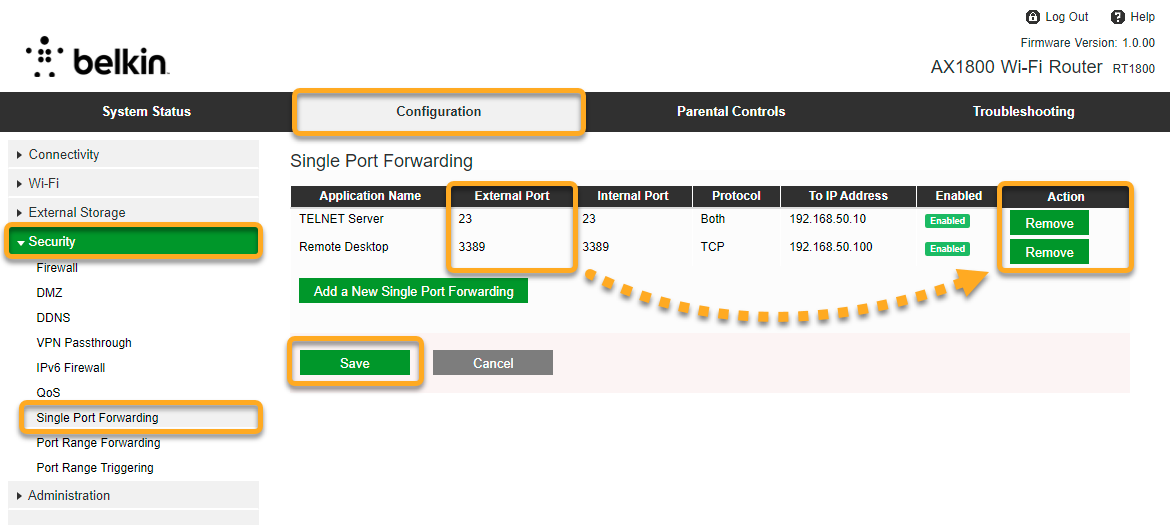
Go to Configuration ▸ Security. |
| 4. |
Select Single Port Forwarding in the left panel. Check for any entries that list port 135, 445, or 338922 or 23 under External Port. Select Remove next to each relevant entry, then confirm your changes by selecting Save. |
| 5. |
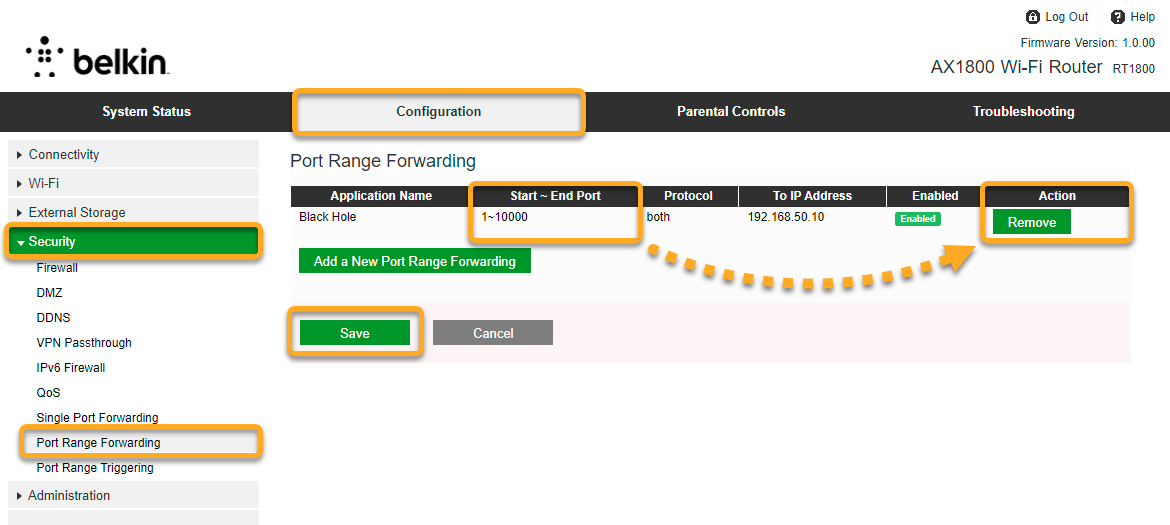
Select Port Range Forwarding in the left panel. Under Start ~ End Port, check for any entries with a range that includes port 135, 445, or 338922 or 23. Select Remove next to each relevant entry, then confirm your changes by selecting Save. |
| 6. |
Reboot your router if necessary. |
Single Port Forwarding
Port Range Forwarding
Cisco
To configure a Cisco wireless router:
| 1. |
From the Network Inspector results screen, select Go to your router settings to open the administration page of your Cisco router. |
| 2. |
Enter your router username and password. If you do not know your login credentials, contact the party who provided the router. This is normally your Internet Service Provider (ISP). |
| 3. |
Select Firewall ▸ Port Forwarding ▸ Service Management.... |
| 4. |
Make a note of the Name that is provided for each entry that lists port 135, 445, or 338922 or 23 under Port Start/ICMP Type/IP Protocol. |
| 5. |
Select Firewall ▸ Port Forwarding in the left panel. |
| 6. |
Under External Service, locate each Name that you made a note of in step 4. For each relevant entry, untick the box next to Enable. |
| 7. |
Confirm your changes by selecting Apply, and reboot your router if necessary. |

D-Link
To configure a D-Link wireless router:
| 1. |
From the Network Inspector results screen, select Go to your router settings to open the administration page of your D-Link router. |
| 2. |
Enter your router username and password. If you do not know your login credentials, contact the party who provided the router. This is normally your Internet Service Provider (ISP). |
| 3. |
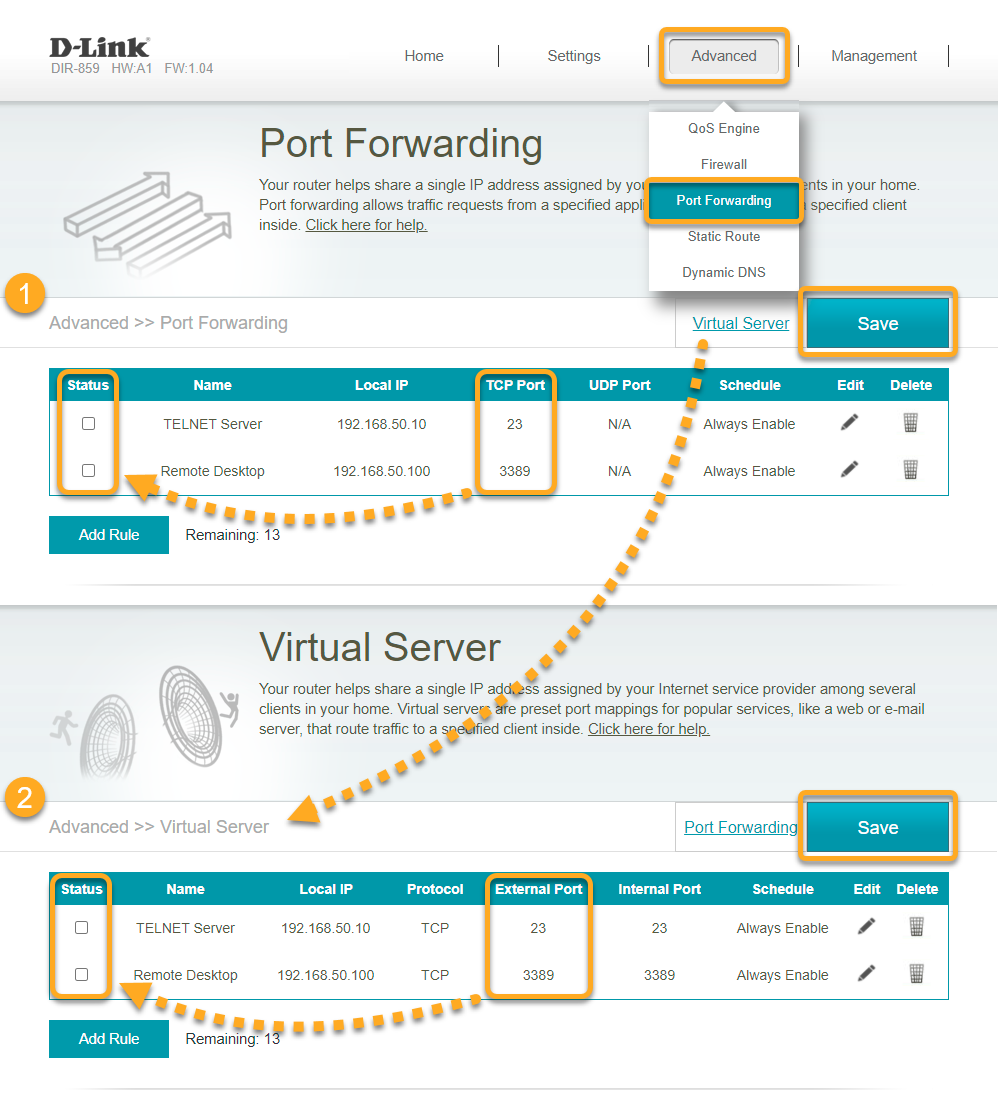
Go to Advanced ▸ Port Forwarding. |
| 4. |
Check for any entries that list port 135, 445, or 338922 or 23 under TCP Port. For each relevant entry, untick the box in the Status column. Confirm your changes by selecting Save. |
| 5. |
Select Virtual Server at the top of the screen. Then, check for any entries that list port 135, 445, or 338922 or 23 under External Port. For each relevant entry, untick the box in the Status column. Confirm your changes by selecting Save. |
| 6. |
Reboot your router if necessary. |
Huawei
To configure a Huawei wireless router:
| 1. |
From the Network Inspector results screen, select Go to your router settings to open the administration page of your Huawei router. |
| 2. |
Enter your router username and password. If you do not know your login credentials, contact the party who provided the router. This is normally your Internet Service Provider (ISP). |
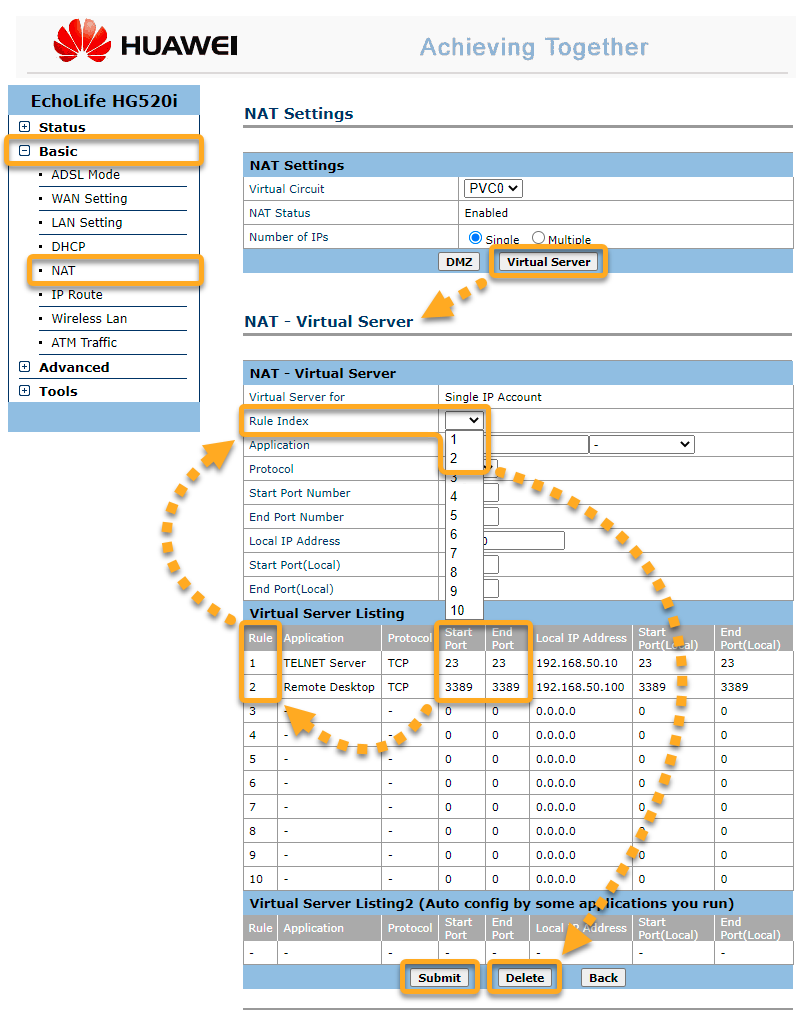
| 3. |
Go to Basic ▸ NAT ▸ Virtual Server. |
| 4. |
In the Virtual Server Listing table, make a note of the Rule number that is provided for each entry with a port range that includes port 135, 445, or 338922 or 23 (the range includes all ports between the Start Port and End Port numbers). |
| 5. |
Under NAT - Virtual Server, use the Rule Index drop-down menu to select each Rule number that you made a note of in step 4. Select the delete button at the bottom of the screen to remove each relevant entry. |
| 6. |
Confirm your changes by selecting Submit, and reboot your router if necessary. |
Linksys
To configure a Linksys wireless router:
| 1. |
From the Network Inspector results screen, select Go to your router settings to open the administration page of your Linksys router. |
| 2. |
Enter your router username and password. If you do not know your login credentials, contact the party who provided the router. This is normally your Internet Service Provider (ISP). |
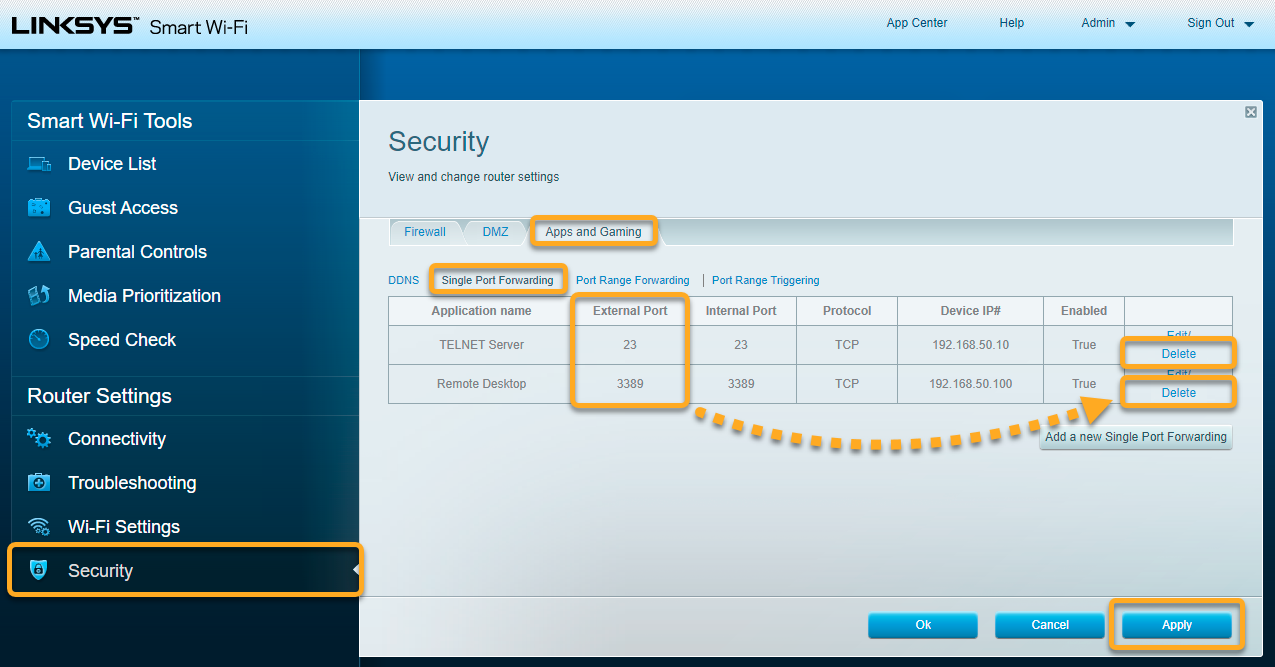
| 3. |
Go to Security ▸ Apps and Gaming ▸ Single Port Forwarding. |
| 4. |
Locate any entries that list port 135, 445, or 338922 or 23 under External Port. Then, choose your preferred option below for each relevant entry:
Confirm your changes by selecting Apply. |
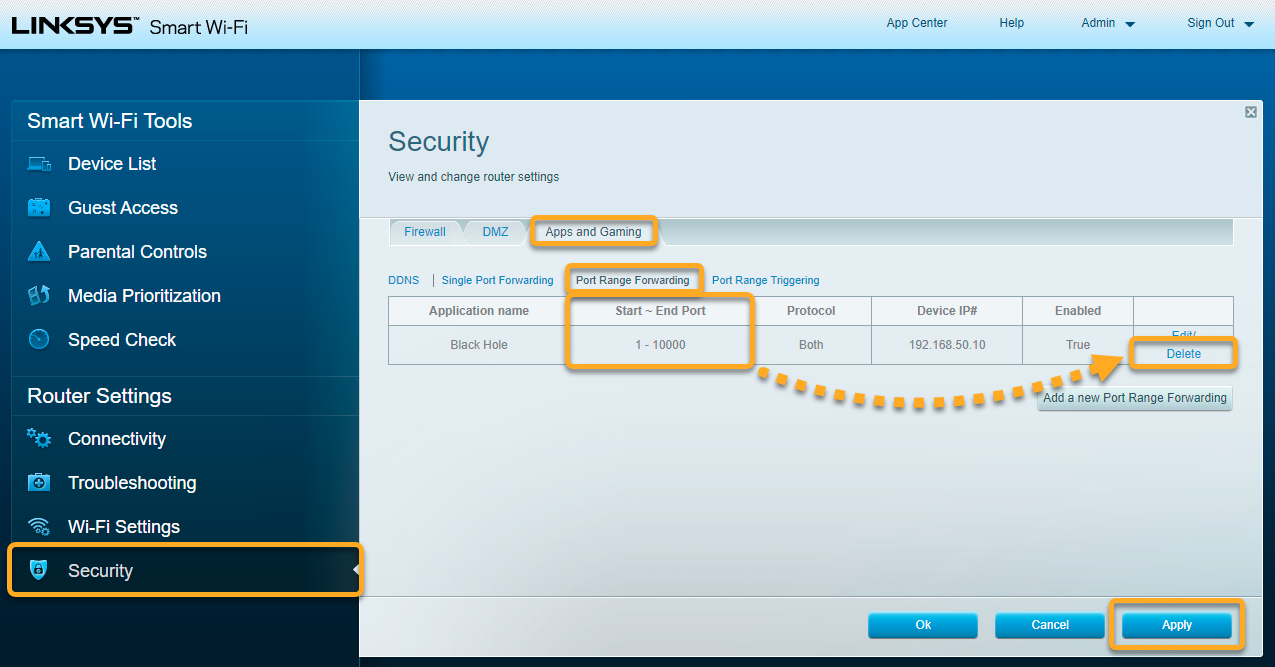
| 5. |
Select the Port Range Forwarding tab. Under Start ~ End Port, check for any entries with a range that includes port 135, 445, or 338922 or 23. Then, choose your preferred option below for each relevant entry:
Confirm your changes by selecting Apply. |
| 6. |
Reboot your router if necessary. |
Single Port Forwarding
Port Range Forwarding
NETGEAR
To configure a NETGEAR wireless router:
| 1. |
From the Network Inspector results screen, select Go to your router settings to open the administration page of your NETGEAR router. |
| 2. |
Enter your router username and password. If you do not know your login credentials, contact the party who provided the router. This is normally your Internet Service Provider (ISP). |
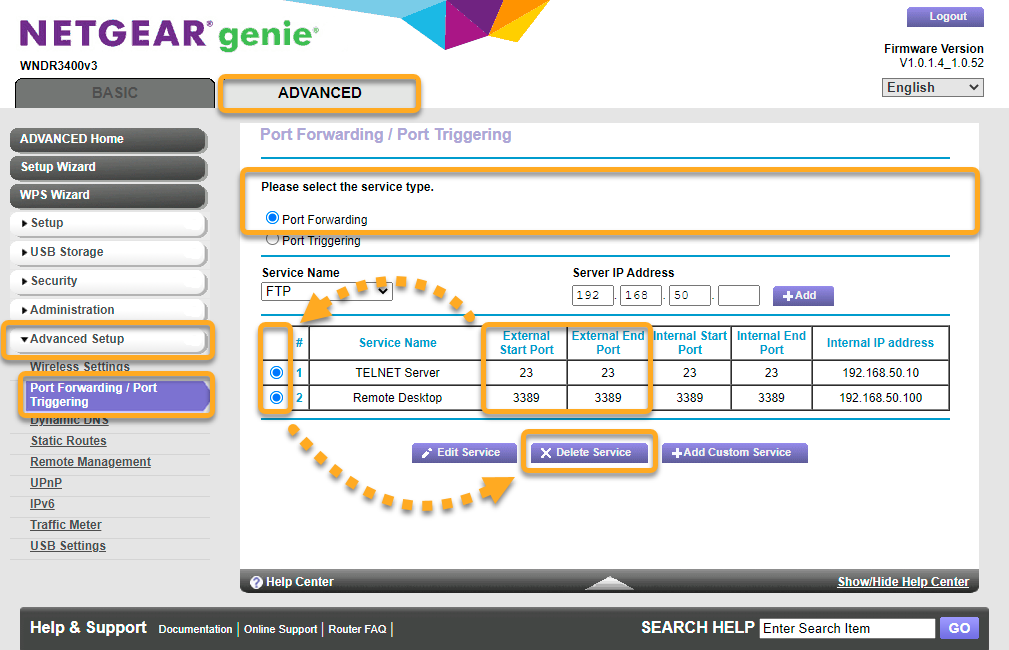
| 3. |
Go to Advanced ▸ Advanced Setup ▸ Port Triggering / Port Forwarding. Under Please select the service type, select Port Forwarding. |
| 4. |
Locate any entries that meet either of the following criteria:
Select each relevant entry, then select the Delete Service button. |
| 5. |
Reboot your router if necessary. |
TP-Link
To configure a TP-Link wireless router:
| 1. |
From the Network Inspector results screen, select Go to your router settings to open the administration page of your TP-Link router. |
| 2. |
Enter your router username and password. If you do not know your login credentials, contact the party who provided the router. This is normally your Internet Service Provider (ISP). |
| 3. |
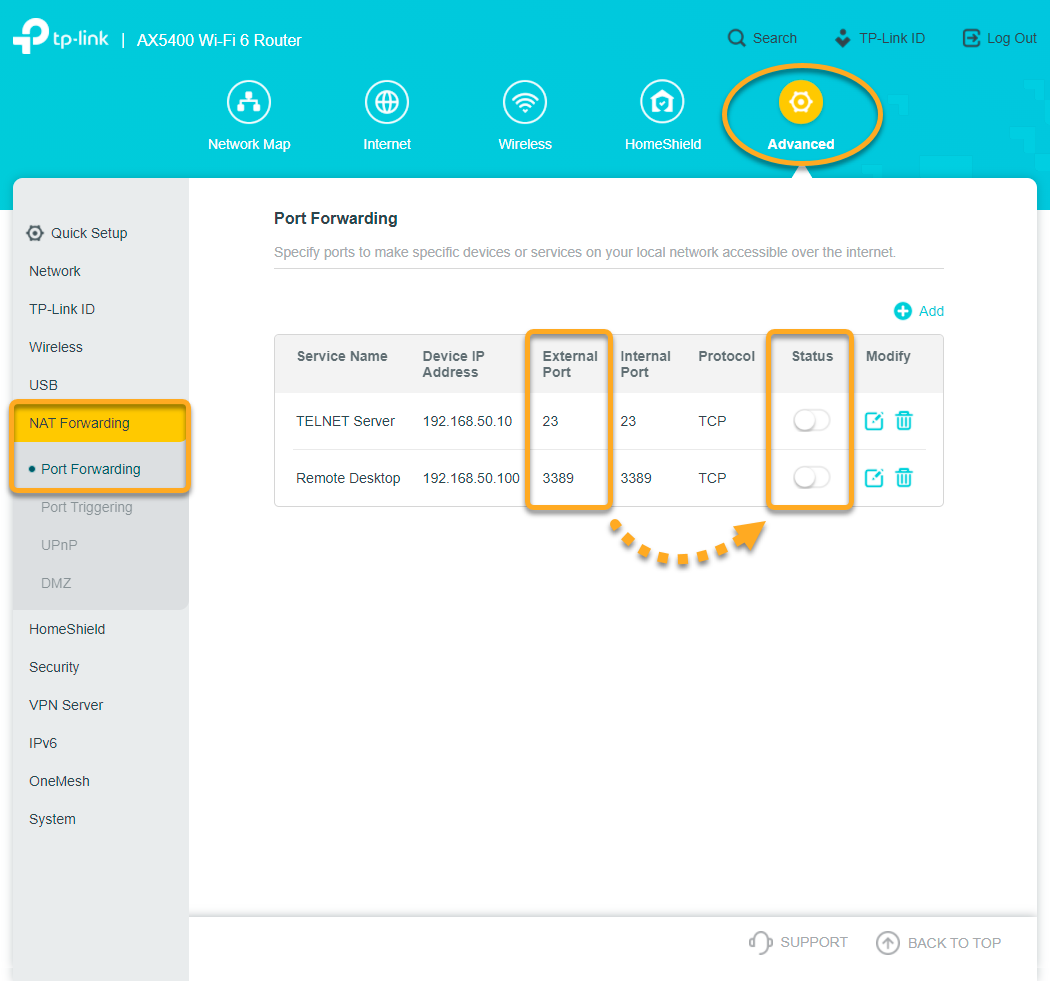
Go to Advanced ▸ NAT Forwarding ▸ Port Forwarding. |
| 4. |
Locate any entries that list port 135, 445, or 338922 or 23 under External Port. Then, choose your preferred option below for each relevant entry:
|
| 5. |
Reboot your router if necessary. |
TRENDnet
To configure a TRENDnet wireless router:
| 1. |
From the Network Inspector results screen, select Go to your router settings to open the administration page of your TRENDnet router. |
| 2. |
Enter your router username and password. If you do not know your login credentials, contact the party who provided the router. This is normally your Internet Service Provider (ISP). |
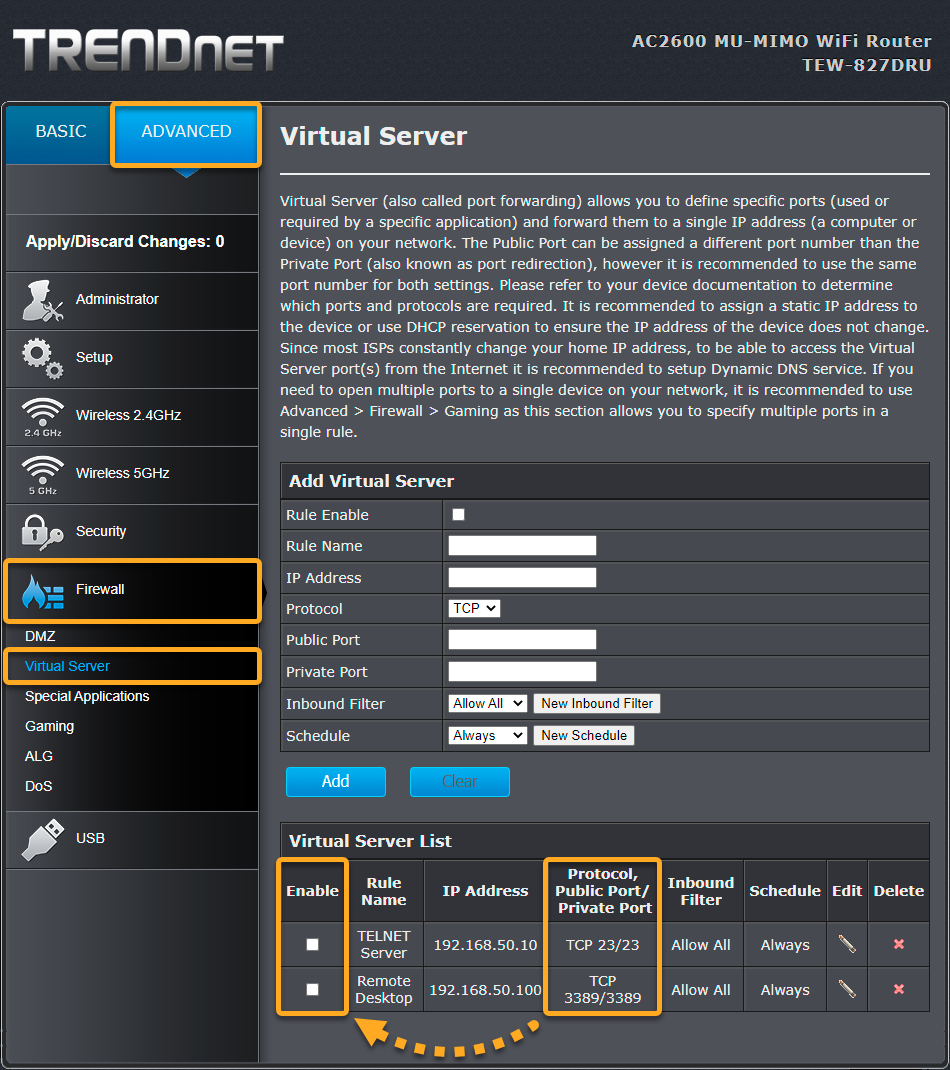
| 3. |
Go to Advanced ▸ Firewall ▸ Virtual Server. |
| 4. |
On the Virtual Server List, locate any entries that list port 135, 445, or 338922 or 23 under Protocol, Public Port/Private Port. Then, choose your preferred option below for each relevant entry:
|
| 5. |
Select Gaming in the left panel. In the Gaming Rule List, check the Ports column for any entries with a range that includes port 135, 445, or 338922 or 23. Then, choose your preferred option below for each relevant entry:
|
| 6. |
Reboot your router if necessary. |
Virtual Server
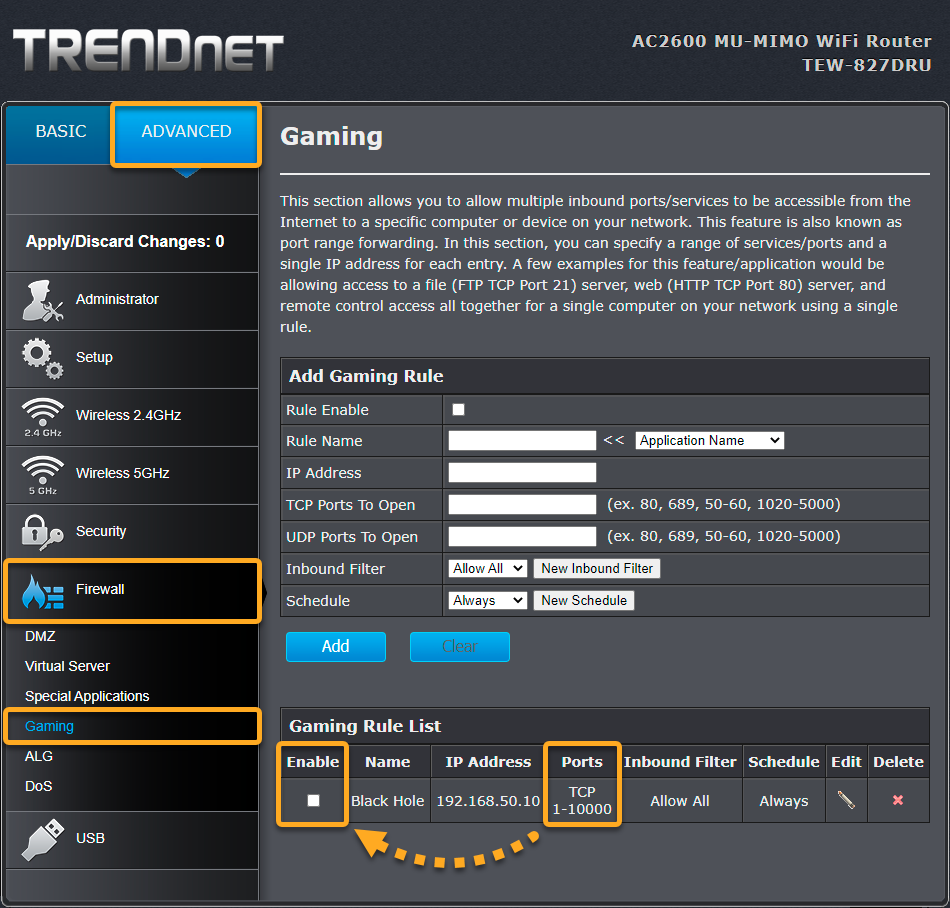
Gaming
Other routers
Below are links to the support pages for other router brands:
Apple | AT&T | Dell | DrayTek | Eero | GL.iNET | Google | MicroTik | Motorola | NEC | Sagem/Sagemcom | Speedefy | Ubiquiti | UniFi | Vodafone | ZyXEL
To configure a wireless router:
| 1. |
From the Network Inspector results screen, select Go to your router settings to open the administration page of your router. |
| 2. |
Enter your router username and password. If you do not know your login credentials, contact the party who provided the router. This is normally your Internet Service Provider (ISP). |
| 3. |
Find the Port Forwarding settings for your router. These settings are normally in the Advanced or Advanced Setup section. If you do not immediately see the Port Forwarding option, try looking in the following categories:
|
| 4. |
In the table showing your active port forwarding entries, locate any entries that list port 135, 445, or 338922 or 23 under External Port (might also be listed under Port, External Start Port, TCP Port, or similar). Either delete or disable each relevant entry. If necessary, confirm your changes (select Save, Apply, OK, or similar). |
| 5. |
If available, select Port Range Forwarding. In the table showing your active port range forwarding entries, locate any entries with a range that includes port 135, 445, or 338922 or 23. Either delete or disable each relevant entry. If necessary, confirm your changes (select Save, Apply, OK, or similar). |
| 6. |
Reboot your router if necessary. |
This section explains how to disable the Universal Plug and Play (UPnP) feature on your router as an alternative security measure to prevent unauthorized devices from connecting to your network. Refer to the steps below:
- From the Network Inspector results screen, select Go to your router settings to open the administration page of your router.
- Enter your router username and password. If you do not know your login credentials, contact the party who provided the router. This is normally your Internet Service Provider (ISP).
- The layout and location of the UPnP setting varies depending on the router brand. Generally, look for Advanced Settings, Network Settings, or LAN Settings. Common locations for UPnP settings:
- Asus: Advanced Settings ▸ WAN ▸ Internet Connection ▸ UPnP
- Belkin: Utilities ▸ System Settings ▸ UPnP
- Cisco: Firewall ▸ Basic Settings ▸ UPnP
- D-Link: Advanced ▸ Advanced Network ▸ UPnP
- Huawei: More Functions ▸ Network Settings ▸ UPnP
- Linksys: Administration ▸ Management ▸ UPnP
- Netgear: Advanced ▸ Advanced Setup ▸ UPnP
- TP-Link: Advanced ▸ NAT Forwarding ▸ UPnP
- TRENDnet: Advanced ▸ UPnP
- Untick or disable the UPnP option. You may be prompted to save the changes and/or reboot your router for the changes to take effect.
- AVG Internet Security
- AVG AntiVirus Free
- Windows and macOS