This article explains how to resolve the issue if Network Inspector in AVG AntiVirus shows the following alert:
- Weak Wi-Fi password
Description
If you see the alert above after running a Network Inspector scan, we have found that your Wi-Fi network is secured with a weak or default password. Anybody in range could easily guess your password and access your Wi-Fi network. This presents the following risks:
- Additional devices connecting to your Wi-Fi network can affect the speed and reliability of your connection.
- An attacker could use your Wi-Fi network to launch other attacks or commit crimes. If an attack is traced back to your network, you may be liable.
- An attacker could connect to your Wi-Fi network and see private data that you send and receive, including your passwords, credit card info, and private messages and photos.
Solution
To resolve this issue, create a strong password for your Wi-Fi network, and all of the devices connected to it.
We recommend that you create a strong password using the guidelines below:
- The password should contain at least 10 characters, but ideally 12 or more. The more characters you use, the more secure your password is.
- The password should not be used to access any other accounts or services.
- The safest passwords are phrases rather than single words. Select a phrase that is memorable for you, but not easily predictable.
Select your router brand for detailed instructions on how to secure your Wi-Fi network with a strong password:
ASUS
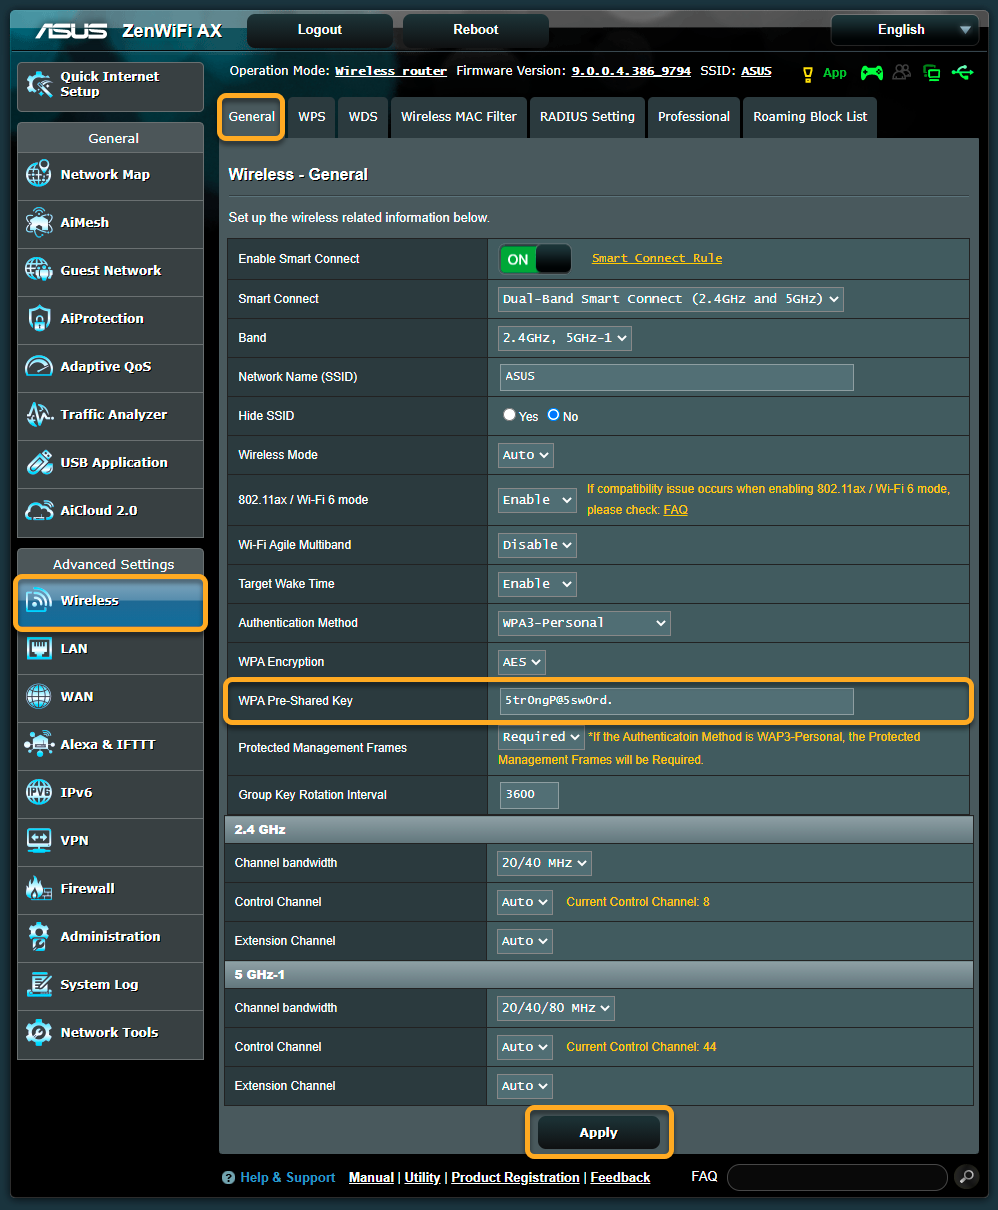
To configure an ASUS wireless router:
| 1. |
From the Network Inspector results screen, select Go to your router settings to open the administration page of your ASUS router. |
| 2. |
Enter your router username and password. If you do not know your login credentials, contact the party who provided the router. This is normally your Internet Service Provider (ISP). |
| 3. |
Follow the step below that matches your router settings: Go to Advanced Settings ▸ Wireless ▸ General. OR Go to Wireless ▸ Interface. OR Go to Wireless ▸ Security. |
| 4. |
In the WPA Pre-Shared Key (or Passphrase) field, create a strong password to encrypt your Wi-Fi network. |
| 5. |
Confirm your changes by selecting Apply or Save, and reboot your router if necessary. |
| 6. |
Repeat steps 3 - 5 for both 2.4 GHz and 5 GHz settings on dual-band routers. |
To configure wireless network devices:
| 1. |
Go to the Wi-Fi settings for each device that is connected to your router, and view the Wi-Fi networks within range. |
| 2. |
Select the name (SSID) of your Wi-Fi network from the list of available networks. |
| 3. |
When prompted, enter the password (or Passphrase, Network/Pre-shared key etc.) that you specified via your router settings. |
| 4. |
If prompted, confirm that you want to establish a wireless connection between the device and your router. |
Belkin
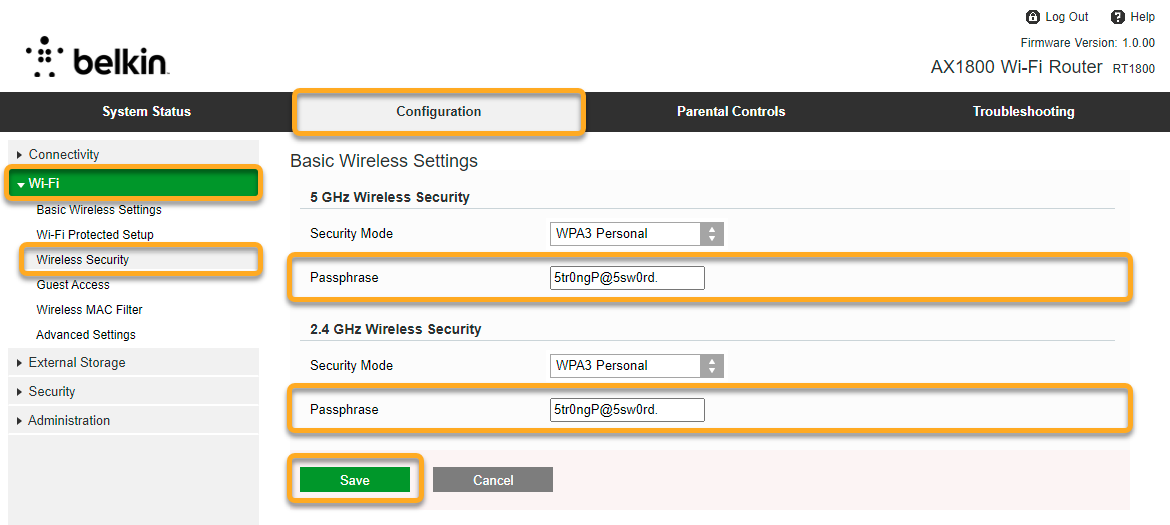
To configure a Belkin wireless router:
| 1. |
From the Network Inspector results screen, select Go to your router settings to open the administration page of your Belkin router. |
| 2. |
Enter your router username and password. If you do not know your login credentials, contact the party who provided the router. This is normally your Internet Service Provider (ISP). |
| 3. |
Go to Configuration ▸ Wi-Fi ▸ Wireless Security. |
| 4. |
In the Passphrase field, create a strong password to encrypt your Wi-Fi network. |
| 5. |
Confirm your changes by selecting Save, and reboot your router if necessary. |
| 6. |
Repeat steps 3 - 5 for both 2.4 GHz and 5 GHz settings on dual-band routers. |
To configure wireless network devices:
| 1. |
Go to the Wi-Fi settings for each device that is connected to your router, and view the Wi-Fi networks within range. |
| 2. |
Select the name (SSID) of your Wi-Fi network from the list of available networks. |
| 3. |
When prompted, enter the password (or Passphrase, Network/Pre-shared key etc.) that you specified via your router settings. |
| 4. |
If prompted, confirm that you want to establish a wireless connection between the device and your router. |
Cisco
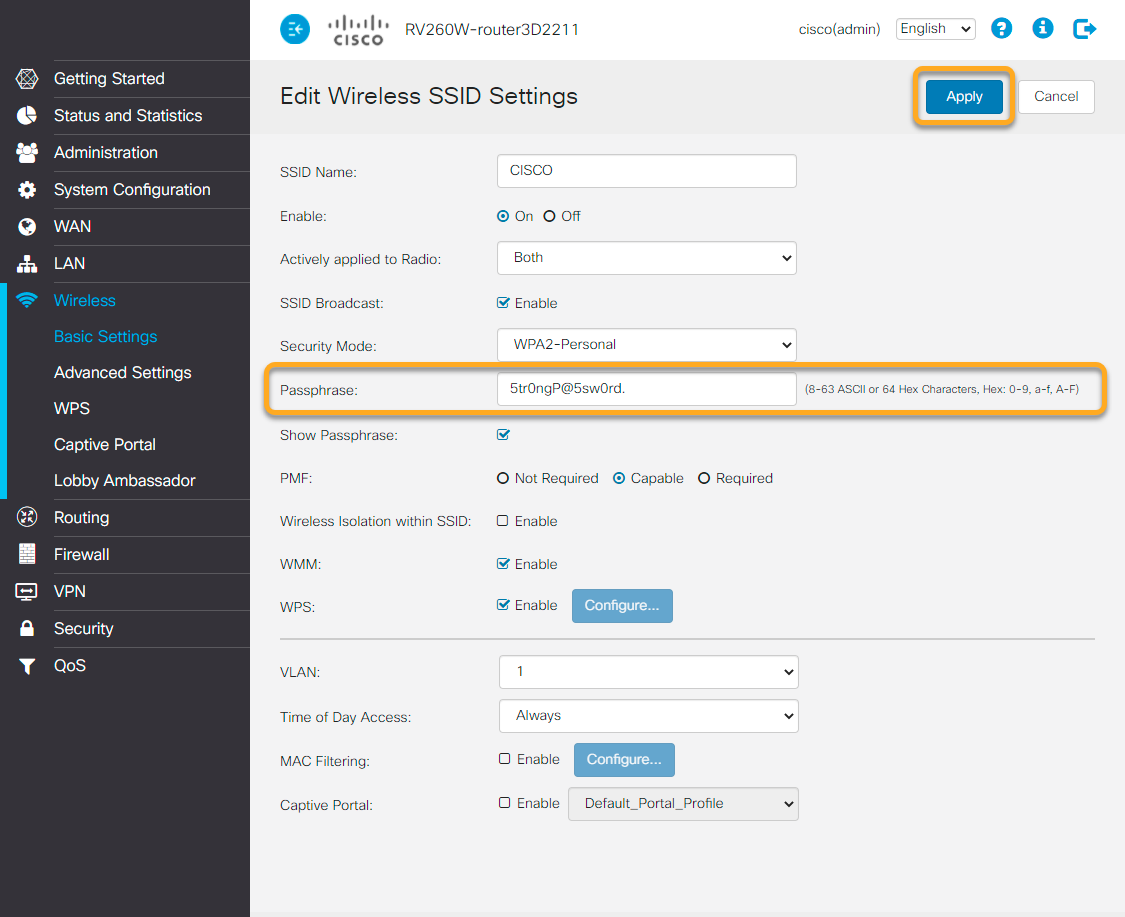
To configure a Cisco wireless router:
| 1. |
From the Network Inspector results screen, select Go to your router settings to open the administration page of your Cisco router. |
| 2. |
Enter your router username and password. If you do not know your login credentials, contact the party who provided the router. This is normally your Internet Service Provider (ISP). |
| 3. |
Go to Wireless ▸ Basic Settings. |
| 4. |
Tick the box next to the vulnerable wireless network, then select edit (the pencil icon). |
| 5. |
In the Passphrase field, create a strong password to encrypt your Wi-Fi network. |
| 6. |
Confirm your changes by selecting Apply, and reboot your router if necessary. |
| 7. |
Repeat steps 3 - 6 for both 2.4 GHz and 5 GHz settings on dual-band routers. |
To configure wireless network devices:
| 1. |
Go to the Wi-Fi settings for each device that is connected to your router, and view the Wi-Fi networks within range. |
| 2. |
Select the name (SSID) of your Wi-Fi network from the list of available networks. |
| 3. |
When prompted, enter the password (or Passphrase, Network/Pre-shared key etc.) that you specified via your router settings. |
| 4. |
If prompted, confirm that you want to establish a wireless connection between the device and your router. |

D-Link
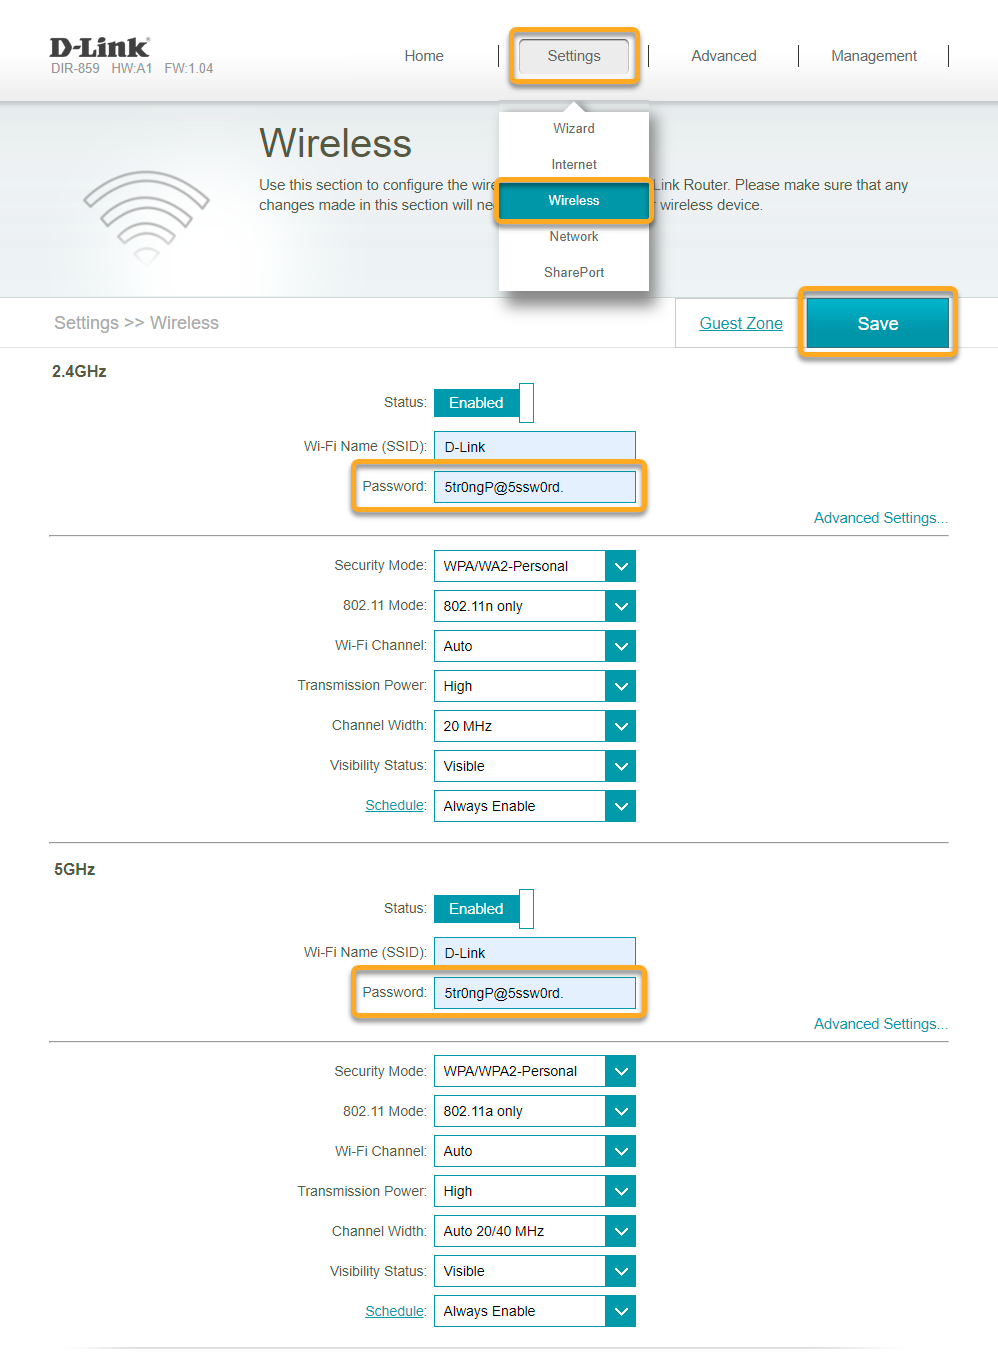
To configure a D-Link wireless router:
| 1. |
From the Network Inspector results screen, select Go to your router settings to open the administration page of your D-Link router. |
| 2. |
Enter your router username and password. If you do not know your login credentials, contact the party who provided the router. This is normally your Internet Service Provider (ISP). |
| 3. |
Follow the step below that matches your router settings: Go to Settings ▸ Wireless. OR Go to Setup ▸ Wireless Settings ▸ Manual Wireless Network Setup. OR Go to Setup ▸ Wireless Connection ▸ Manual Wireless Connection Setup. |
| 4. |
In the Password, Pre-Shared/Network Key, or Passphrase field, create a strong password to encrypt your Wi-Fi network. |
| 5. |
Confirm your changes by selecting Save or Save settings. |
| 6. |
Repeat steps 3 - 5 for both 2.4 GHz and 5 GHz settings on dual-band routers, and reboot your router if necessary. |
To configure wireless network devices:
| 1. |
Go to the Wi-Fi settings for each device that is connected to your router, and view the Wi-Fi networks within range. |
| 2. |
Select the name (SSID) of your Wi-Fi network from the list of available networks. |
| 3. |
When prompted, enter the password (or Passphrase, Network/Pre-shared key etc.) that you specified via your router settings. |
| 4. |
If prompted, confirm that you want to establish a wireless connection between the device and your router. |
Huawei
To configure a Huawei wireless router:
| 1. |
From the Network Inspector results screen, select Go to your router settings to open the administration page of your Huawei router. |
| 2. |
Enter your router username and password. If you do not know your login credentials, contact the party who provided the router. This is normally your Internet Service Provider (ISP). |
| 3. |
Follow the step below that matches your router settings: Go to Basic ▸ Wireless LAN. OR Go to Basic ▸ WLAN ▸ WLAN. |
| 4. |
In the Pre-Shared Key field, create a strong password to encrypt your Wi-Fi network. |
| 5. |
Confirm your changes by selecting Submit. |
| 6. |
Repeat steps 3 - 5 for both 2.4 GHz and 5 GHz settings on dual-band routers, and reboot your router if necessary. |
To configure wireless network devices:
| 1. |
Go to the Wi-Fi settings for each device that is connected to your router, and view the Wi-Fi networks within range. |
| 2. |
Select the name (SSID) of your Wi-Fi network from the list of available networks. |
| 3. |
When prompted, enter the password (or Passphrase, Network/Pre-shared key etc.) that you specified via your router settings. |
| 4. |
If prompted, confirm that you want to establish a wireless connection between the device and your router. |

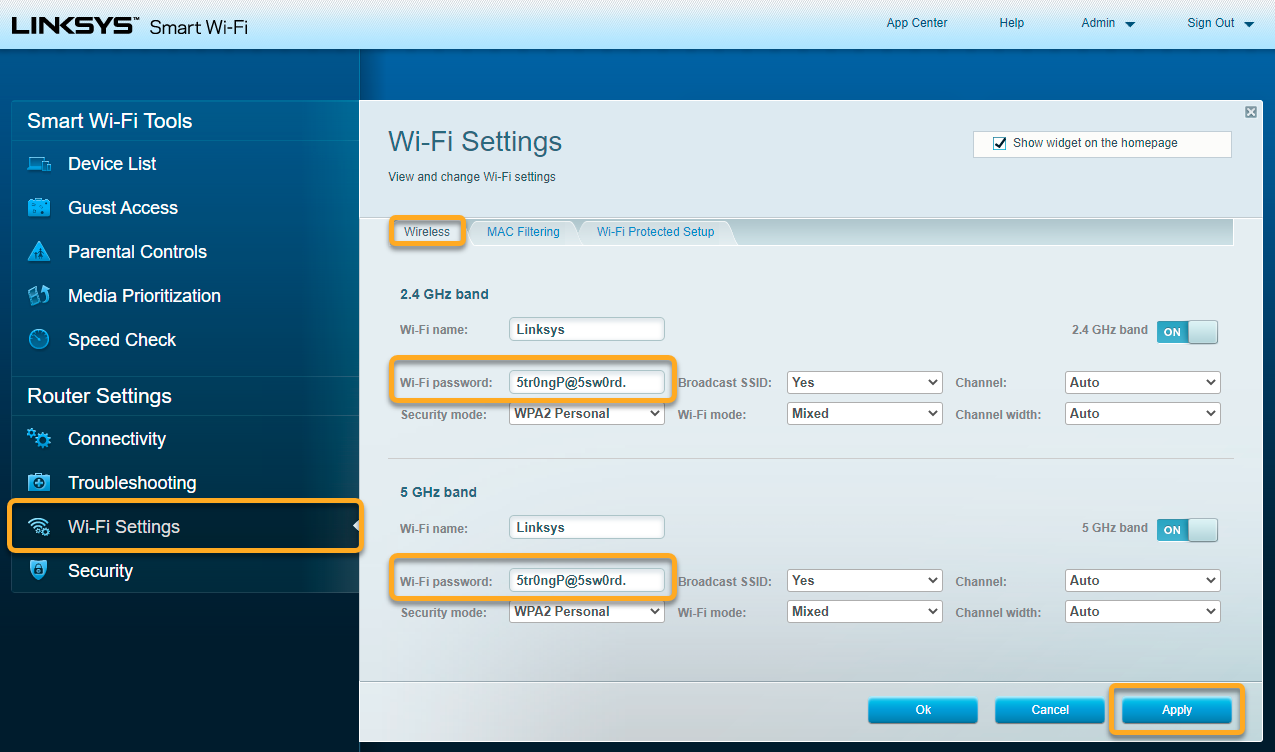
Linksys
To configure a Linksys wireless router:
| 1. |
From the Network Inspector results screen, select Go to your router settings to open the administration page of your Linksys router. |
| 2. |
Enter your router username and password. If you do not know your login credentials, contact the party who provided the router. This is normally your Internet Service Provider (ISP). |
| 3. |
Follow the step below that matches your router settings: Go to Wi-Fi Settings ▸ Wireless. OR Go to Wireless ▸ Wireless Settings ▸ Manual. OR Go to Wireless ▸ Wireless ▸ Edit. |
| 4. |
In the Wi-Fi password or Passphrase field, create a strong password to encrypt your Wi-Fi network. |
| 5. |
Confirm your changes by selecting Apply, Save settings, or OK. |
| 6. |
Repeat steps 3 - 5 for both 2.4 GHz and 5 GHz settings on dual-band routers, and reboot your router if necessary. |
To configure wireless network devices:
| 1. |
Go to the Wi-Fi settings for each device that is connected to your router, and view the Wi-Fi networks within range. |
| 2. |
Select the name (SSID) of your Wi-Fi network from the list of available networks. |
| 3. |
When prompted, enter the password (or Passphrase, Network/Pre-shared key etc.) that you specified via your router settings. |
| 4. |
If prompted, confirm that you want to establish a wireless connection between the device and your router. |
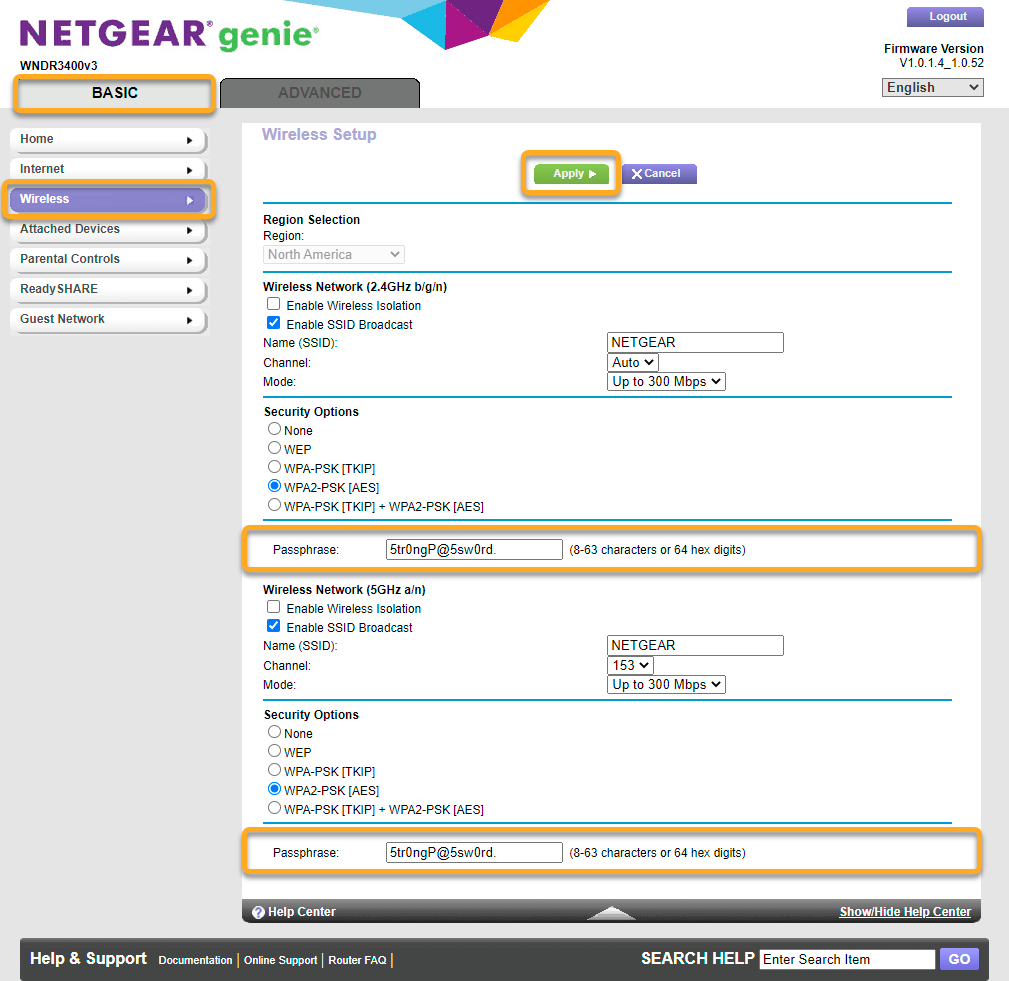
NETGEAR
To configure a NETGEAR wireless router:
| 1. |
From the Network Inspector results screen, select Go to your router settings to open the administration page of your NETGEAR router. |
| 2. |
Enter your router username and password. If you do not know your login credentials, contact the party who provided the router. This is normally your Internet Service Provider (ISP). |
| 3. |
Follow the step below that matches your router settings: Go to Basic ▸ Wireless. OR Go to Advanced ▸ Setup ▸ Wireless Setup. OR Go to Setup ▸ Wireless settings. |
| 4. |
In the Passphrase field, create a strong password to encrypt your Wi-Fi network. |
| 5. |
Confirm your changes by selecting Apply. |
| 6. |
Repeat steps 3 - 5 for both 2.4 GHz and 5 GHz settings on dual-band routers, and reboot your router if necessary. |
To configure wireless network devices:
| 1. |
Go to the Wi-Fi settings for each device that is connected to your router, and view the Wi-Fi networks within range. |
| 2. |
Select the name (SSID) of your Wi-Fi network from the list of available networks. |
| 3. |
When prompted, enter the password (or Passphrase, Network/Pre-shared key etc.) that you specified via your router settings. |
| 4. |
If prompted, confirm that you want to establish a wireless connection between the device and your router. |
TP-Link
To configure a TP-Link wireless router:
| 1. |
From the Network Inspector results screen, select Go to your router settings to open the administration page of your TP-Link router. |
| 2. |
Enter your router username and password. If you do not know your login credentials, contact the party who provided the router. This is normally your Internet Service Provider (ISP). |
| 3. |
Follow the step below that matches your router settings: Select Wireless in the top panel. OR Go to Wireless (2.4GHz/5GHz) ▸ Wireless Security. OR Go to Wireless ▸ Wireless Settings ▸ Enable Wireless Security. |
| 4. |
In the Password, PSK/Wireless Password, or PSK Passphrase field, create a strong password to encrypt your Wi-Fi network. |
| 5. |
Confirm your changes by selecting Save. |
| 6. |
Repeat steps 3 - 5 for both 2.4GHz and 5GHz settings on dual-band routers, and reboot your router if necessary. |
To configure wireless network devices:
| 1. |
Go to the Wi-Fi settings for each device that is connected to your router, and view the Wi-Fi networks within range. |
| 2. |
Select the name (SSID) of your Wi-Fi network from the list of available networks. |
| 3. |
When prompted, enter the password (or Passphrase, Network/Pre-shared key etc.) that you specified via your router settings. |
| 4. |
If prompted, confirm that you want to establish a wireless connection between the device and your router. |

TRENDnet
To configure a TRENDnet wireless router:
| 1. |
From the Network Inspector results screen, select Go to your router settings to open the administration page of your TRENDnet router. |
| 2. |
Enter your router username and password. If you do not know your login credentials, contact the party who provided the router. This is normally your Internet Service Provider (ISP). |
| 3. |
Go to Basic ▸ Wireless. |
| 4. |
In the Pre-Shared Key field, create a strong password to encrypt your Wi-Fi network. |
| 5. |
Confirm your changes by selecting Save. |
| 6. |
Repeat steps 3 - 5 for both 2.4 GHz and 5 GHz settings on dual-band routers, and reboot your router if necessary. |
To configure wireless network devices:
| 1. |
Go to the Wi-Fi settings for each device that is connected to your router, and view the Wi-Fi networks within range. |
| 2. |
Select the name (SSID) of your Wi-Fi network from the list of available networks. |
| 3. |
When prompted, enter the password (or Passphrase, Network/Pre-shared key etc.) that you specified via your router settings. |
| 4. |
If prompted, confirm that you want to establish a wireless connection between the device and your router. |

Other routers
Below are links to the support pages for other router brands:
Apple | AT&T | Dell | DrayTek | Eero | GL.iNET | Google | MicroTik | Motorola | NEC | Sagem/Sagemcom | Speedefy | Ubiquiti | UniFi | Vodafone | ZyXEL
To configure a wireless router:
| 1. |
From the Network Inspector results screen, select Go to your router settings to open the administration page of your router. |
| 2. |
Enter your router username and password. If you do not know your login credentials, contact the party who provided the router. This is normally your Internet Service Provider (ISP). |
| 3. |
Find the Wireless settings section (may also be called Wi-Fi settings/setup or similar). |
| 4. |
Find the field to create a Wireless password (or Passphrase, Network/Pre-shared key etc.) to encrypt your Wi-Fi network. |
| 5. |
Confirm your changes (select Save settings, Update, OK, or similar). |
| 6. |
Repeat steps 3 - 5 for both 2.4 GHz (B/G) and 5 GHz (A) settings on dual-band routers, and reboot your router if necessary. |
To configure wireless network devices:
| 1. |
Go to the Wi-Fi settings for each device that is connected to your router, and view the Wi-Fi networks within range. |
| 2. |
Select the name (SSID) of your Wi-Fi network from the list of available networks. |
| 3. |
When prompted, enter the password (or Passphrase, Network/Pre-shared key etc.) that you specified via your router settings. |
| 4. |
If prompted, confirm that you want to establish a wireless connection between the device and your router. |
Tips
To ensure that your Wi-Fi network remains secure, refer to the additional tips below:
- Rename your Wi-Fi network if it uses a default network name (or SSID) that identifies the make of your router (for example, Linksys or NETGEAR). Identifying the make of your router makes it easier for hackers to break in.
- Reveal any unwanted visitors on your Wi-Fi network by running regular Network Inspector scans. The scan results screen shows all of the devices that are currently connected to your network. After running the scan, you can also tick the box next to Enable notification of new devices on this network to ensure that you are notified each time a new device connects to your network.
- We recommend that you do not configure your router to hide the name of your Wi-Fi network (or SSID). When your network name is invisible, your wireless devices broadcast the name themselves, which is even more dangerous.
- We do not recommend using a MAC address access filter, as they are difficult to set up, and very easy to bypass.
- Advanced users can change the subnet value from
192.168.0.xor192.168.1.xto a value that is less common, such as192.168.13.x. This increases security, because many attacks are performed by web snippets trying to access the most common values.
- AVG Internet Security 22.x for Windows
- AVG AntiVirus FREE 22.x for Windows
- AVG Internet Security 20.x for Mac
- AVG AntiVirus 20.x for Mac
- Microsoft Windows 11 Home / Pro / Enterprise / Education
- Microsoft Windows 10 Home / Pro / Enterprise / Education - 32 / 64-bit
- Microsoft Windows 8.x / Pro / Enterprise - 32 / 64-bit
- Microsoft Windows 8 / Pro / Enterprise - 32 / 64-bit
- Microsoft Windows 7 Home Basic / Home Premium / Professional / Enterprise / Ultimate - Service Pack 1 with Convenient Rollup Update, 32 / 64-bit
- Apple macOS 12.x (Monterey)
- Apple macOS 11.x (Big Sur)
- Apple macOS 10.15.x (Catalina)
- Apple macOS 10.14.x (Mojave)
- Apple macOS 10.13.x (High Sierra)
- Apple macOS 10.12.x (Sierra)
- Apple Mac OS X 10.11.x (El Capitan)